DIY

Ikea Hack Library Built-in

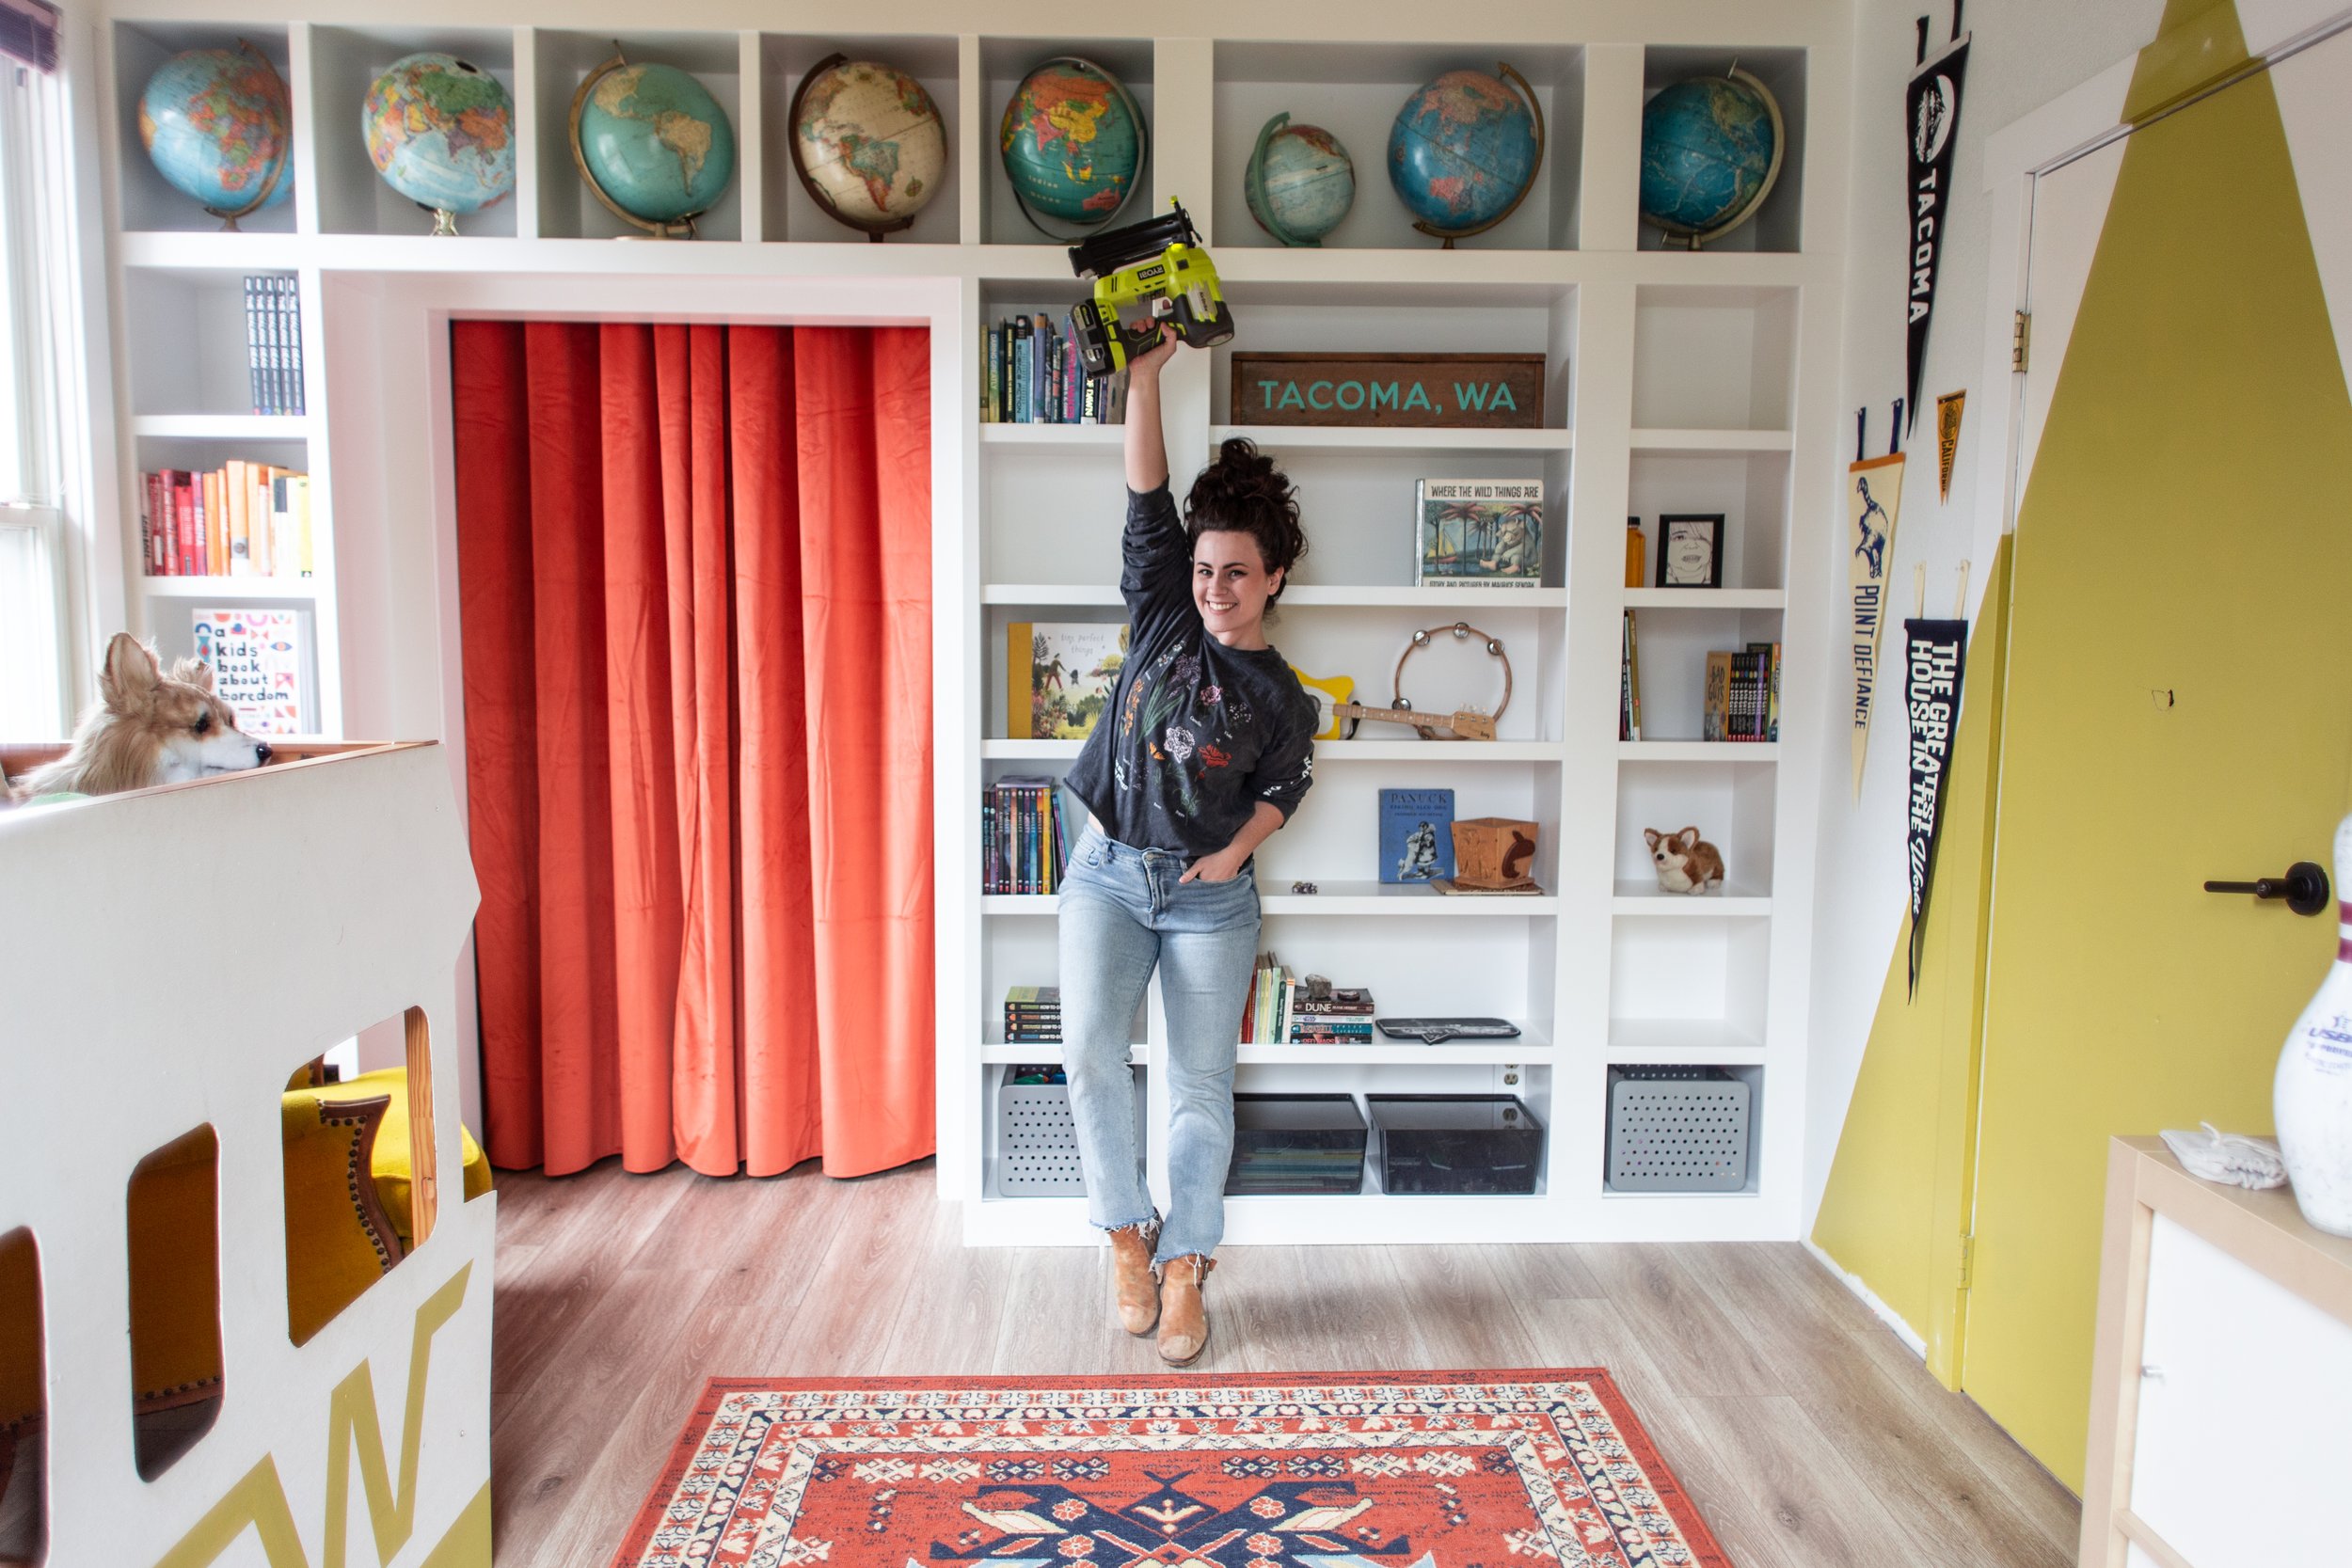
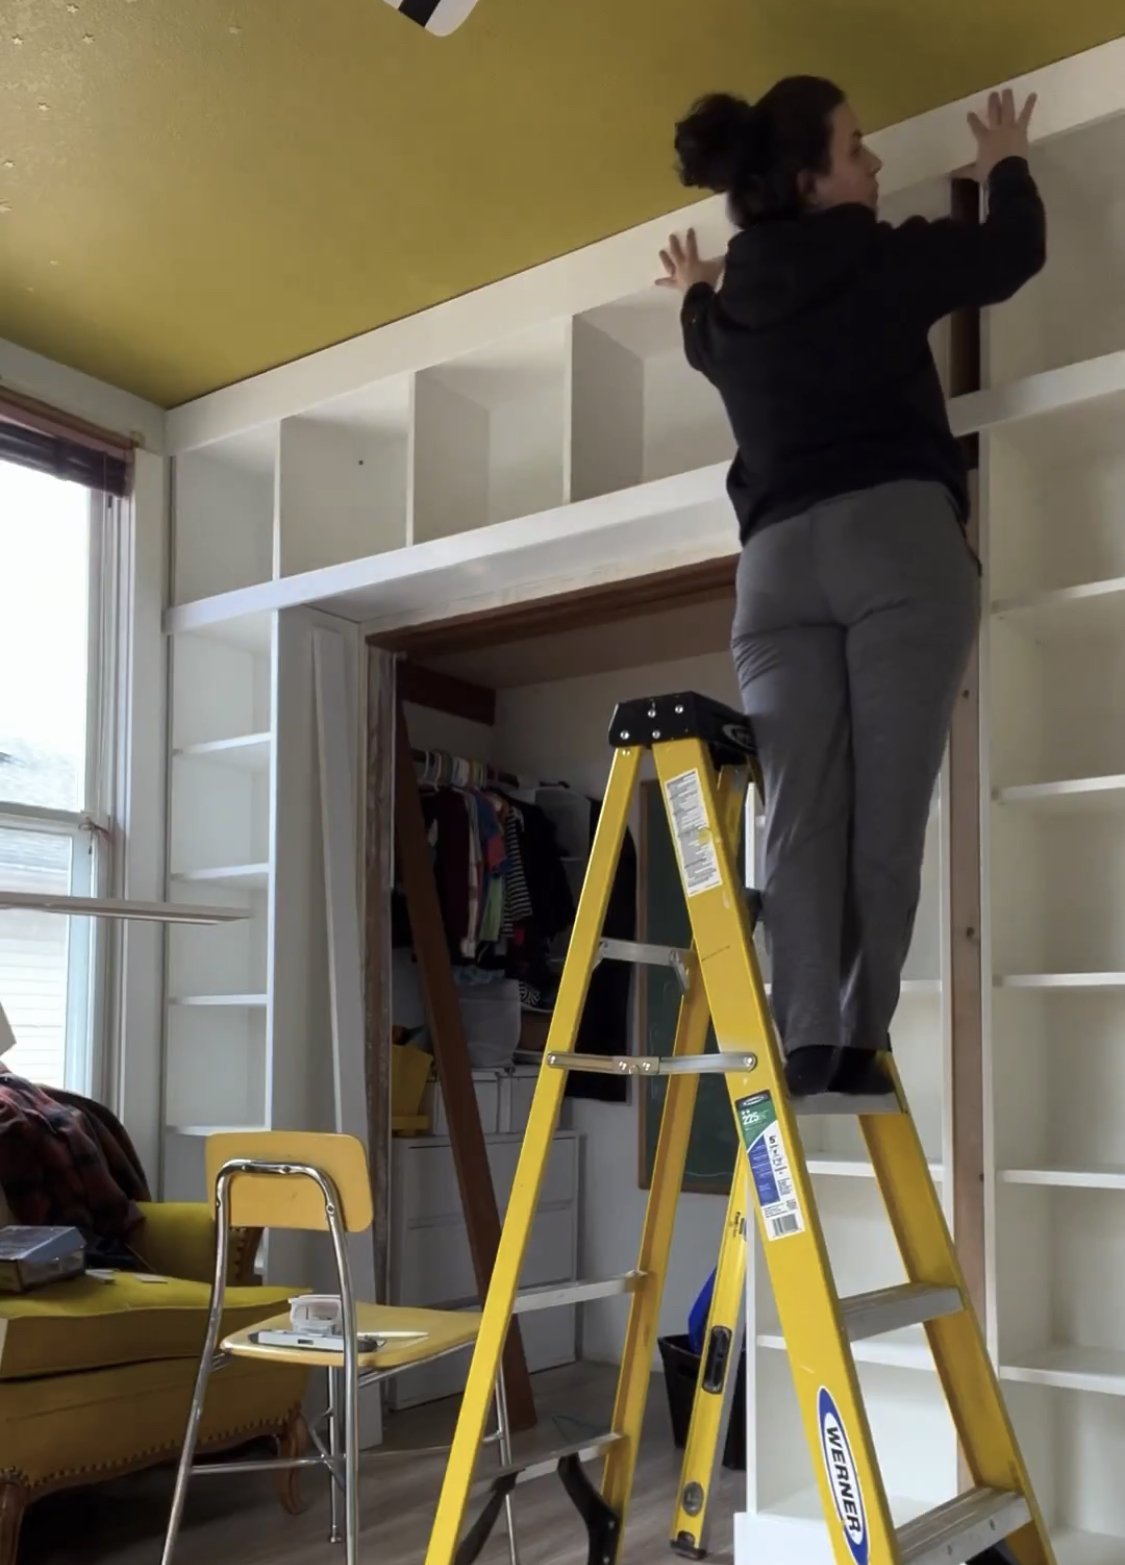
Jack’s library wall is done! This Ikea hack built-in bookshelf was such a fun project to tackle. This build was partially created from Ikea Billy bookcases. The top section of cubbies that spans the entire wall is custom built from scratch, and the shelves below that are the Billy bookcases. Everything was custom trimmed out and secured to the wall to be fully built-in and permanent!

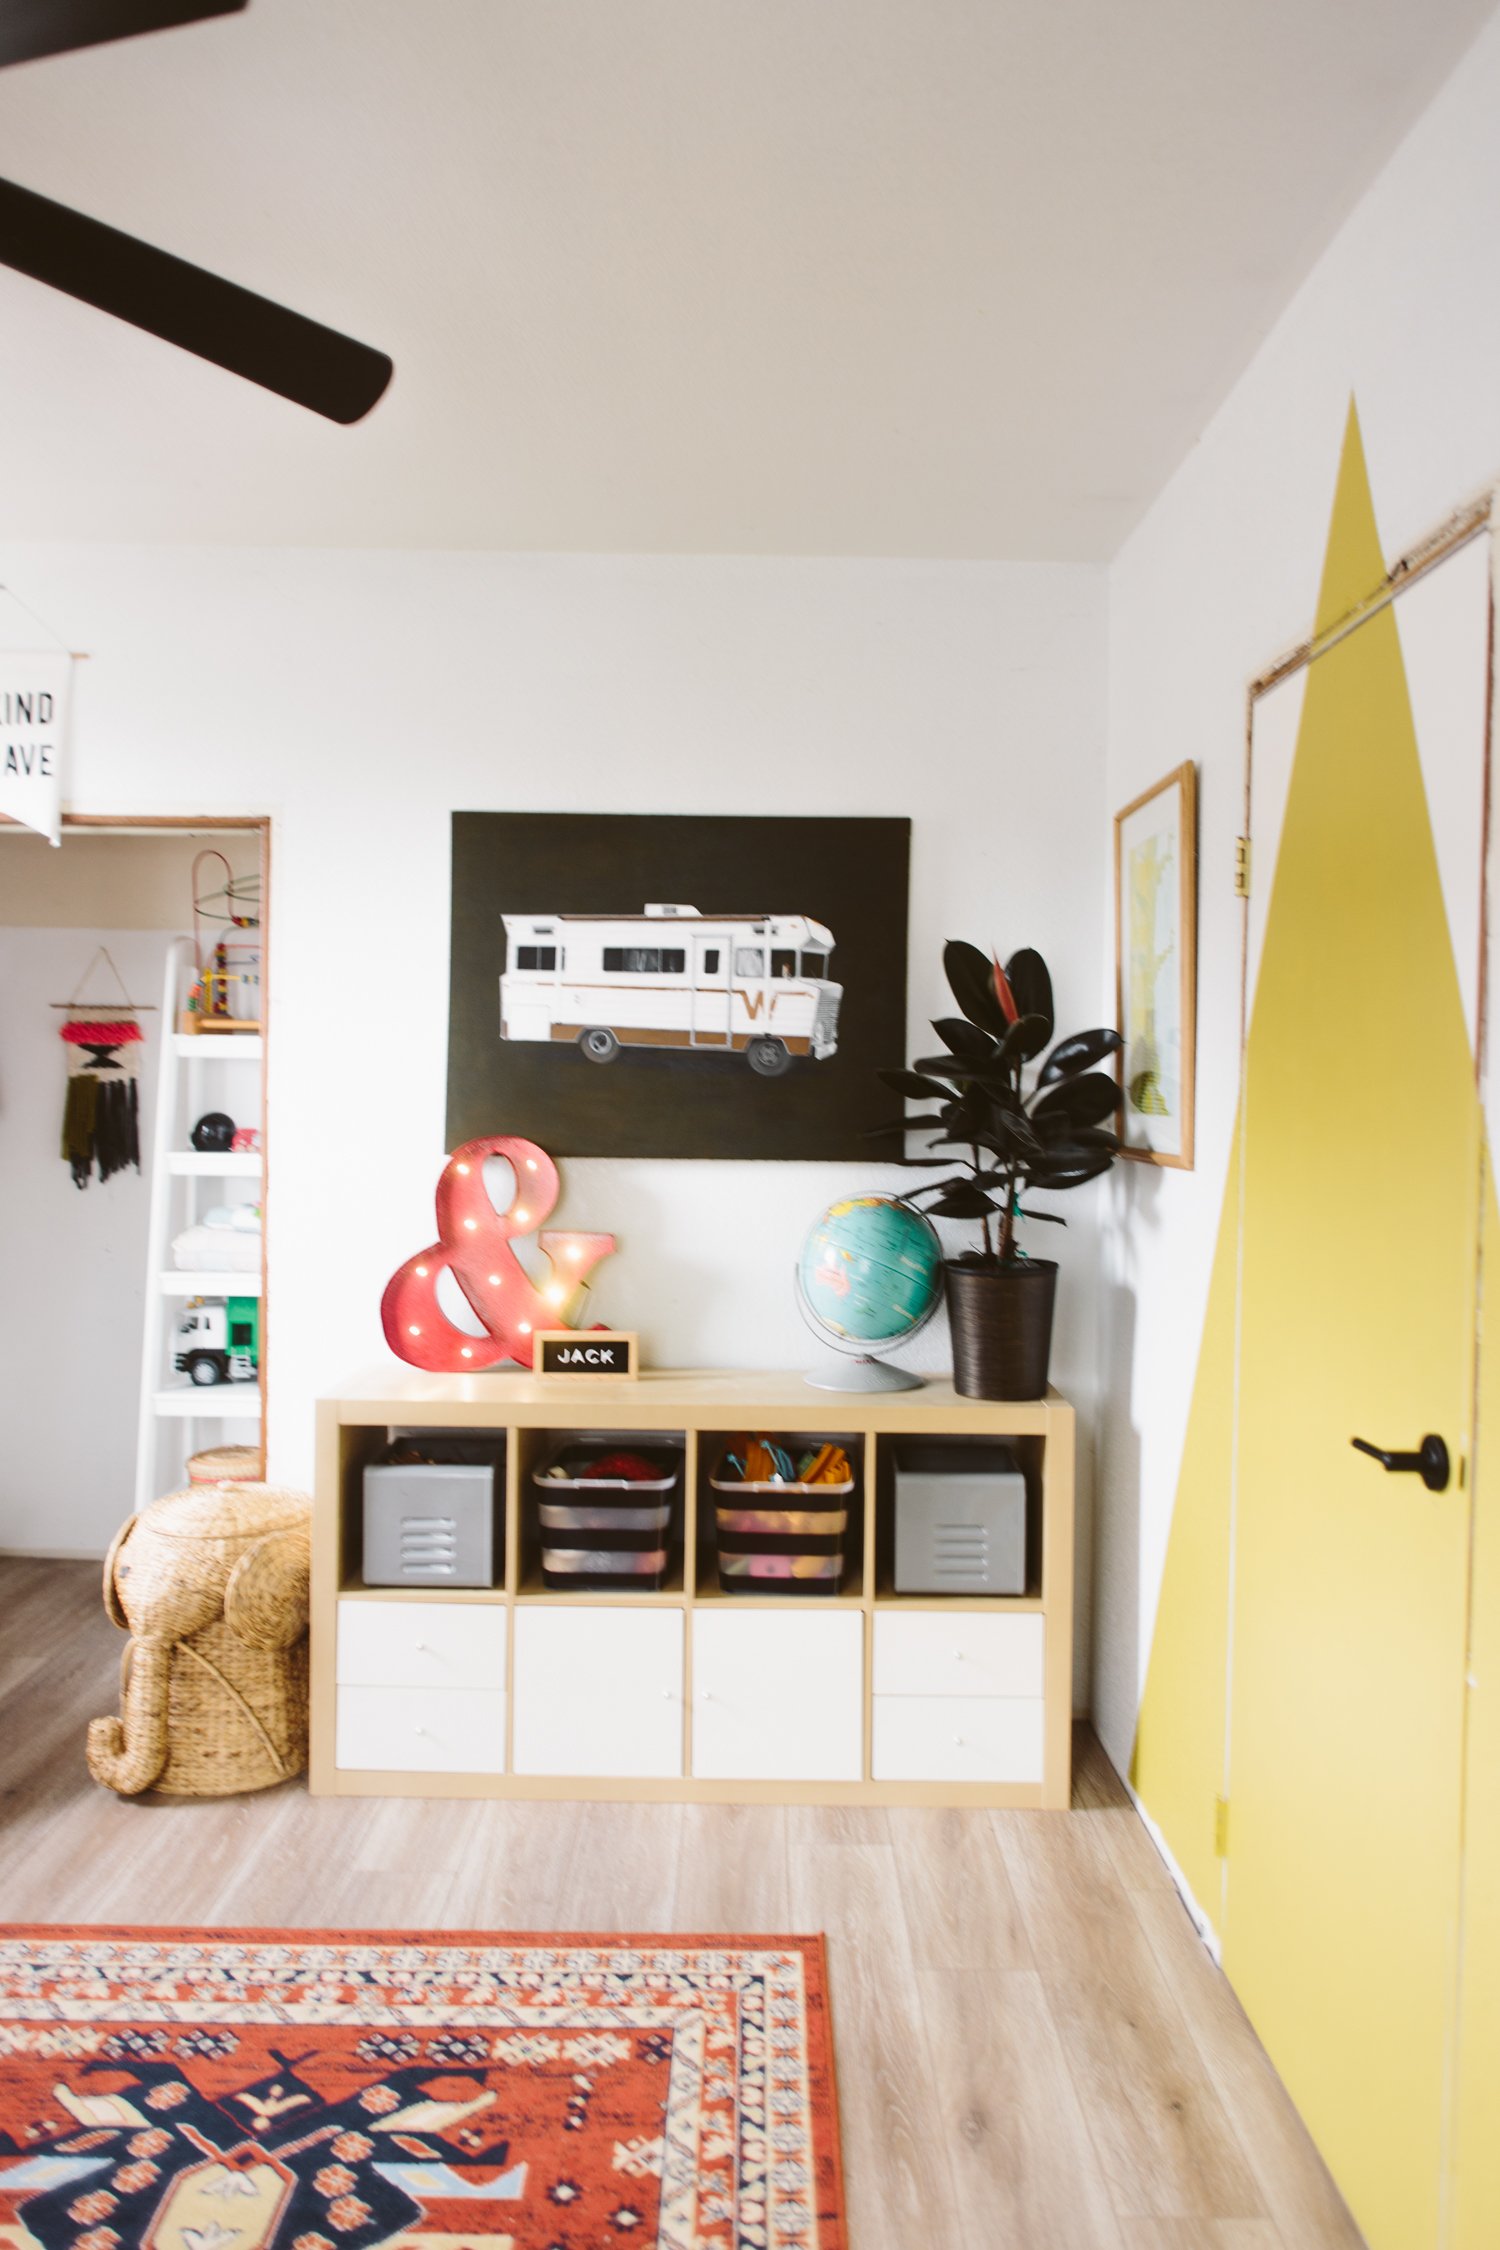
This wall was originally space that was really unusable. You could put a dresser or bookshelves in the wider section of wall, but it’s also behind the swing of the door, so no seating or bed could be against that wall. I had an Ikea Kallax shelf there for a few years, holding Jack’s books, games, and toys, but as he’s started reading more and getting more into board games, I quickly ran out of space on that shelf. Transforming the wall into a floor-to-ceiling bookcase felt like the perfect way to add so much storage and functionality to this room.

Project Cost Breakdown

Plywood for top shelves: $119.50

Ikea Billy Bookcases (3x 16in wide and 1x 32in): $236.00

White Paint + Paint Brush: $64.98

Primer, Wood Filler, Caulk: $103.87

Trim (various sizes): $180.53

Coral Curtains (used an old existing Ikea curtain rod): $40.26

Project total: $745.14


This total doesn’t include the tools used to complete this project, which I already had. It also doesn’t include fasteners like screws or brad nails, which I also already had on hand. The tools I used to complete this project were:

Circular Saw
Drill + Impact Driver
Table Saw
Pocket Hole Jig
Brad Nailer
Corner Clamps

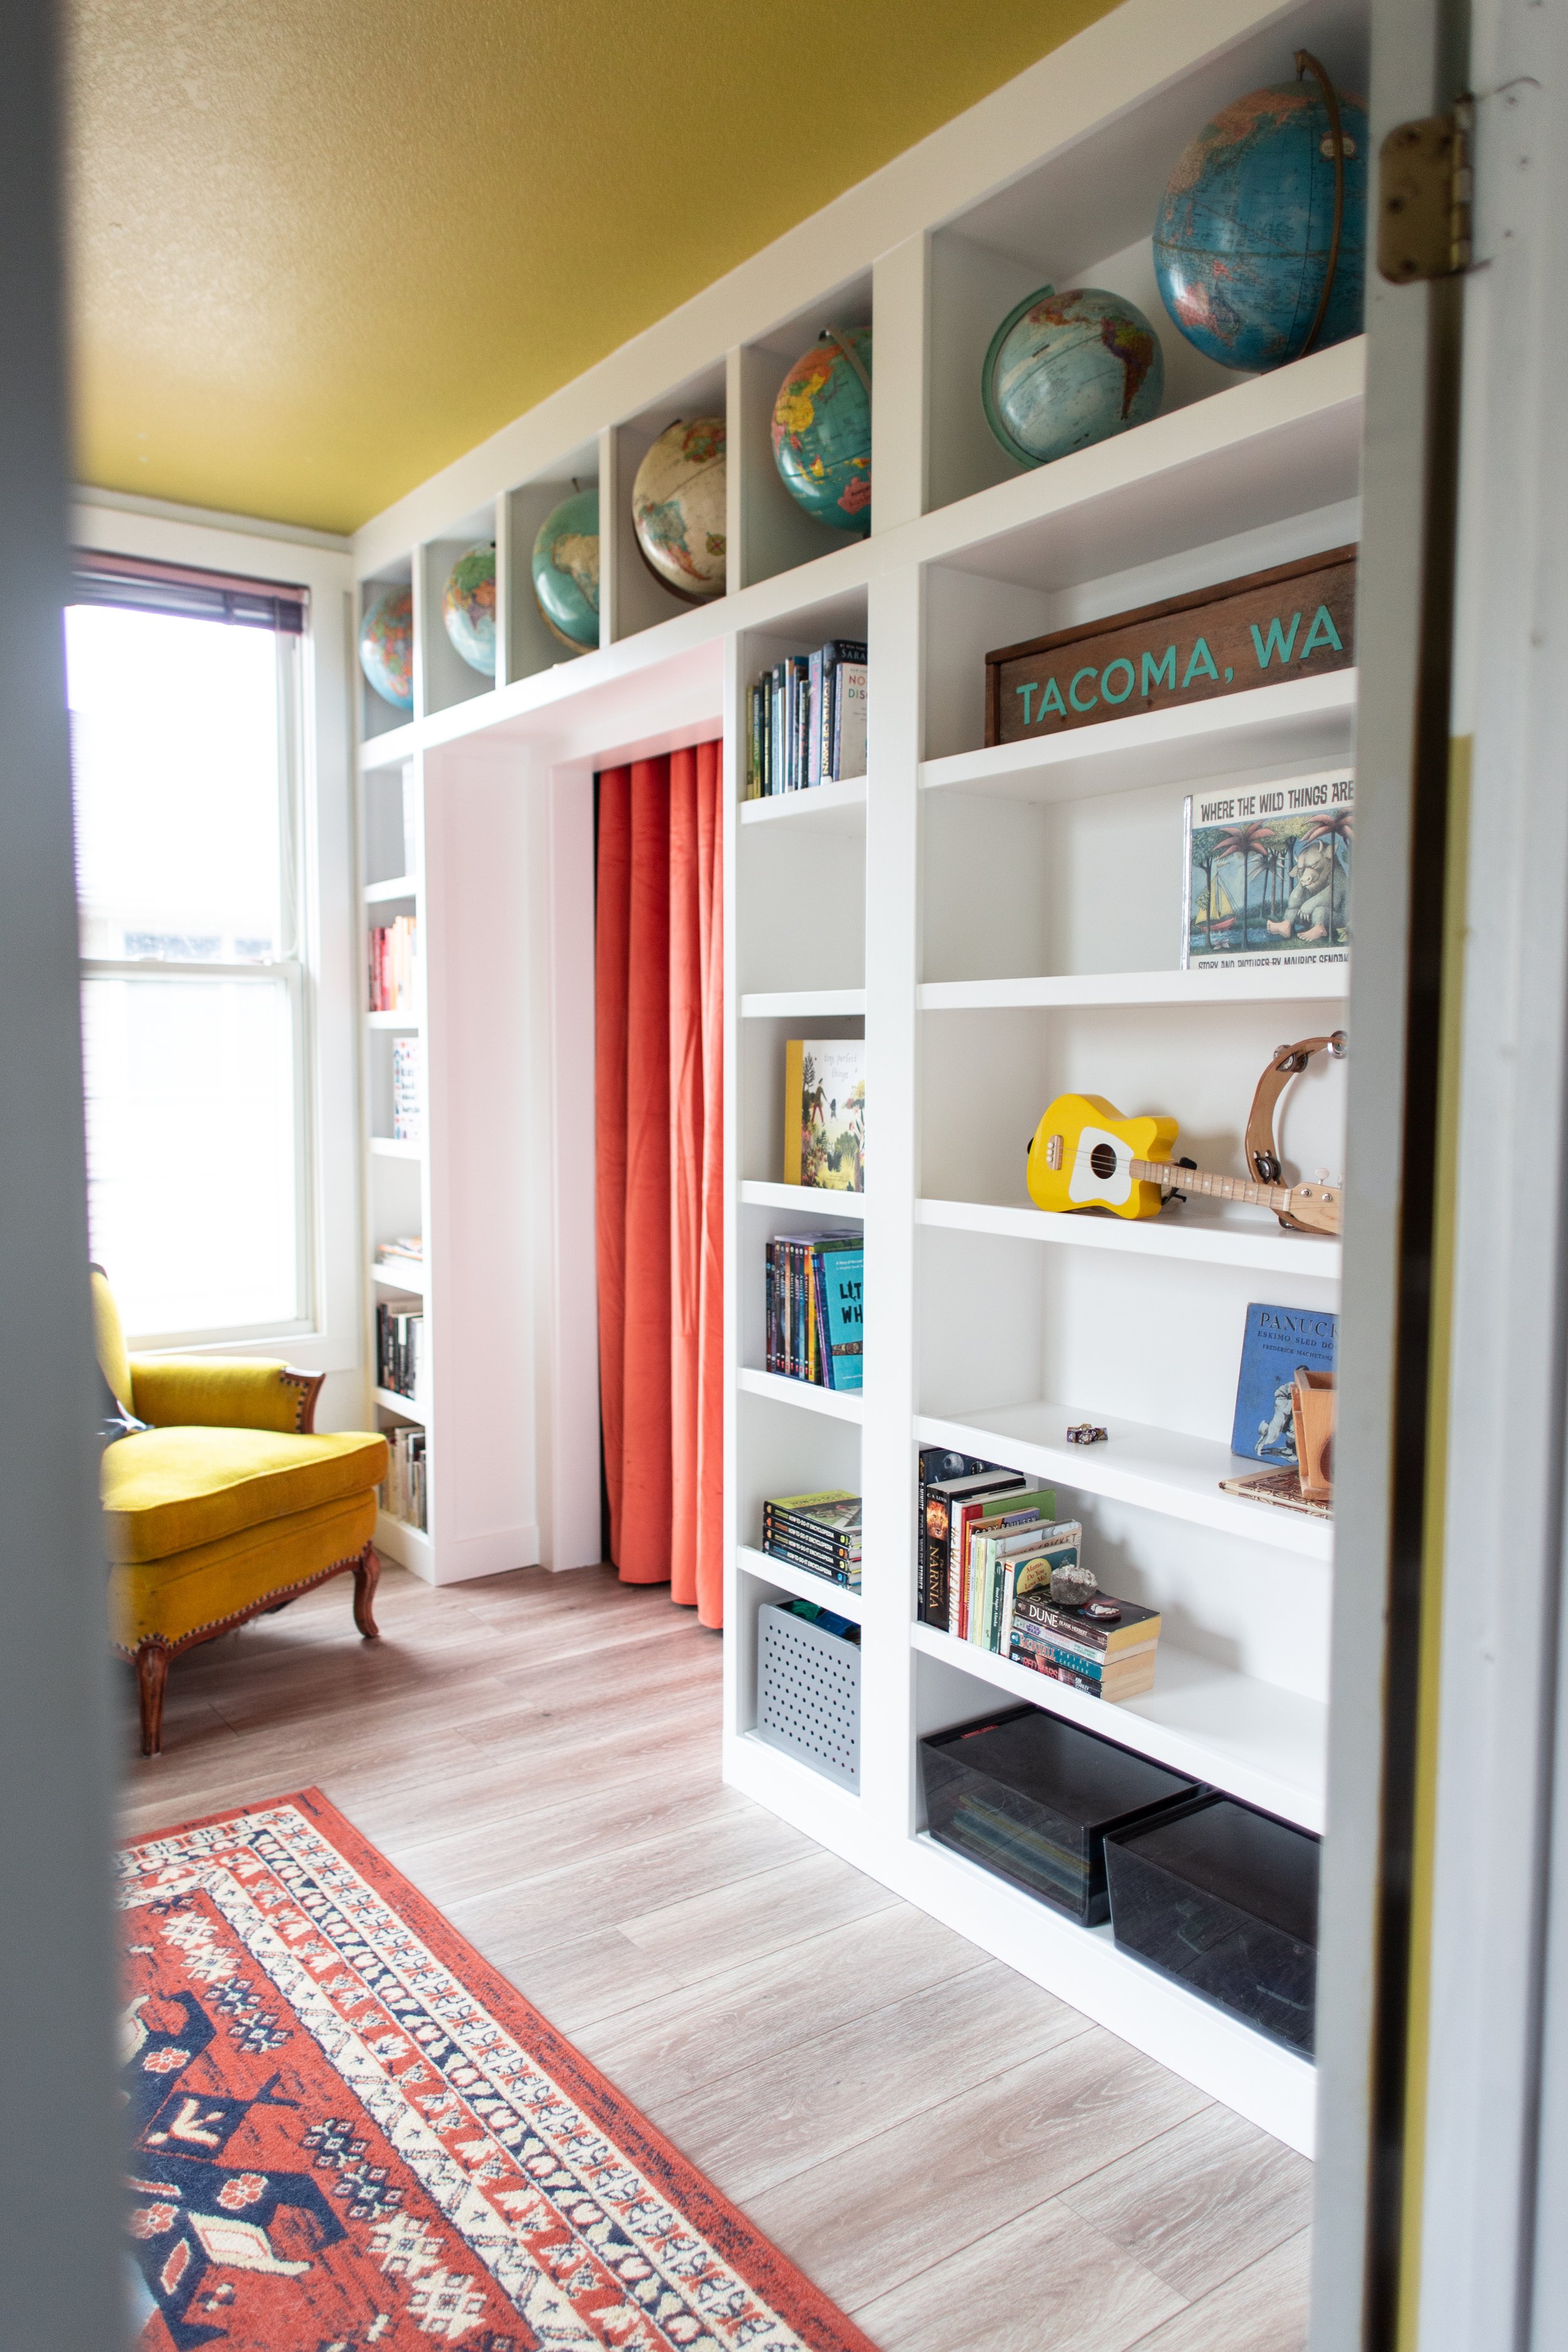
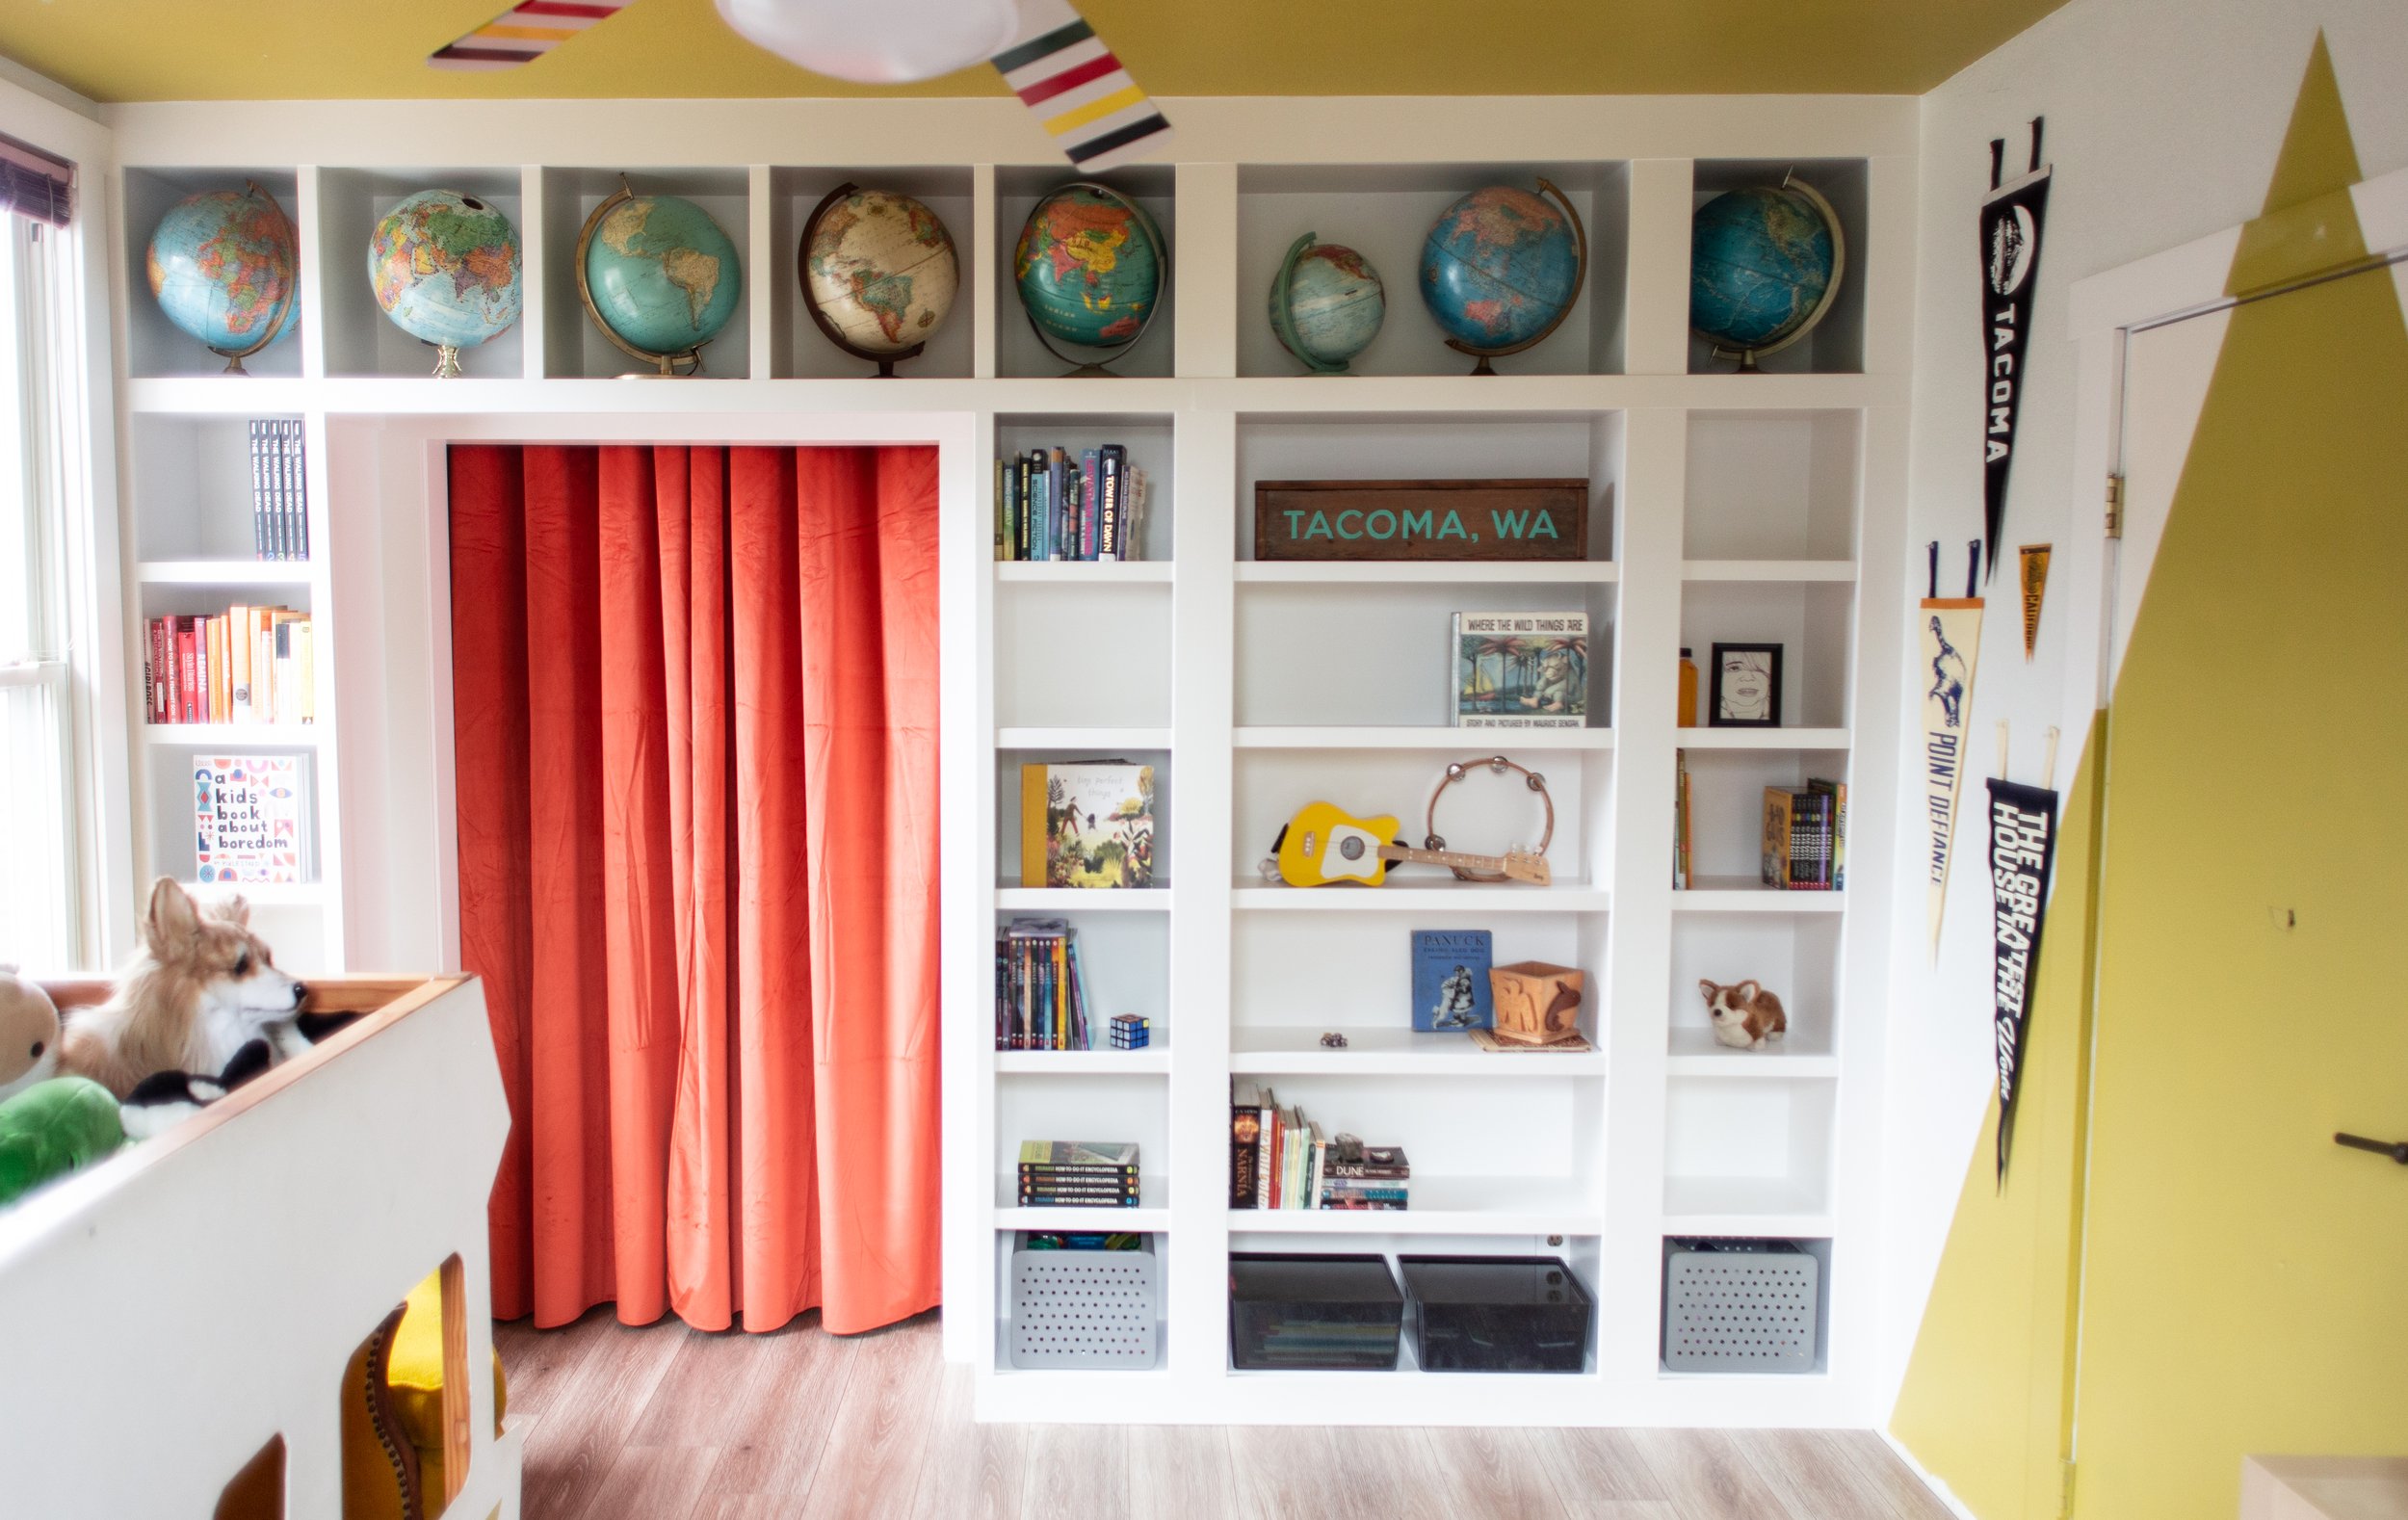
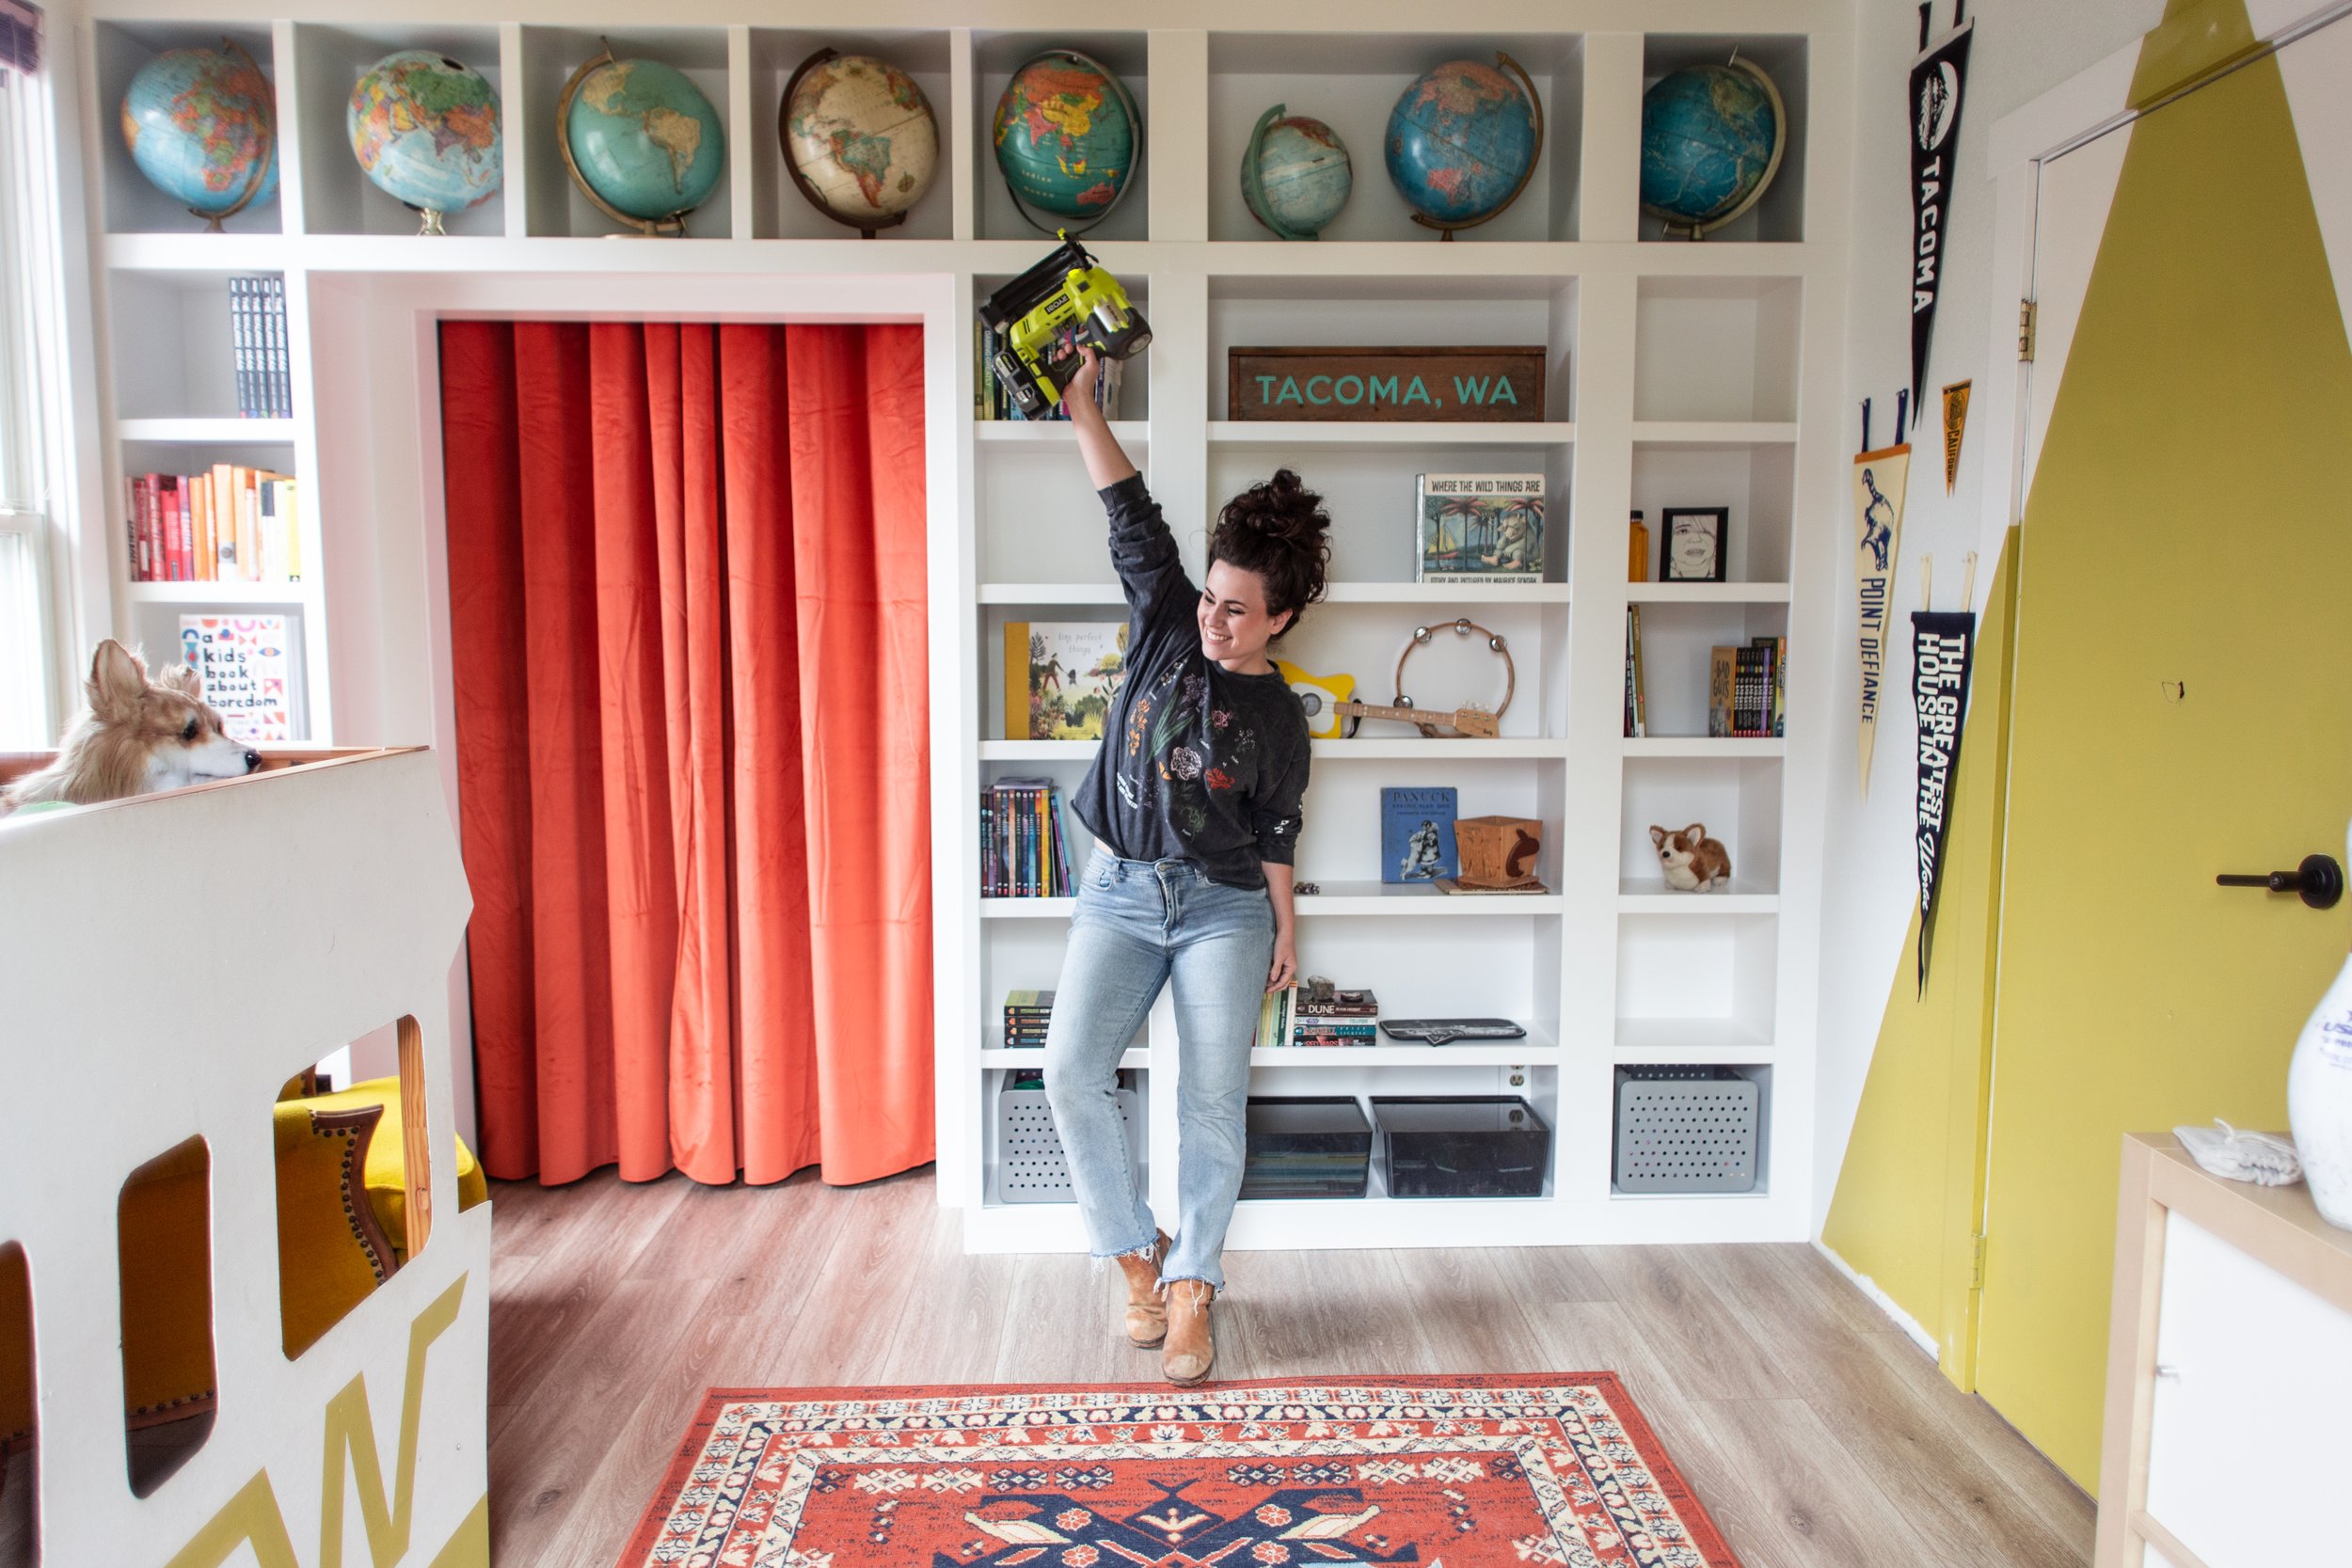
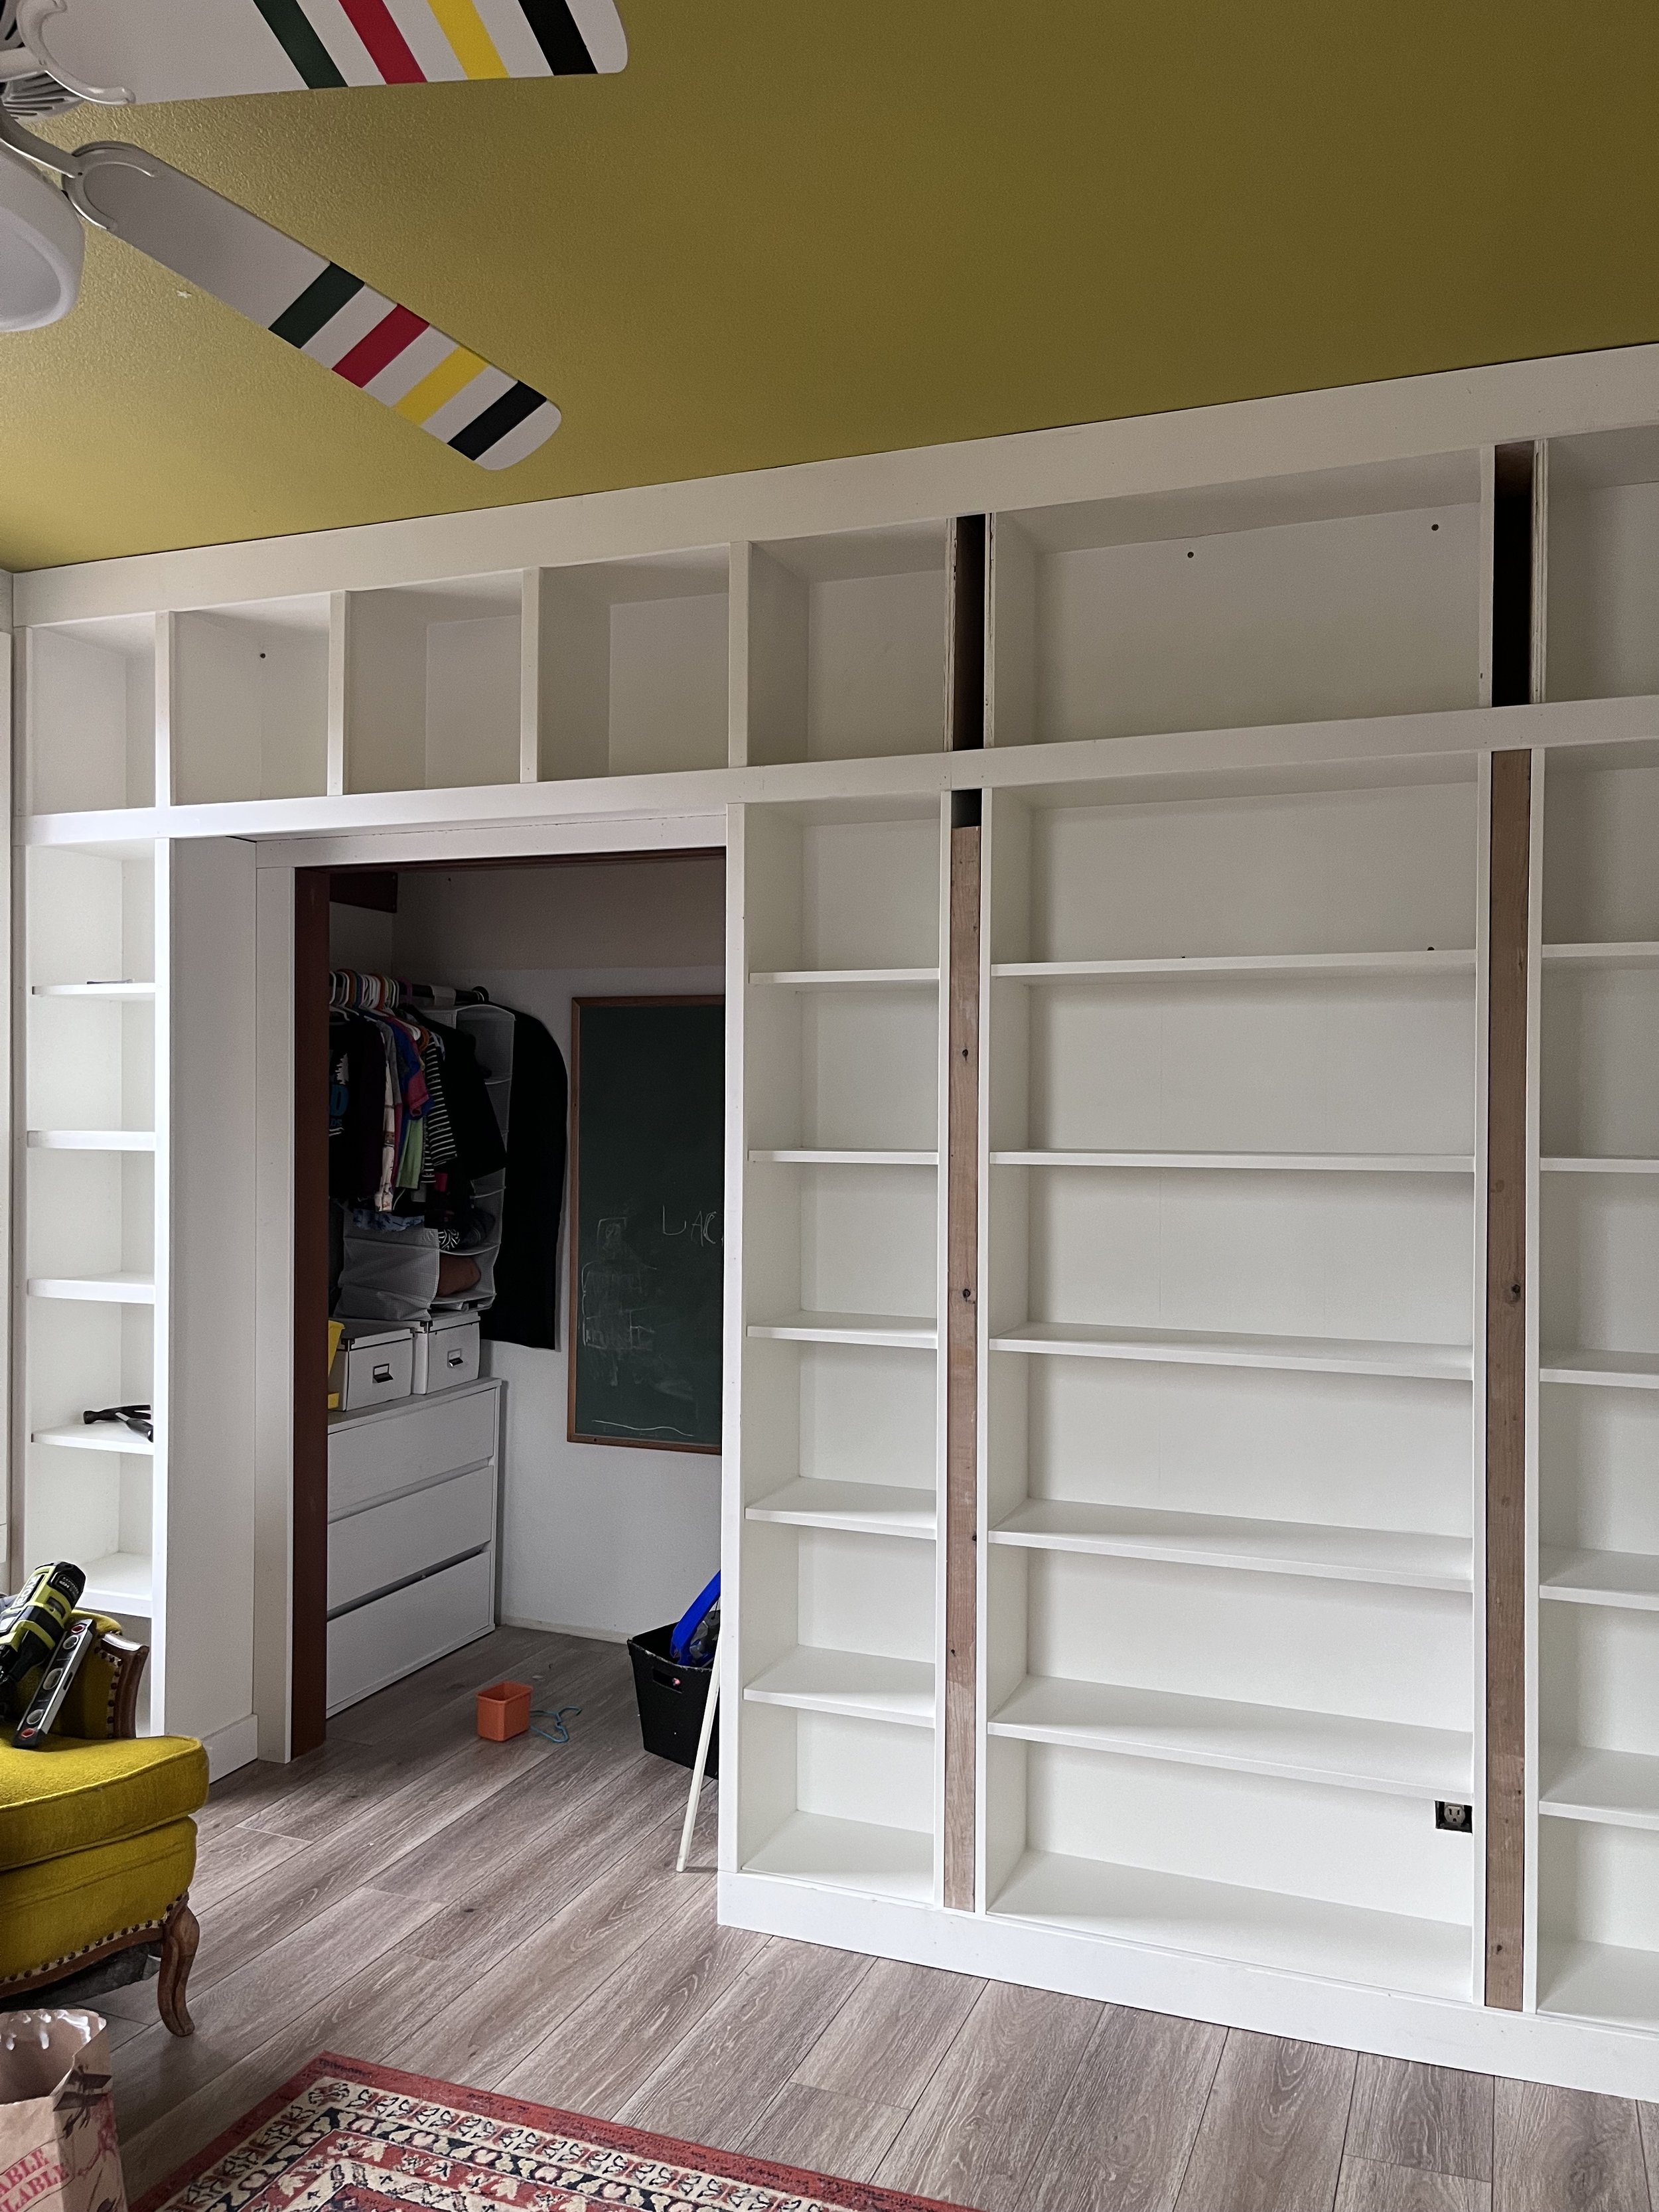
For this project, I decided to use Ikea Billy bookcases for the bottom section of shelves, then custom build the top section that spans the entire wall, going over the closet doorway.

I began by building the Ikea Billy bookcases. I needed to install all the shelves so I could fill all the bracket holes on the insides with wood filler. This really makes them feel seamless and built-in without all the little holes. Once the wood filler was dry I could take these outside and sand them to smooth out the wood filler and scuff up the laminate finish to prep for primer. I sanded with 220 using my sheet sander, then pulled them into the garage to spray with primer.

Using my Graco X7 paint sprayer I sprayed Zinsser B-I-N primer, which is a shellac based primer that sticks super well to finishes like the laminate Ikea furniture finish. Make sure to wear a respirator mask when spraying it, this stuff is pretty nasty but it works great. I put two coats of primer on.

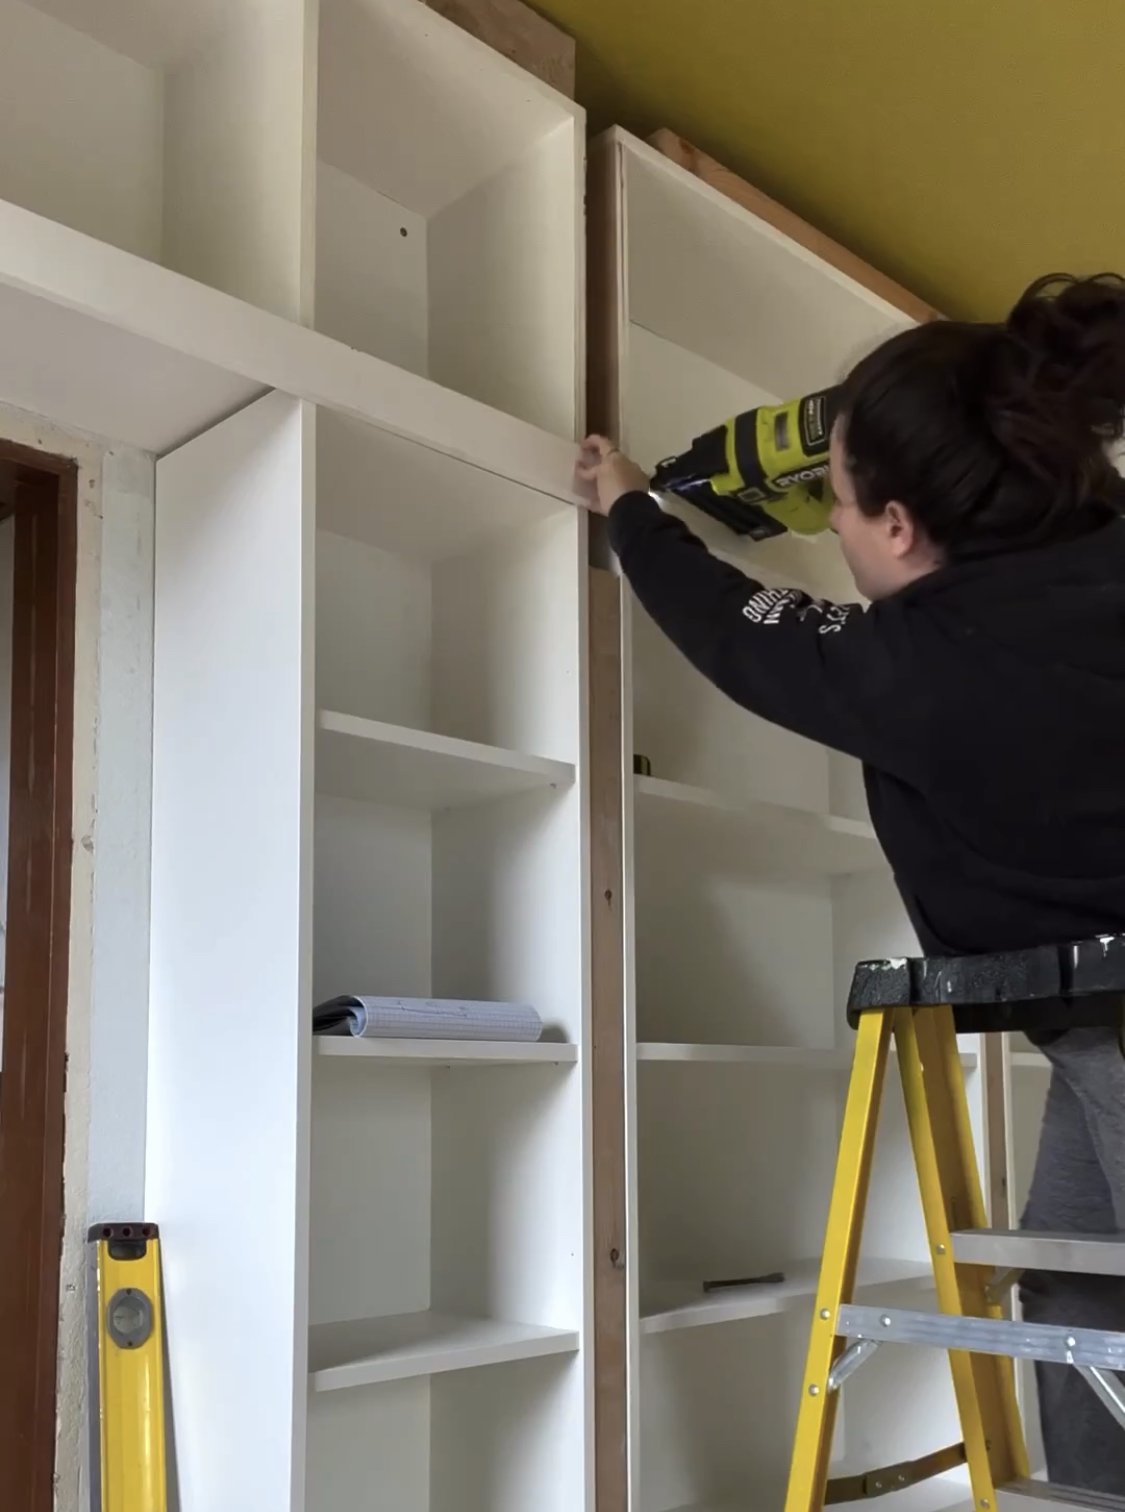
To install the Ikea bookcases, I needed to measure where my studs were and then I added 1/2in scraps of plywood to the wall where the studs were because the way the back of these bookshelves is constructed leaves about a 1/2in gap between the back panel and the wall, which you can see in the video below

I screwed through the back of the bookshelves, the plywood scrap and into the studs to secure these to the wall, then I got to work building the top section of the library from scratch.

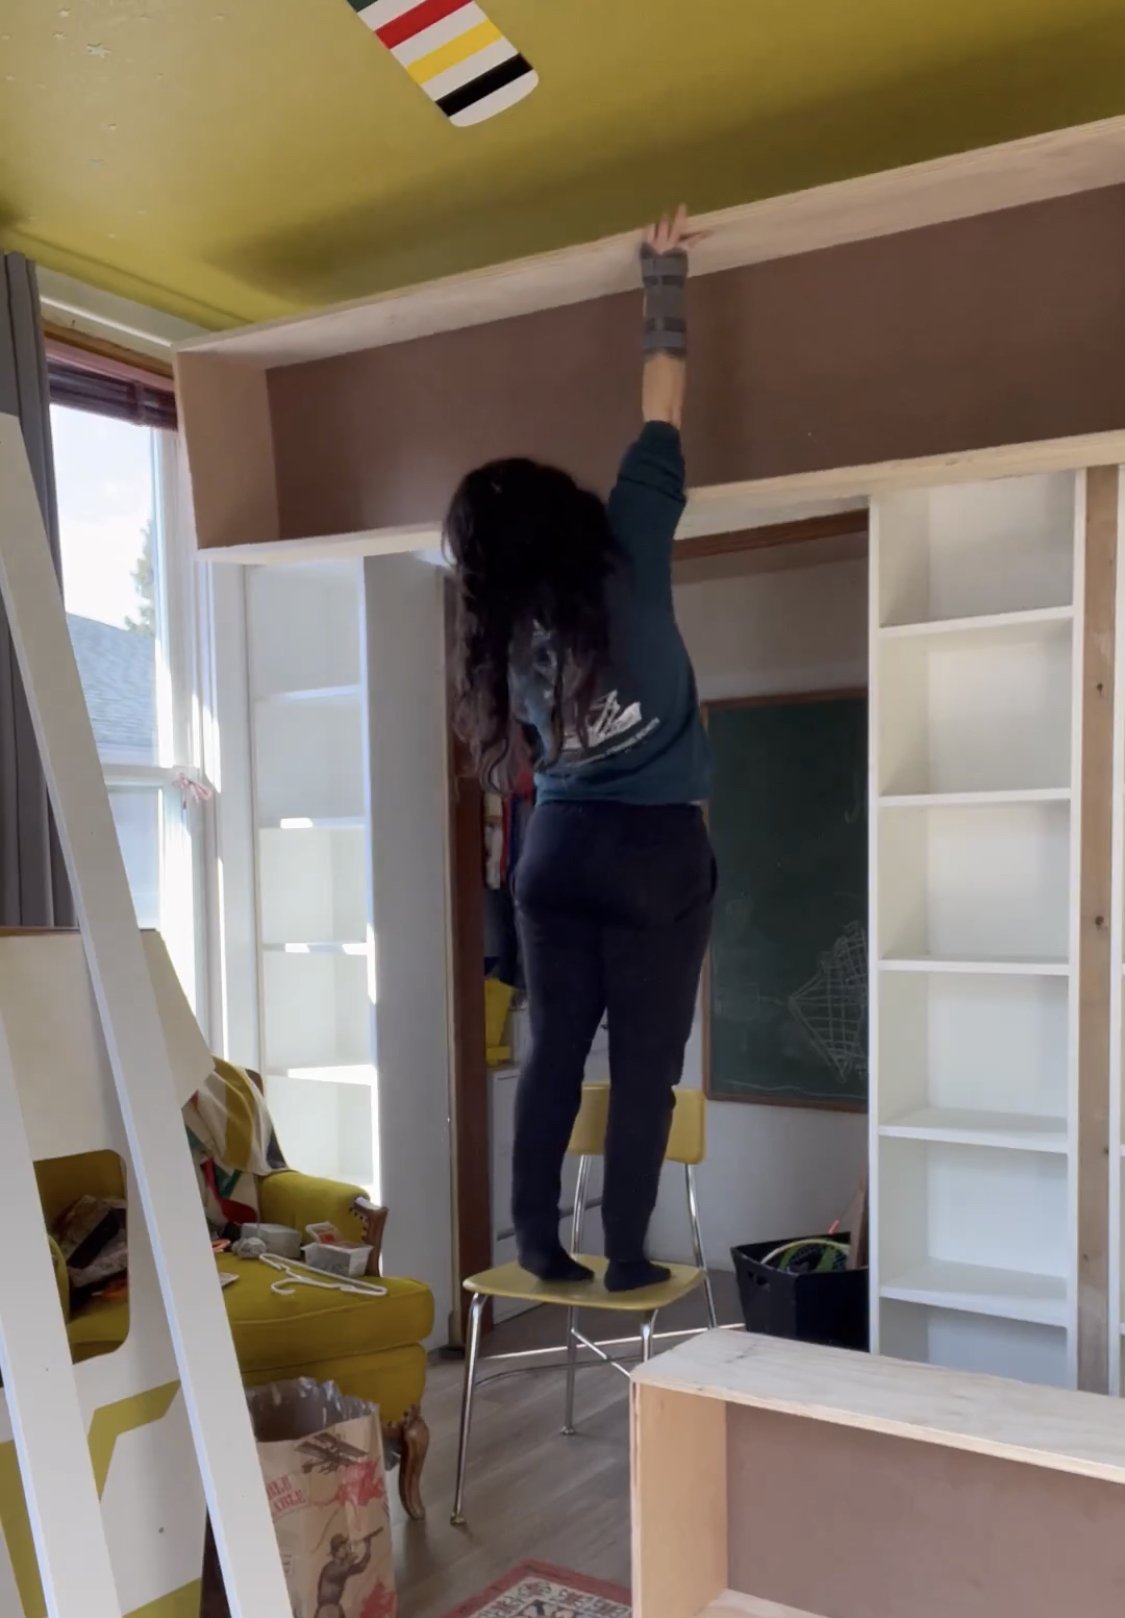
I built this section in two pieces, one piece that spanned over the closet doorway and sat atop the two 16” billy bookcases that flank that doorway, and then a second one that sat atop the 32” bookcase and the 16” bookcase in the corner of the room. I used cabinet grade plywood to build these, which was about $55/sheet at Home Depot, and then used hardboard for the back wall.

I mapped out the measurements for all the side panels and inside vertical separators and input those into cutlistoptimizer.com to get an efficient plan for how to utilize my plywood to avoid waste, this was super helpful when it came time to cut every piece.

To assemble these upper boxes, I used my Kreg pocket hole jig and drilled two pocket holes on the top and bottom of the vertical sides of the box, and then used corner clamps to hold everything together nice and square while I screwed the sides on to the bottom of the box. Then I flipped it over to attach the top, again using pocket screws.

To cut the hardboard for the back, I just laid the boxes on the hardboard, traced around their perimeter, and then cut out those rectangles. Those got nailed on to the back of the boxes, then we pulled the boxes inside to temporarily install them on the top of the billy bookcases so I could mark where all the vertical dividers would go in those boxes. I wanted all the dividers to match up perfectly with the sides of the Ikea shelves so things looked seamless from bottom to top.

With those measurements taken, I then brought those boxes back down to the ground and installed the verticals using wood glue and brad nails. The final thing the custom boxes needed was a couple coats of primer, so they went back out to the garage for spraying.

Finally they could be installed permanently, again— screwing them to the studs (these didn’t need that extra plywood because they didn’t have a gap between the back panel and the wall).

Now I’m able to start installing trim and this is where things get really fun because it starts to feel really built in and finished. I had a couple wider vertical sections, and then a wider crown piece and a 2in horizontal that spanned the full wall, but for the most part the fronts of the bookshelf all got 1.5in wide trim: verticals as well as the horizontal shelf fronts. I used by brad nailer to install all of these, making sure to nail in at opposing diagonals for added security.

All the nail holes got filled with wood filler, and all the seams and joints got caulk, then it was time for paint!

I used Behr’s Scuff Defense paint in Satin finish with the color Bit of Sugar, which is a really nice bright white. Two coats later and I was done! I chose to brush and roll the paint on, rather than have to mask off the whole room and drag my big ol paint sprayer into the house. It took a little longer, but I’m happy with how smooth the finish ended up.

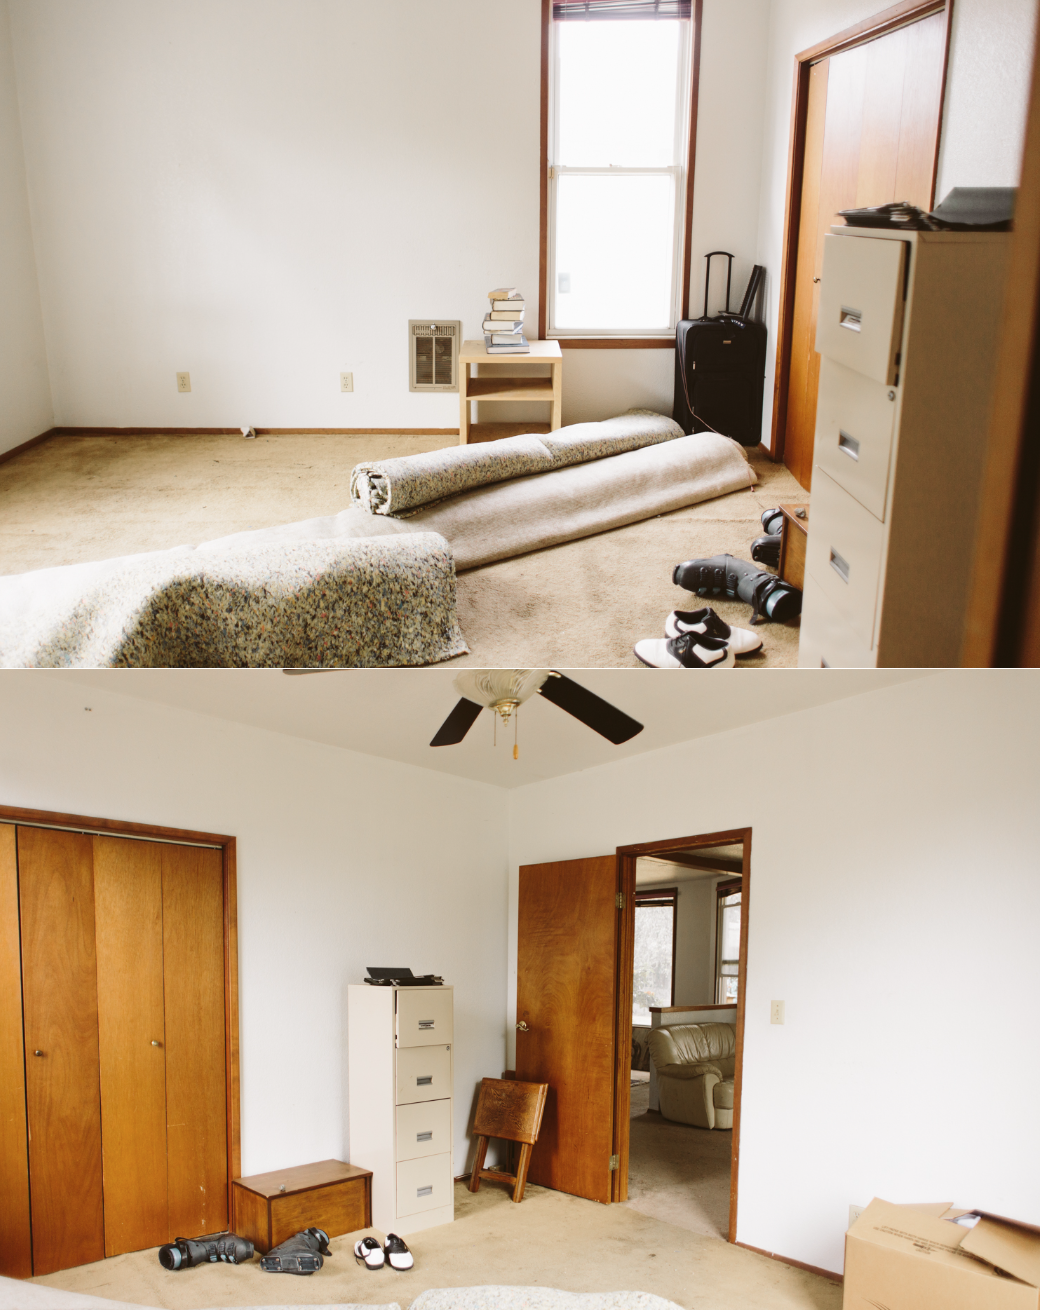
Can you believe this is the same room, just a few short years ago? (Okay maybe not short years. We did have a whole pandemic between 2018 and now— it’s actually felt like an eternity since we bought this house).

I’m super proud of how this room has transformed and TBH I think Jack’s room might be my favorite room in the entire house. It’s so bright and happy and fun. It feels really special.


You may also like:

DIY Hex Tile Coffee Table

Two of the things I love most about DIY are refreshing old pieces, and using reclaimed or leftover materials to make something totally new and beautiful. Most of this coffee table is made using salvaged pieces and leftover building materials. I had a few tiles left over from my bathroom remodel and I never could throw them away, even though there weren’t very many, simply because they’re SO pretty. I started scheming how I could use them and realized there’d probably be enough to make a coffee table. I found some vintage table legs at a local building material salvage spot, and the coffee table started coming to life. Thanks to some beautiful Behr Champagne Gold spray paint, the table legs got a refresh, and I was able to make a mixed material table top with the tiles I had.

Watch the full tutorial below!

You might also like

DIY Corrugated Metal Raised Beds

DIY corrugated metal raised beds

I made these galvanized corrugated metal raised beds a few years ago and always intended on doing a DIY tutorial for them and never got around to it until now!  I'm actually kind of glad because I was able to see how they held up over the years.  They've held up beautifully!  The only part that needed some TLC was the top trim, which needed to be re-stained after years of being pelted with rain for months on end during our wet winters here in the PNW.  So today I sanded those down and put a new coat of stain on and they look nice and (almost) new.

These beds are seriously one of my favorite DIYs that we did in our yard, they were pretty easy to build and I like the way they add a little bit of industrial vibes.  I'm not usually a fan of corrugated metal, it can get too kitschy and shabby chic, but these are pretty low-profile and to me they don't read as either of those aesthetics.

DIY corrugated metal raised beds

What you'll need to make one 4ft x 4ft raised bed:
(adjust quantities sizes depending on the size of the beds you're making)


1- 8ft 4x4
2- 8ft galvanized corrugated metal sheets
2- 8ft 1x4's
16- 1 in screws with small washers (to attach the metal to the 4x4s)
8- 1.5 in wood screws (to attach the top trim to the 4x4s)
Skill Saw
Metal cutting skill saw blade (to cut the corrugated metal)

2.jpg


01/ Cut the 4x4 into four 15 inch long pieces to make the "legs" of your raised bed. 

4.jpg

02/ Chop the two corrugated metal pieces in half to create four 4 ft pieces.  Then cut each piece down to be 15 in wide-- the height of your raised beds.

03/ Attach one of your four metal pieces to two of the 4x4s to create the first side of the raised bed. Do this again to create the opposite side. Use the screws with washers and place the screws in the dips of the corrugated metal- I used 4 screws for each 4x4.

3.jpg

04/ Now you'll start putting the sides together.  Place the two sides you've just made so they stand up (they should be able to stand up on their own, but if not, have someone help hold them), and have the metal sides facing each other. Take another piece of the corrugated metal that you pre-cut and place it against the 4x4 to create the third side of your bed. Screw it to the 4x4s with your screws + washers.

Two of the sides will have the metal "inside" the 4x4s and two will have the metal on the outside.  

Do this again to attach the final side of the bed.

6.jpg

05/  Cut the 1x4s into four 4ft pieces, then cut a 45º angle on every end so that they fit together to create 90º corners. Place these flat on top the 4x4's and screw them into the top of the 4x4s.

06/ optional, but I recommend staining the wood to protect it from the elements.  We built our beds about 4 years ago and I just now had to sand and re-stain the top trim because it'd been worn down by all the rain we get in the winters. 

The metal is still perfect and hasn't rusted at all!  These beds are super affordable and can be made in an afternoon!

If you're worried about the beds moving (mine haven't at all) and want to anchor them a little, you can make the 4x4's a little longer than the bottom of the corrugated metal and dig those down into the ground, or just dig the whole thing, sides and all, into the ground a few inches.

DIY corrugated metal raised beds

You Might Also Like

Blueprint Lighting Glow Up

Thank you to Blueprint Lighting for sponsoring this post and providing the light fixture for this space.

It’s truly hard to say what the biggest transformation in this space was since every single element made such an impact, but updating light fixtures not only replaced an ugly element with something stunning, but also vastly improved the brightness in a room that was previously pretty dark.

The original “boob light” flushmount fixture was ugly, sure, but it also did not do enough in terms of lighting the kitchen. This kitchen only has a north facing window, which means in the overcast winter days, it was not lighting the space adequately.

The ceilings in this room aren’t high enough for much more than a flushmount, so I knew I’d have to replace it with something at least semi-flushmount at most, and when I found Blueprint Lighting’s Lucienne flushmount I immediately knew it’d be perfect!

They sent over a whole set of finish samples, which made it even harder to pick because there are so many color and finish options! I almost went with the Malachite or Denmark colors to match the cabinet color, but ultimately I decided to go with the brushed brass to match the other brass elements in the room.

It’s legitimately one of the most beautiful light fixtures I’ve ever installed and now I’m jealous that it’s in my brother’s kitchen, not my own, thought to be honest, I do have my eye on some of their chandeliers for my kitchen. Now that my ceiling is painted black, a light fixture would really pop against the dark ceiling!

DIY Easy click-connect laminate flooring install

Spring 2022 One Room Challenge | Week 2

There are a lot of nailed-down details on this One Room Challenge remodel, but one thing that was up in the air when I started- the flooring. The original flooring was, well, it was okay. The kitchen/dining/entry area had vinyl plank and the living room was carpeted. It all looked very worn down, and there was a noticeable hump in the floor right as you entered the kitchen.

We needed to decide on the flooring situation ASAP because I didn’t want to paint the cabinets and get those finished nicely and THEN go in and do flooring demo and potentially bang up the new cabinet paint. Since this decision was being made last minute, we also needed flooring that was in stock and available in the quantity we needed to do the entire space— kitchen/dining and the entry/living room.

Well, my parents found some beautiful waterproof laminate flooring at Costco and bought out the whole store (and had to hit up another Costco to get the remaining boxes needed), and we quickly decided to tackle the floors first thing.

Demo was pretty easy, the old vinyl planks came out super easily, and the carpet did as well. Once the flooring was out we were able to figure out what what going on with the lump in the subfloors by the kitchen. The carpeted living room also needed a 1/4in underlayment plywood added to bring that area’s subfloor up to the same level as the floor that had the vinyl planks, which was much easier than fixing the hump.

We ended up pulling out the 1/4in underlayment on either side of the lump, which brought the peak of the hump down lower and we were able to fill in that area with self leveler so the new floors are nice and level with no awkward hump. We ended up needing a couple coats of the self leveler (we didn’t buy enough the first time), so that took a couple days of prep work, which we folded in with prepping the cabinets to prime and paint so there wasn’t any lost time on the cabinet painting front.

I’ve done floating click-connect laminate flooring before in our house, so I had a pretty good idea of what to expect. These kinds of floors are very DIYer friendly. It’s hard to mess up the install, and it’s super straightforward, these were no different. We ended up with Mohawk Waterproof Laminate floors in Millport Hickory. They have the foam under pad attached to the bottom of the plank so you don’t even need to install a pad before going in with the flooring install!

I picked up a laminate flooring install kit from Home Depot, which was exactly what we needed to do the install, and Ryobi had sent over their flooring saw, which came in clutch. I was on cutting duty outside and my brother and Dad were on install inside and we made pretty quick work of the floor!

One thing manufacturers recommend, and I’ll second, is to use planks from different boxes as you work, and to inspect the planks as you install because there are only so many plank designs and you don’t want to end up with identical planks super close to one another. The other thing you’ll want to make sure of is that the gap you leave around the edges of the room (there should be a slight gap to allow for expasion) isn’t too big so that your baseboard trim is able to cover that. We weren’t super careful in a couple spots and had to to some tweaking to make it work.

Ultimately, click-connect laminate flooring is a perfect DIY project. It’s straightforward, relatively easy, and there are so many options out there now for different looks, as well as water-resistant or waterproof planks as well!