DIY

10 tools to start on your DIY journey

One of the things that can feel overwhelming when it comes to being a beginner DIYer is not knowing where to start when it comes to those first tool purchases. Whether it’s not knowing which tools to get first, or what brand to go with, or what accessories to get, the world of tools is one that you’ll need to enter in order to have success with your DIYs!

Another big reason it can feel overwhelming: money. Tools cost money! And some of them can be more expensive than others. Don’t feel like you need to run out and buy a whole workshop full of tools right of the bat. You can buy tools slowly, as you need them.

We’ll start with some non-power tools that I always keep on hand, and then we’ll get into the power tools that are essential!

Hammer


This almost feels like it goes without saying! A hammer is one of the most basic tools out there and it’s extremely handy. A hammer is great for everything from putting up shelves and building Ikea furniture, to framing a wall. There are lots of hammers out there, but a basic standard hammer is all you really need (unless you start getting into some more specific building realms). And! They’re very inexpensive.

Tape Measure


”Measure twice, cut once!” and in order to measure twice, you’ll need a Tape Measure. You may want multiple, because if you’re anything like me, you’ll misplace yours and there’s nothing more annoying than not being able to find a tape when you’re working. I also keep a smaller 12 or 16ft tape in my house for easy grabbing, and I’ll usually have a 12ft one in my purse for when I’m out and about and need to measure furniture or stuff at Home Depot. A standard 25ft one is a really great length for having in your toolbox, and is what I have in mine!

Level


A level is super handy and the type you get first may depend on what you’re most wanting to do, DIY-wise. If you’re just installing shelving, hanging pictures, etc— smaller stuff, you may only need a short little level. If you’re leveling counters, floors, or larger projects, you’ll probably want a larger one. I like having a small 1ft level for little things, a more substantial 4ft level, as well as an 8ft one. If you want to get techy and fancy you can also get a laser level, which is a very cool little tool!
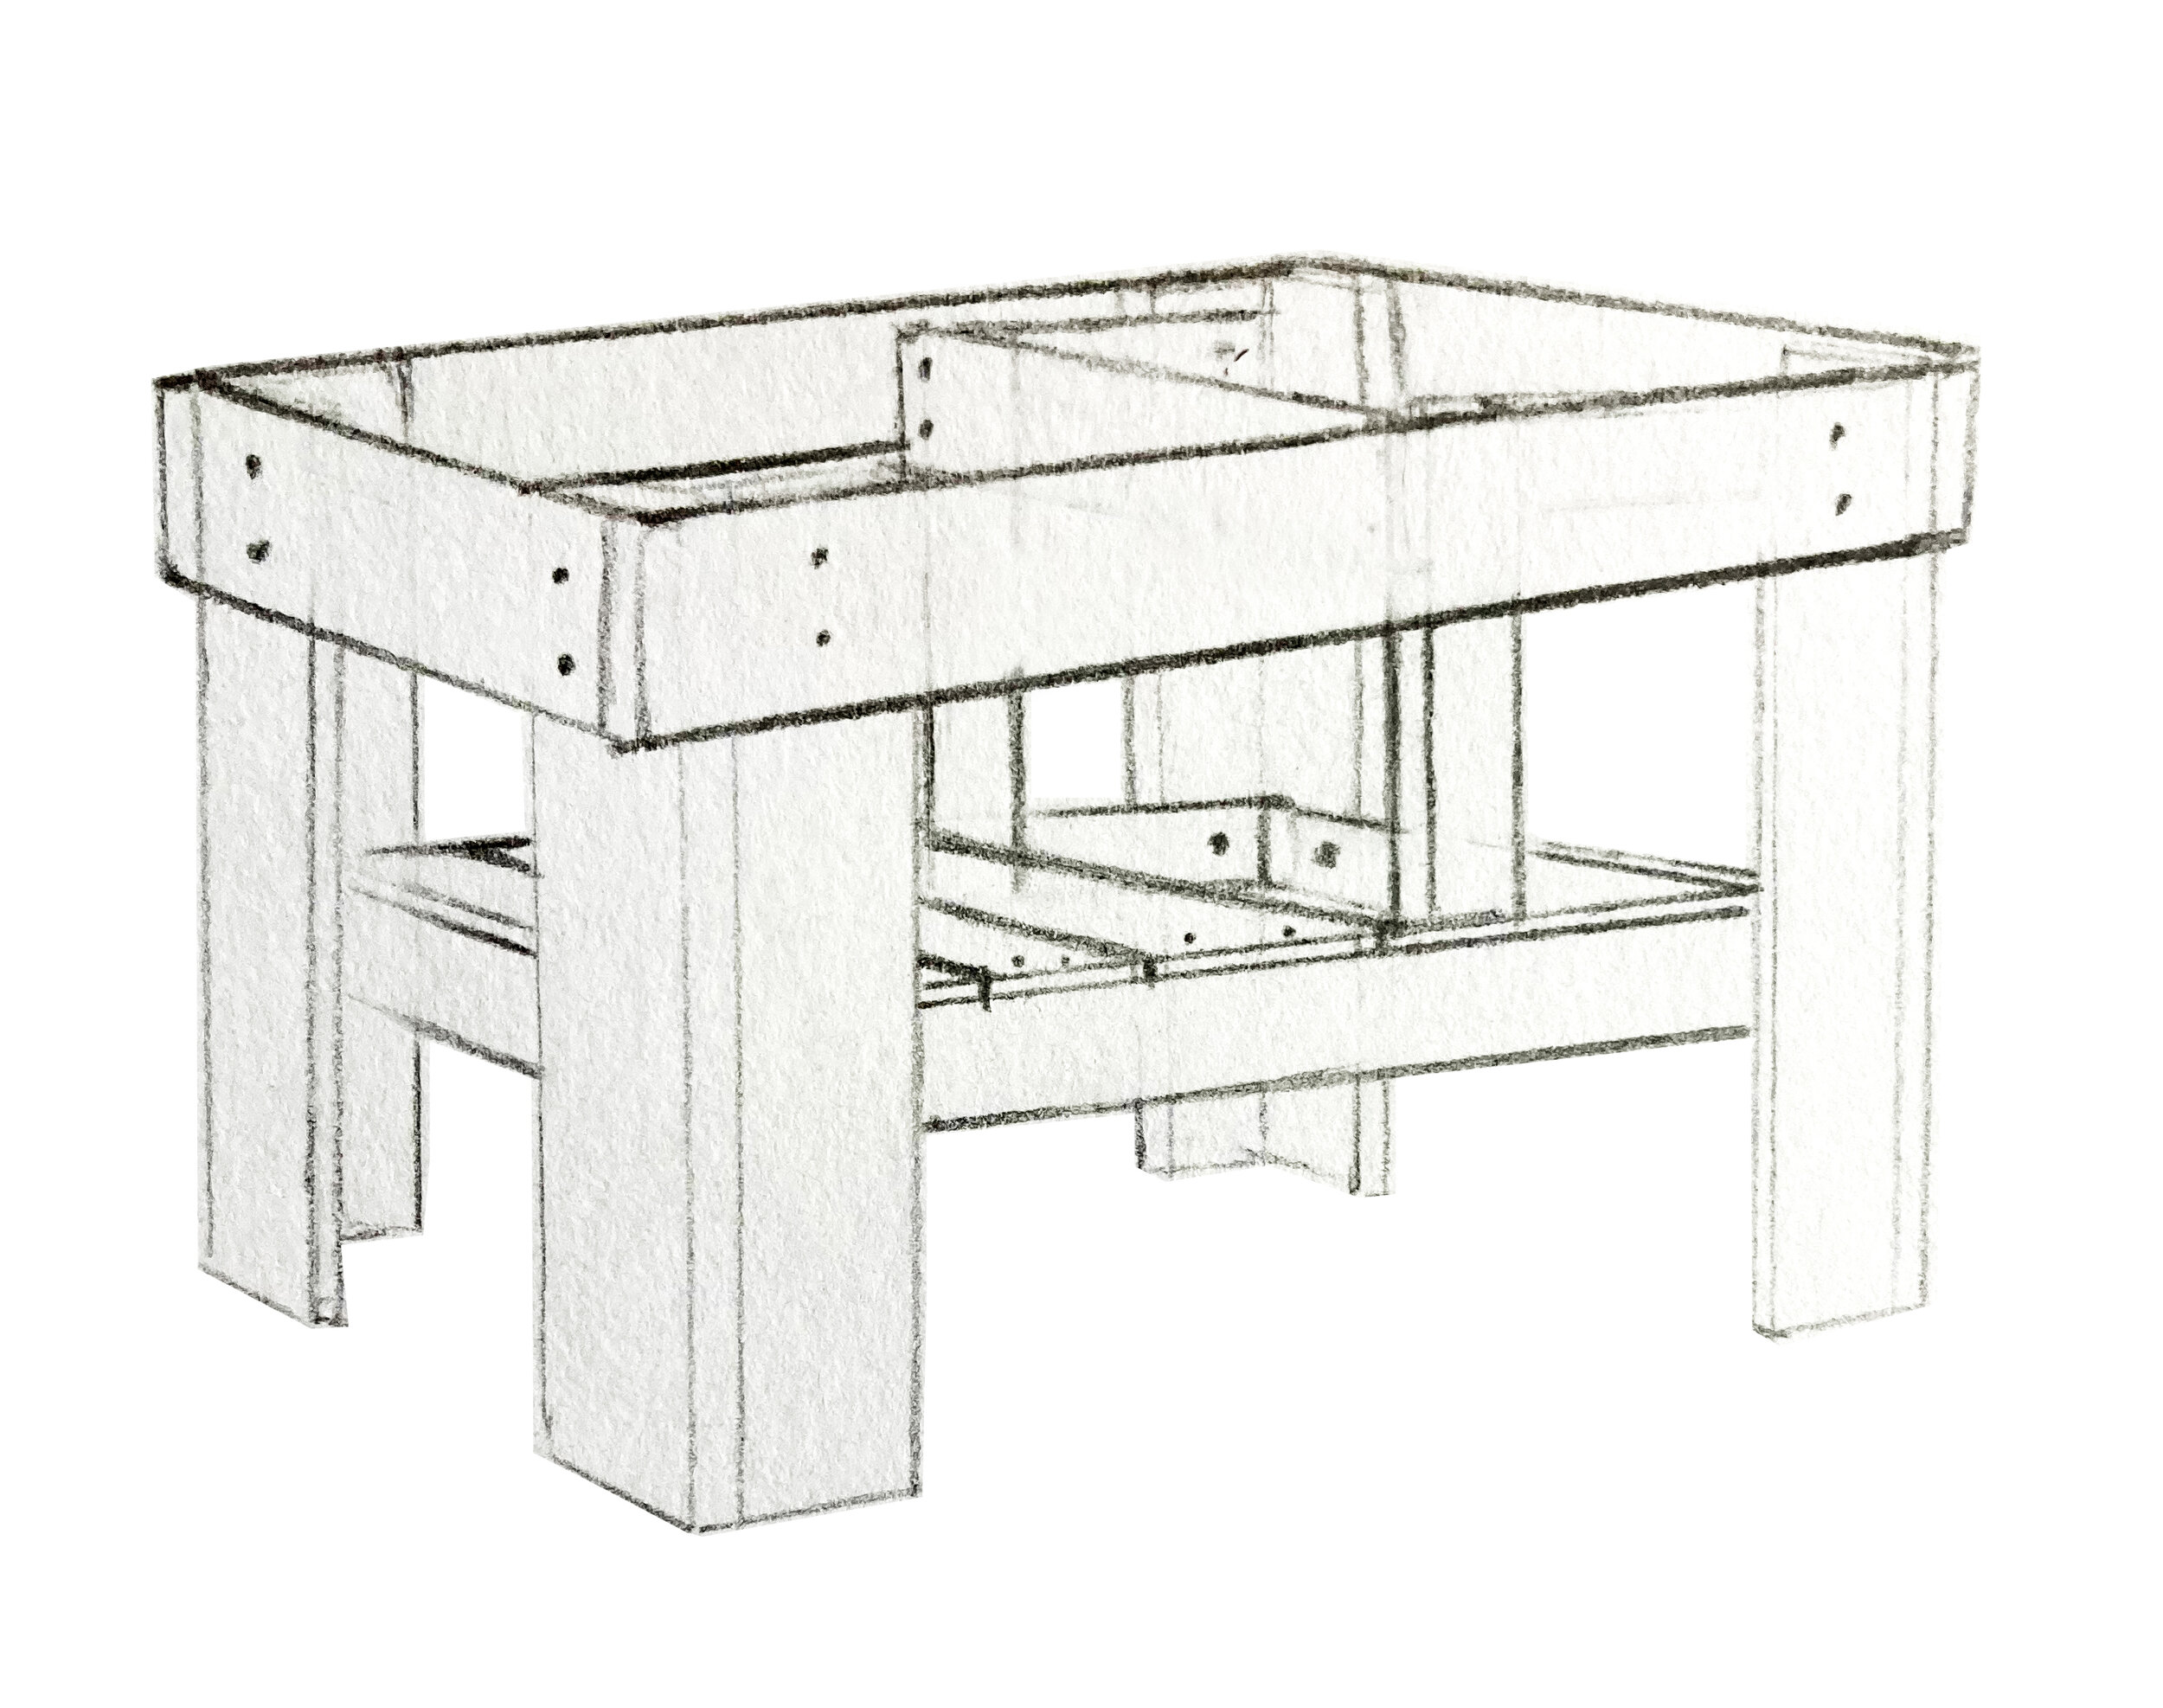
Sawhorses

Havinga set of sawhorses, even just some cheap plastic ones, comes in SO handy when you’re working on projects. Cutting wood, making a makeshift table, painting things, sawhorses will help with countless projects and make things 100 times easier.

Power Tools:

Power tools come in two options: corded and battery powered. Typically corded versions are a little more affordable, and they can also be more powerful, but cordless battery operated tools can be more lightweight and convenient. For instance, my battery operated brad nailer is WAY more convenient because I don’t have to hook up my air compressor and pull out the long air hose. I just pick it up and start nailing. My battery operated circular saw is also much lighter and easier to wield than my corded version, but the corded version is more powerful.

Another thing to consider if you start buying battery powered tools is that you’ll want to stick to a brand, only because once you start buying batteries, those batteries will be specific to that brand’s tools and won’t work on another brand. So you don’t want to buy a Ryobi drill and get the battery pack and charger for that and then get a Makita circular saw, because then you’ll have to invest in Makita batteries and charger (and batteries can be expensive!). So stick to one brand, get a few batteries so you can have a spare or two on hand, or charging up so you’ll never get stuck with a tool and a bunch of dead batteries mid-project— that’s the worst!

This obviously doesn’t apply to corded tools since their power source will be the outlet, so you can go “off brand” with those. I use Ryobi for my battery powered tools and I have a few random brands in my corded tools.

Brad Nailer

Having a brad nailer is super handy for a lot of different projects. Working on furniture, installing trim, putting up molding, making shelving, my brad nailer gets a ton of use around my house. There are lots of different nailer types and sizes too, so depending on what projects you think you’re most likely to tackle, you may want a stapler, a pin nailer, a 16 gauge, etc. I LOVE having a battery powered nailer because then I don’t have to have an air compressor with a long air hose dragging through my house in order to work on projects.

Drill + Impact Driver

A drill is one of the most useful and basic power tools you can have in your arsenal. Not only can you drill various size holes with standard drill bits, spade bits, hole bits, and more, you can also use it as a power screw driver. I would say that my drill is my most used tool over the years and if you don’t have any tools at all start with a power drill! An impact driver is very similar to a drill and they look almost identical, but there are some differences. Impact drivers are more lightweight and compact and they also have more torque. While drills hold bits using a “chuck” which is basically a unique way to clamp down on the bit to hold it in place (and you can use standard or hex bits), Impact drivers have a quick change clamp and only take hex bits.

So why/when do you use an impact driver? Impact drivers are more commonly used to drive in a large quantity of fasteners, longer screws and lag bolts. If you use impact-rated, 1/4-inch hex-shank drill bits, you can accomplish some basic drilling tasks with an impact driver. However, these tasks will be limited in scope. An impact driver is not ideal for precision drilling tasks and should be limited to jobs where the size or placement of the hole is not crucial but more torque may be needed, such as drilling through metal and dense or knotty wood.

A lot of time you’ll see these two sold in a set, which is a nice way to get both, but if you can only afford one, go with a standard drill. I will add that driving in screws is much easier with an impact driver, and as a small (yet strong) woman, I have to use much less force to screw in using an impact driver, which is nice.

Circular Saw

The circular saw is an extremely useful tool if you’re doing any kind of building. It’s the first power saw you should add to your toolkit, IMHO. You can make cross cuts, rip cuts, angled cuts, and more. It’s great for cutting plywood, lumber, you can use a blade designed to cut metal, etc. It’s a super handy tool that will instantly level up your DIY. A circular saw can feel intimidating to some, so make time to practice to get the feel for and hang of how it behaves and cuts.

Jig Saw

The one big limitation that a circular saw has is that it can’t make curved cuts. Which is why I highly recommend grabbing a jig saw next. After my circular saw, my jig saw is my most used saw. I love it’s capabilities, and it’s the pervect tool for making more precision cuts.

Sander

Having a power sander on hand is super useful. I use mine all the time. Whether I’m sanding down a piece of furniture to refinish, prepping cabinets to paint, cleaning up cut edges, or smoothing rough surfaces, my sander makes it so easy. There are a few different style of sanders, but for starting out I’d get a sheet sander, or orbital sander, though a corner sander is also a great starter. These styles are great for most basic sanding you’ll be doing.

DIY Fireside Cooler Table Tutorial

Duraflame Thumbnail.jpg

There’s not much I love more than enjoying a cold beverage while sitting beside a campfire. We’ve been needing a side table for our fire pit area for a while now, so instead of building a regular table, I made one that houses our little cooler! Now we can have ice cold bevs on hand while we’re enjoying the backyard!

Want to build your own cooler table? Just follow the tutorial below!

You’ll need:


A cooler
Drill
18 gauge brad nailer
Cedar 1x4s
1x2s
Cedar fence boards (lumber quantities will depend on the size of the cooler you’re building the table around)
2in exterior screws
1 1/4 in exterior screws
3/4 in screws
Flat metal plates
Small hinges

step1.jpg

Step 1:

Make the corner uprights

Cut your cedar 1x4s into eight 22in lengths (or longer if you want your table higher). These will be the corners of your table. Drill pilot holes and then screw them together in an “L” at a right angle using 2 in exterior screws. I put 3 screws in each.

step2.jpg

Step 2:

Make the basic structure

Attach 1x2s to the corner pieces to connect them all together. This will be what the platform for your cooler sits on, so you’ll want to measure the height of your cooler, and then add a half inch— that’s how far down from the top of the corner pieces you’ll attach these 1x2s. The length and depth of your table will depend on the size of your cooler. I’d measure the short side 1x2s to be about an inch larger than your cooler’s depth. If you want to have a table section that doesn’t open (like mine), measure the width of your cooler and add about 10-12inches. This will how long you want your long side 1x2’s to be. Drill pilot holes in the 1x2s before screwing them to the corner pieces and then attach wth 1 1/4 in exterior screws.

step3.jpg

Step 3:

Create the platform for the cooler

Cut cedar fence board that span across and rest on top of the 1x2s. This will be the platform that your cooler sits on. Use an 18 guage brad nailer to attach the boards to the 1x2’s

(image is viewing from the top down)

step4.jpg

Step 4:

Create an interior wall to secure the cooler

This step is probably unnecessary, but I wanted to create a little barrier so the cooler didn’t scoot over under where the table top doesn’t hinge open. This just keeps the cooler snug in it’s spot. I did this by framing a barrier using 1x2s (which is what I had on hand), but you could also just add another cedar 1x4 to the outside of the platform base 1x2s and then do a cedar fence board across the top from front to back.

step6.jpg

Step 5:

Wrap the top of the table

Measure the short side of the table from corner to corner, then cut two cedar 1x4’s at that length. Attach to the top of the corner uprights using 1 1/4 in exterior screws or 18guage brad nails (if you don’t want to see the screws). Do this on both short sides. Now measure the long sides, including the pieces you just attached. Cut two lengths of 1x4 at that measurement and attach those to the long sides of the table.

step8.jpg

Step 6:

Sheath the outside of the table

Using cedar fence boards (I used both 5.5in wide and 3in wide fence boards) repeat the process you just did for attaching the 1x4s to the top. Use an 18 gauge brad nailer to put two nails in each side of each board to attach them to the corner uprights. I put a small gap between each board (the width of a carpenter’s pencil).

step7.jpg

Step 7:

Create the table top

The table top is made out of cedar 1x4s. I had my table top over hang about a half inch on either side, so my 1x4s were cut 1 inch longer than the depth of the table. For the side that isn’t hinged, you just attach the 1x4s to the base. You can do this with brad nails from the top, or if you don’t want any fasteners showing on the top (which I didn’t), you can use pocket screws to screw the table top boards on from below.

I used flat brackets and 3x4in screws to attach all the hinged table top boards together, which is a bit inelegant, but works great. You could also use pocket screws to screw the boards together side by side.

Once your hinged table section is created all you have to do is attach it to the base using a couple small hinges!

DuraflameXLizMorrow-1.jpg
 

DIY Painted Faux Tile Backsplash

IMG_0046.jpg

My ultimate plan for our kitchen backsplash involves a gorgeous black zellige tile, but I knew that it would be a while until we got that tile project underway. In the meantime, I decided to have fun with a hand-painted backsplash that gave the effect of a faux tile look. I absolutely love how much depth the dark backsplash adds to the space!

Hand painting isn’t for everyone and there are other affordable but less tedious and time-consuming ways to upgrade your backsplash, like stick-on tiles, removable wallpaper, and paint stencils. You can even get a stencil that mimics this hexagon design!

For my process, I used chalk to trace the hexagon shape onto the wall, then used a straightedge to draw the lines inside the hexagons with chalk. Once that template was on the wall, I used a small craft paintbrush to paint interior latex paint along those lines. Definitely tedious! But I did this in the midst of the post-election madness and a tedious project that needed a lot of focus what a pleasant distraction, haha.

IMG_0068.jpg

DIY Hanging Rope Shelf

IMG_0080.jpg

I made this shelf probably five or six years ago and it’s followed me around in all those years. I brought it over to our new house when we moved in last year and it’s just been sitting in Jack’s closet since then. Yesterday I finally decided to put it up, but then when I got some questions about it I realized I had never posted the DIY to my blog! So here it is!

What you’ll need:

  • Rope

  • Screw hooks and anchors

  • Wood planks

  • Drill

1/ Drill holes in the shelves in their four corners, about an inch in from the edges.

2/  Decide how far apart you want your shelves to hang from eachother. Cut a length of rope long enough to go from the bottom of the lowest shelf, up to the top of the shelves and back to the bottom, plus a couple of feet.

3/ Tie a knot at one end of the rope and push the other end through a corner hole on the first plank. Tie the next knot at the distance apart you decided to make your shelves and then push the end of the rope through the next shelf’s corresponding corner hole.

4/ Repeat with each shelf. When you reach the top shelf, create a looped knot at the top, forming a right triangle so the shelves hang level from the screw hook you’ll be hanging the shelves from.

IMG_9215.jpg
21889777151_4a284bfb42_b.jpg

5/  Now, take the rope down through the back holes in the shelves, tying knots at equal distances as the first set of knots so the shelves hang level. When you get back to the bottom knot, cut off the excess rope. Repeat with the second side.

6/ Measure the distance between the two rope sides to determine how far apart you’ll place your hooks. Decide how high you want the shelves to hang, then install your screw hooks. You might want to put anchors in, depending on what kind of walls you have and how heavy you predict the items on your shelf will be.

7/  Once the screw hooks are in, you can hang the shelf! Use a level to check that your shelves are straight. You may need to do some tweaking and raise/lower some of the knots to get everything perfectly level.

21868253322_6c83837d41_b.jpg

DIY Minimal Scandinavian Slatted Headboard

DIY wood slatted headboard

When we moved into the flip house, we left pretty much all our furniture at the other house so it could be a fully furnished Airbnb. We ended up getting an old Ikea Hopen bed frame for free from a friend who didn’t need it anymore, but I knew I wanted to replace the headboard with something unique and more scandinavian-inspired. I’d seen a slatted Ikea headboard before, but upon some research found out it was discontinued, so I set out to make my own! I figured it’d be pretty simple since it was just wood slats, and it was!


What you’ll Need:

12 8ft 2x2’s
2-3 8ft 1x2’s
1.5in wood screws

If you want to make this very affordably, get 2x2 furring strips. They’re usually under $3 each, but furring strips are made of pretty low quality wood, so you’ll need to dig through them to find ones that aren’t warped, cracked, or with a bunch of knots. If you want fancier wood, you can find pine 2x2s in the trim section that can be more like $11-12 each. I wanted to make this on the cheap so I opted for the furring strips.

DIY Wood Slat Headboard
  1. Depending on how wide you want your headboard, you may need to cut the 1x2’s down. I wanted mine to be 8ft so I didn’t need to cut my 2x2s shorter.

  2. Cut your 1x2s down. I cut mine down to 3 ft so they would stick down below the slats about 6 inches and sit behind the back of my bed frame between the frame and the wall to keep the headboard in place. I kept the middle three 1x2s 3 ft long, and trimmed the ones closest to the end on each side down so those two didn’t stick out below the bottom slat. If you don’t have a bedframe where this method would work, you can cut the middle 1x2s so they go from the top of the headboard, all the way to the floor, appx 44in.

    If you want the 1x2 verticals to disappear more, you can paint them the color of the wall behind your headboard before attaching them.


DIY Minimal Scandinavian Slatted Headboard

3. Lay out your 2x2s how you want them for your headboard and make sure the ends are all even. I spaced them out about 3/4 inch, using a piece of 1x2 to space the 2x2s evenly.

headboard2.jpg

4. Once all the 2x2s were set up, I placed my 1x2s on top, starting with the one right in the center, then spacing the others 18 inches apart. I used pencil to draw a line along each side of each 1x2 marking where they went (in the illustration I drew four 1x2s, but I realized later that I actually used five).

5. Start by screwing the two outside 1x2s onto the 2x2s. I’d recommend pre-drilling the 1x2s, as I was lazy and didn’t and had a bit of splitting on a couple of my 1x2s. as I was screwing, I put the spacer 1x2 between the 2x2s as I was screwing to make sure they were spaced exactly.

6. With the two outside 1x2s attached, the spacing will be set and you can screw the remaining three 1x2s on, and you’re done! Flip it over and put it behind your bed! I didn’t anchor mine because it’s pretty well stuck between my bed and the wall, but you can also screw the 1x2’s to the wall between the slats in a few spots to make sure it stays put.

DIY Scandinavian Slatted Headboard
DIY slatted ikea headboard

More DIY this way….