shopping

Budget vs Investment Pergola Comparison

Are you considering adding a pergola to your outdoor space but unsure whether to opt for a budget-friendly option or invest in higher-quality materials and expert craftsmanship? When it comes to outdoor structures like pergolas, it's important to weigh the benefits and drawbacks of both options. While a budget-friendly option may seem attractive upfront, investing in a high-quality pergola can provide long-term benefits such as increased durability, better resistance to outdoor elements, and a longer lifespan overall. To help you make an informed decision, we've put together a comparison of two different pergola projects: one completed on a budget using lower-quality materials, and one that utilized high-end materials and expert craftsmanship.

Let’s start with the budget pergola.

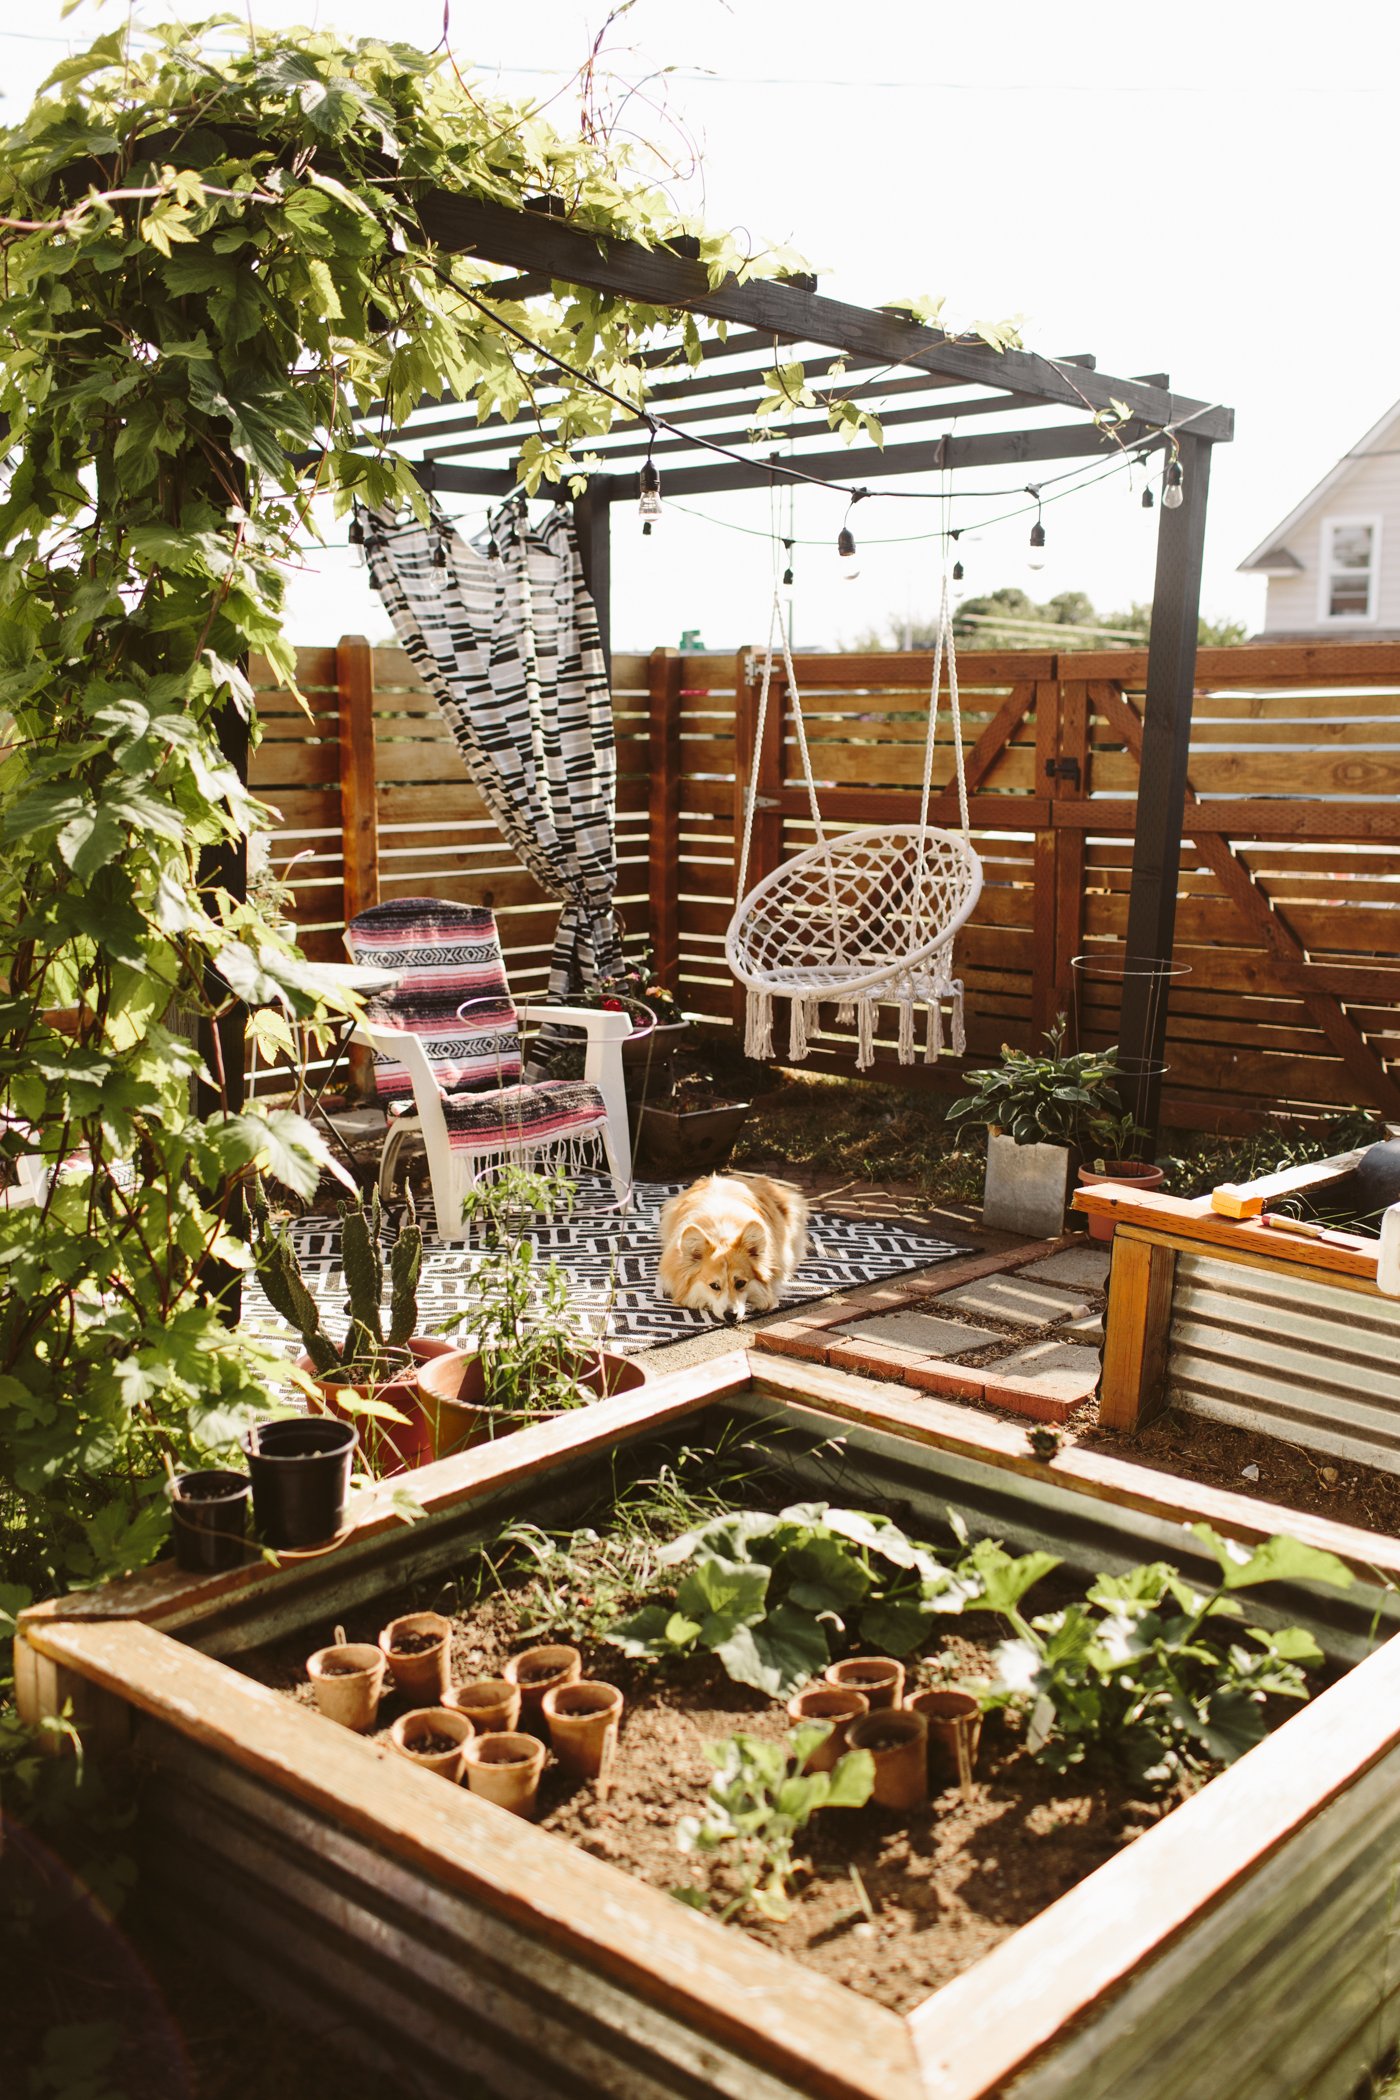
Several years ago I spotted a modern black pergola at Target. It was metal, and had a really simple silhouette that I loved. I believe it was around $400-500, which at the time was out of my budget (they no longer sell that one, but this one is similar). So one weekend I decided to build one myself that had a similar feel to it, and I did it for around $100. You can see that project here.

It actually ended up being a pretty great dupe of the Target version, and I made it using 4x4, 2x4, and 2x2 lumber, painted black. It was the perfect little pergola for our hops to climb on and I believe we had this pergola for about 3 years before we sold the house.

Pros:
— It was super affordable. I used cheap pine (instead of outdoor treated lumber or cedar), and paint I already had on hand.
— It was the perfect place for our hops to climb, which made perfect shade in the summertime.
— It had the style I was wanting.
— It was easy and quick to build.

Cons:

— After a while it wasn’t very sturdy. I didn’t anchor it to the ground because it was sitting on concrete (and because I didn’t want it permanent), and it didn’t have any angle bracing in the corners. After a couple years we added some angle bracing in the corners to shore it up.
— Because it wasn’t made with outdoor lumber it might not have lasted for many years due to rot (especially because of how wet the winters are here in the pnw).

Despite the cons, I really liked this pergola. It was extremely affordable to build, and brought us tons of enjoyment for the few years we had it. We didn’t have the budget for something more expensive, so rather than not having a pergola at all, we had one that was a little chintzy, quality-wise, but it was all we needed. Had we stayed at this house for longer, I probably would have eventually replaced it or rebuilt it to something more high quality that would last a long time. (Also, it should be noted that this was built prior to the price hikes on lumber in 2020, so it might be over $100 to build at this time).

The investment pergola:

This pergola was part of an entire patio build project, so I knew I wanted something that was high quality, sturdy, and would last. Because the budget pergola was built in front of our garage door, I didn’t want it to be permanent in case we ever needed to drive a car into the garage (we didn’t use it for a car, but just in case). This pergola wasn’t going to be going anywhere that it might need to move, so I felt comfortable installing something super permanent.

This pergola, with all the components we used, totals about $3500. Because I worked with LINX on this project as a sponsored campaign they provided the materials, so I made sure to price things out online so I could know the full cost of this pergola. This number includes all the brackets (the corner brackets, and the base brackets that attach it to the patio), the metal grate on the roof, and the 6x6 timbers. LINX makes their own hollow engineered timbers, which I used in this pergola (they’re nice because they are lighter weight and you can hide any electrical cords inside the hollow core if you’re doing any sort of lighting). These timbers are definitely more expensive than standard 6x6 lumber, so you could also cut costs there as well.

Pros:
— This thing is solid. It’s definitely going to last decades.
— It has the style I want (again— modern), but there are also a ton of different ways to utilize the LINX bracket system to create a totally custom pergola.
— Even though the timbers are engineered, they’re still real wood (unlike something like Trex decking, which isn’t) so I could stain them the color I wanted.
— I designed the custom roof to be the perfect place for hops to climb because I loved how the hops climbed on our old pergola so much (LINX also has shade sails that work perfectly with their brackets, if you’re wanting a shade situation)

Cons:
— Way more expensive than $100 (we built ours with 6x6 lumber/brackets, which are more expensive. LINX also has 4x4 brackets and STIX timbers that cost a bit less).
— Not as easy or quick to build. Because this was made with 6x6 timbers, it was much heavier, and we needed about 4 people to put it up, whereas I was able to build and put up the cheaper pergola entirely by myself.

I love both of these pergolas for different reasons, and I don’t think one is better than the other because each one has their place. Not everything has to always be the highest, best quality. It’s okay to do things in a more affordable way, especially if you go into it knowing that it’s not going to last forever. Our cheap pergola worked amazing for us, and the fancier LINX pergola is perfect in its own way as well. Most importantly, do what works for your life, your space, and your finances.


Now, obviously, there’s a pretty big gap between $100 and $3500 and there are plenty of pergola options out there in between that price range.


10x12ft Pergola — $1422


12x12ft Pergola — $599


10x12 ft Pergola — $2048


10x12 ft Pergola — $1633


10x12ft Pergola — $630

I hope that gives you a few more options within some different budgets for pergolas. I haven’t used any of the ones I linked above so I can’t speak to their quality, but they all have a similar modern look, which is what I was going for with both of my pergolas. I can’t wait to get outside this summer and enjoy our new patio and pergola, and I hope this helps you figure out your pergola patio situation this summer too!

Unique and eclectic sofas under $1000

Couches can be a big expense, and while the quality for sure increases as the price increases, sometimes a several thousand dollar couch just isn’t in the cards yet. Or maybe you do want to save up for a pricer sofa, but in the meantime still want one that matches your design vibe at a lower price point. Here are a few options that are under $1000 that still have a really fun style to them. They’re unique and eclectic, will add to the design of your space, but might not take up your entire furniture budget for the year.

1 | 2 | 3 | 4 | 5

I think my favorites in this group are the top one, the blue one, and the bottom one. I’d for sure get that top one if it was offered in some more colors. Dirty corgi paws + white couch just isn’t a math equation I want to put in my house. I love the color of the orange one, and the fabric looks interest and unique as well. I don’t think it’s a boucle, but it gives that look, which I like.

6 | 7 | 8 | 9

The orange and yellow ones in this group are slightly over that $1000 cap but I loved them and I think they probably are a slightly higher quality being from Urban Outfitters. I really love the spherical legs on the pink couch though. Such a fun detail that really adds a lot of design interest.

Something fun you can do to customize existing furniture is to replace boring legs with stuff that’s more eclectic. My go-to shop for furniture legs is Pretty Pegs. They make tons of uniquely shaped furniture legs designed for both IKEA furniture and other furniture. They also make drawer/door handles and knobs so you can customize those on your dressers and cabinets as well! It’s a really great resource for DIYers and furniture flippers alike.


You May Also Like

10 tools to start on your DIY journey

One of the things that can feel overwhelming when it comes to being a beginner DIYer is not knowing where to start when it comes to those first tool purchases. Whether it’s not knowing which tools to get first, or what brand to go with, or what accessories to get, the world of tools is one that you’ll need to enter in order to have success with your DIYs!

Another big reason it can feel overwhelming: money. Tools cost money! And some of them can be more expensive than others. Don’t feel like you need to run out and buy a whole workshop full of tools right of the bat. You can buy tools slowly, as you need them.

We’ll start with some non-power tools that I always keep on hand, and then we’ll get into the power tools that are essential!

Hammer


This almost feels like it goes without saying! A hammer is one of the most basic tools out there and it’s extremely handy. A hammer is great for everything from putting up shelves and building Ikea furniture, to framing a wall. There are lots of hammers out there, but a basic standard hammer is all you really need (unless you start getting into some more specific building realms). And! They’re very inexpensive.

Tape Measure


”Measure twice, cut once!” and in order to measure twice, you’ll need a Tape Measure. You may want multiple, because if you’re anything like me, you’ll misplace yours and there’s nothing more annoying than not being able to find a tape when you’re working. I also keep a smaller 12 or 16ft tape in my house for easy grabbing, and I’ll usually have a 12ft one in my purse for when I’m out and about and need to measure furniture or stuff at Home Depot. A standard 25ft one is a really great length for having in your toolbox, and is what I have in mine!

Level


A level is super handy and the type you get first may depend on what you’re most wanting to do, DIY-wise. If you’re just installing shelving, hanging pictures, etc— smaller stuff, you may only need a short little level. If you’re leveling counters, floors, or larger projects, you’ll probably want a larger one. I like having a small 1ft level for little things, a more substantial 4ft level, as well as an 8ft one. If you want to get techy and fancy you can also get a laser level, which is a very cool little tool!

Sawhorses

Havinga set of sawhorses, even just some cheap plastic ones, comes in SO handy when you’re working on projects. Cutting wood, making a makeshift table, painting things, sawhorses will help with countless projects and make things 100 times easier.

Power Tools:

Power tools come in two options: corded and battery powered. Typically corded versions are a little more affordable, and they can also be more powerful, but cordless battery operated tools can be more lightweight and convenient. For instance, my battery operated brad nailer is WAY more convenient because I don’t have to hook up my air compressor and pull out the long air hose. I just pick it up and start nailing. My battery operated circular saw is also much lighter and easier to wield than my corded version, but the corded version is more powerful.

Another thing to consider if you start buying battery powered tools is that you’ll want to stick to a brand, only because once you start buying batteries, those batteries will be specific to that brand’s tools and won’t work on another brand. So you don’t want to buy a Ryobi drill and get the battery pack and charger for that and then get a Makita circular saw, because then you’ll have to invest in Makita batteries and charger (and batteries can be expensive!). So stick to one brand, get a few batteries so you can have a spare or two on hand, or charging up so you’ll never get stuck with a tool and a bunch of dead batteries mid-project— that’s the worst!

This obviously doesn’t apply to corded tools since their power source will be the outlet, so you can go “off brand” with those. I use Ryobi for my battery powered tools and I have a few random brands in my corded tools.

Brad Nailer

Having a brad nailer is super handy for a lot of different projects. Working on furniture, installing trim, putting up molding, making shelving, my brad nailer gets a ton of use around my house. There are lots of different nailer types and sizes too, so depending on what projects you think you’re most likely to tackle, you may want a stapler, a pin nailer, a 16 gauge, etc. I LOVE having a battery powered nailer because then I don’t have to have an air compressor with a long air hose dragging through my house in order to work on projects.

Drill + Impact Driver

A drill is one of the most useful and basic power tools you can have in your arsenal. Not only can you drill various size holes with standard drill bits, spade bits, hole bits, and more, you can also use it as a power screw driver. I would say that my drill is my most used tool over the years and if you don’t have any tools at all start with a power drill! An impact driver is very similar to a drill and they look almost identical, but there are some differences. Impact drivers are more lightweight and compact and they also have more torque. While drills hold bits using a “chuck” which is basically a unique way to clamp down on the bit to hold it in place (and you can use standard or hex bits), Impact drivers have a quick change clamp and only take hex bits.

So why/when do you use an impact driver? Impact drivers are more commonly used to drive in a large quantity of fasteners, longer screws and lag bolts. If you use impact-rated, 1/4-inch hex-shank drill bits, you can accomplish some basic drilling tasks with an impact driver. However, these tasks will be limited in scope. An impact driver is not ideal for precision drilling tasks and should be limited to jobs where the size or placement of the hole is not crucial but more torque may be needed, such as drilling through metal and dense or knotty wood.

A lot of time you’ll see these two sold in a set, which is a nice way to get both, but if you can only afford one, go with a standard drill. I will add that driving in screws is much easier with an impact driver, and as a small (yet strong) woman, I have to use much less force to screw in using an impact driver, which is nice.

Circular Saw

The circular saw is an extremely useful tool if you’re doing any kind of building. It’s the first power saw you should add to your toolkit, IMHO. You can make cross cuts, rip cuts, angled cuts, and more. It’s great for cutting plywood, lumber, you can use a blade designed to cut metal, etc. It’s a super handy tool that will instantly level up your DIY. A circular saw can feel intimidating to some, so make time to practice to get the feel for and hang of how it behaves and cuts.

Jig Saw

The one big limitation that a circular saw has is that it can’t make curved cuts. Which is why I highly recommend grabbing a jig saw next. After my circular saw, my jig saw is my most used saw. I love it’s capabilities, and it’s the pervect tool for making more precision cuts.

Sander

Having a power sander on hand is super useful. I use mine all the time. Whether I’m sanding down a piece of furniture to refinish, prepping cabinets to paint, cleaning up cut edges, or smoothing rough surfaces, my sander makes it so easy. There are a few different style of sanders, but for starting out I’d get a sheet sander, or orbital sander, though a corner sander is also a great starter. These styles are great for most basic sanding you’ll be doing.

New T-Shirts! Rep the DIY life!

IMG_1054.jpg

In an effort to not turn my entire wardrobe into paint splattered, sawdust encrusted DIYing clothes, I decided to make some cute (and, okay, a little kitschy) DIYing shirts for me and you! If you need a little somethin to throw on for your weekly— or if you’re like me, daily— Home Depot run, this is it right here.

Scroll down to check out all the new designs!

IMG_1074-Edit.jpg

Living Room Finishing Touches

Having a toddler in your house makes it remarkably difficult to complete home projects, go figure. I was able to get my banana leaf wallpaper up during one nap, miraculously, but other than that, things have been slow going.  That being said, I'm pretty excited about how things are coming along, slow as they may be.  I've been able to thrift and craigslist some really awesome pieces, so I'm pretty much set on furniture, and now it's just more of the finishing-touches type things that I need to bring the room to where I'd like it to be.  I don't have a huge wishlist of things, but these few pieces would really tie the room together, as the dude would say.

Living room inspiration