photography tips

10 tips for taking beautiful photos of your home

How to take beautiful photos of your home

If you’re an interior designer, proud homeowner wanting to showcase your decor, or just wanting to improve your interior images for instagram, here are a few of my tips for snapping the best shots of your interiors! A couple of these tips will relate specifically to DSLR shooters, but most are applicable to anyone— even those of you using your phone camera to capture your images!

01/ SHOOT STRAIGHT-ON TO WALLS

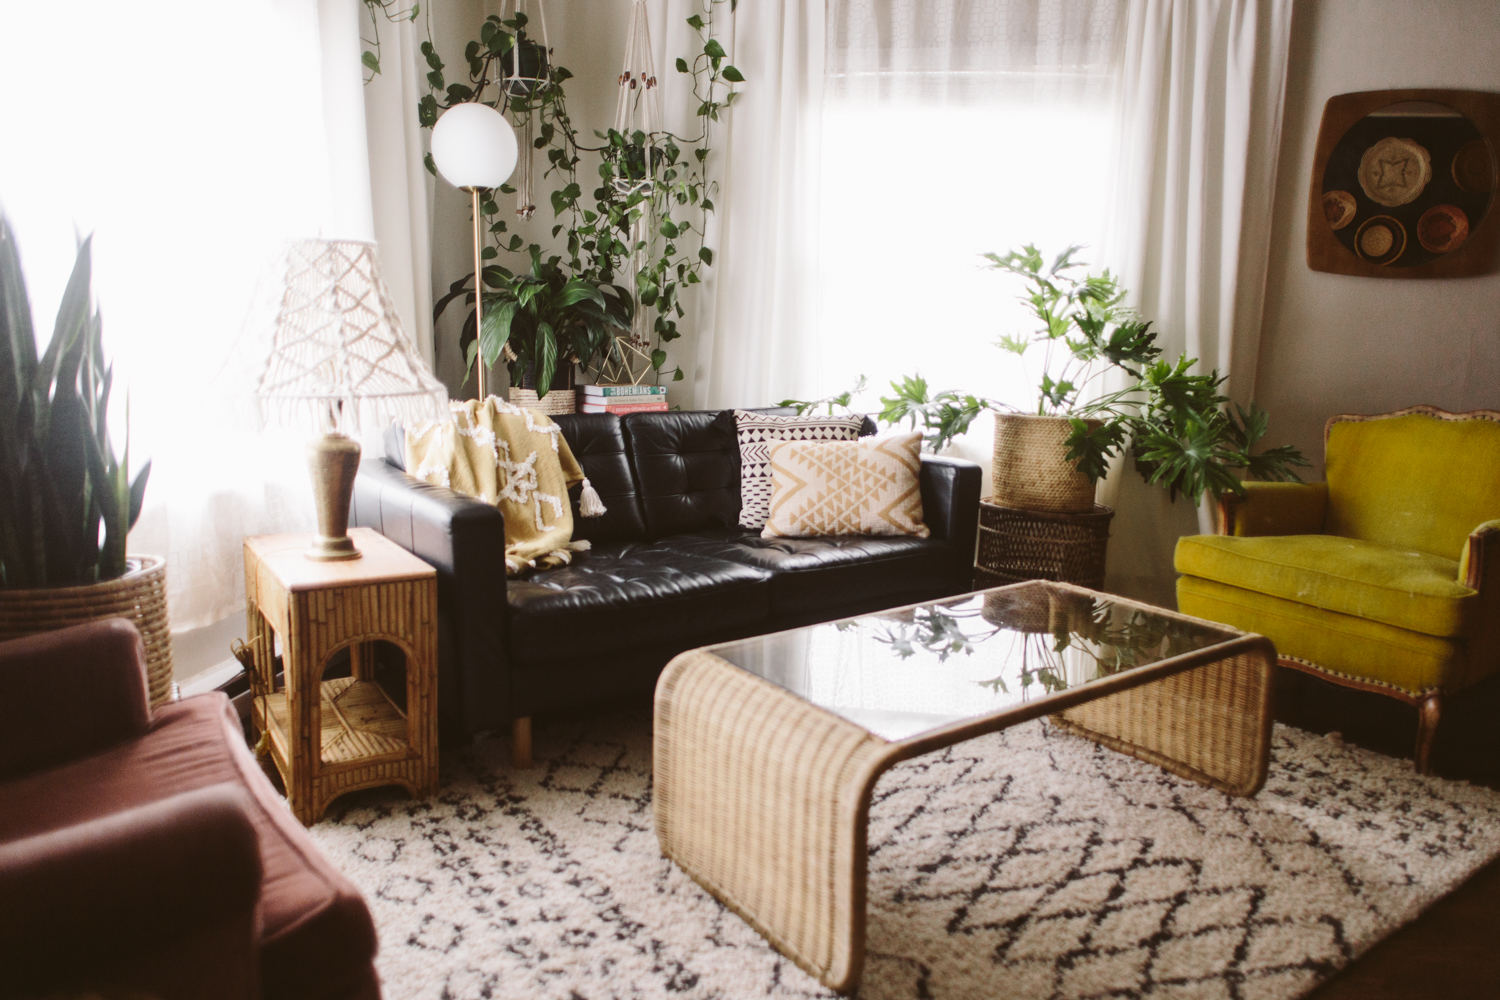
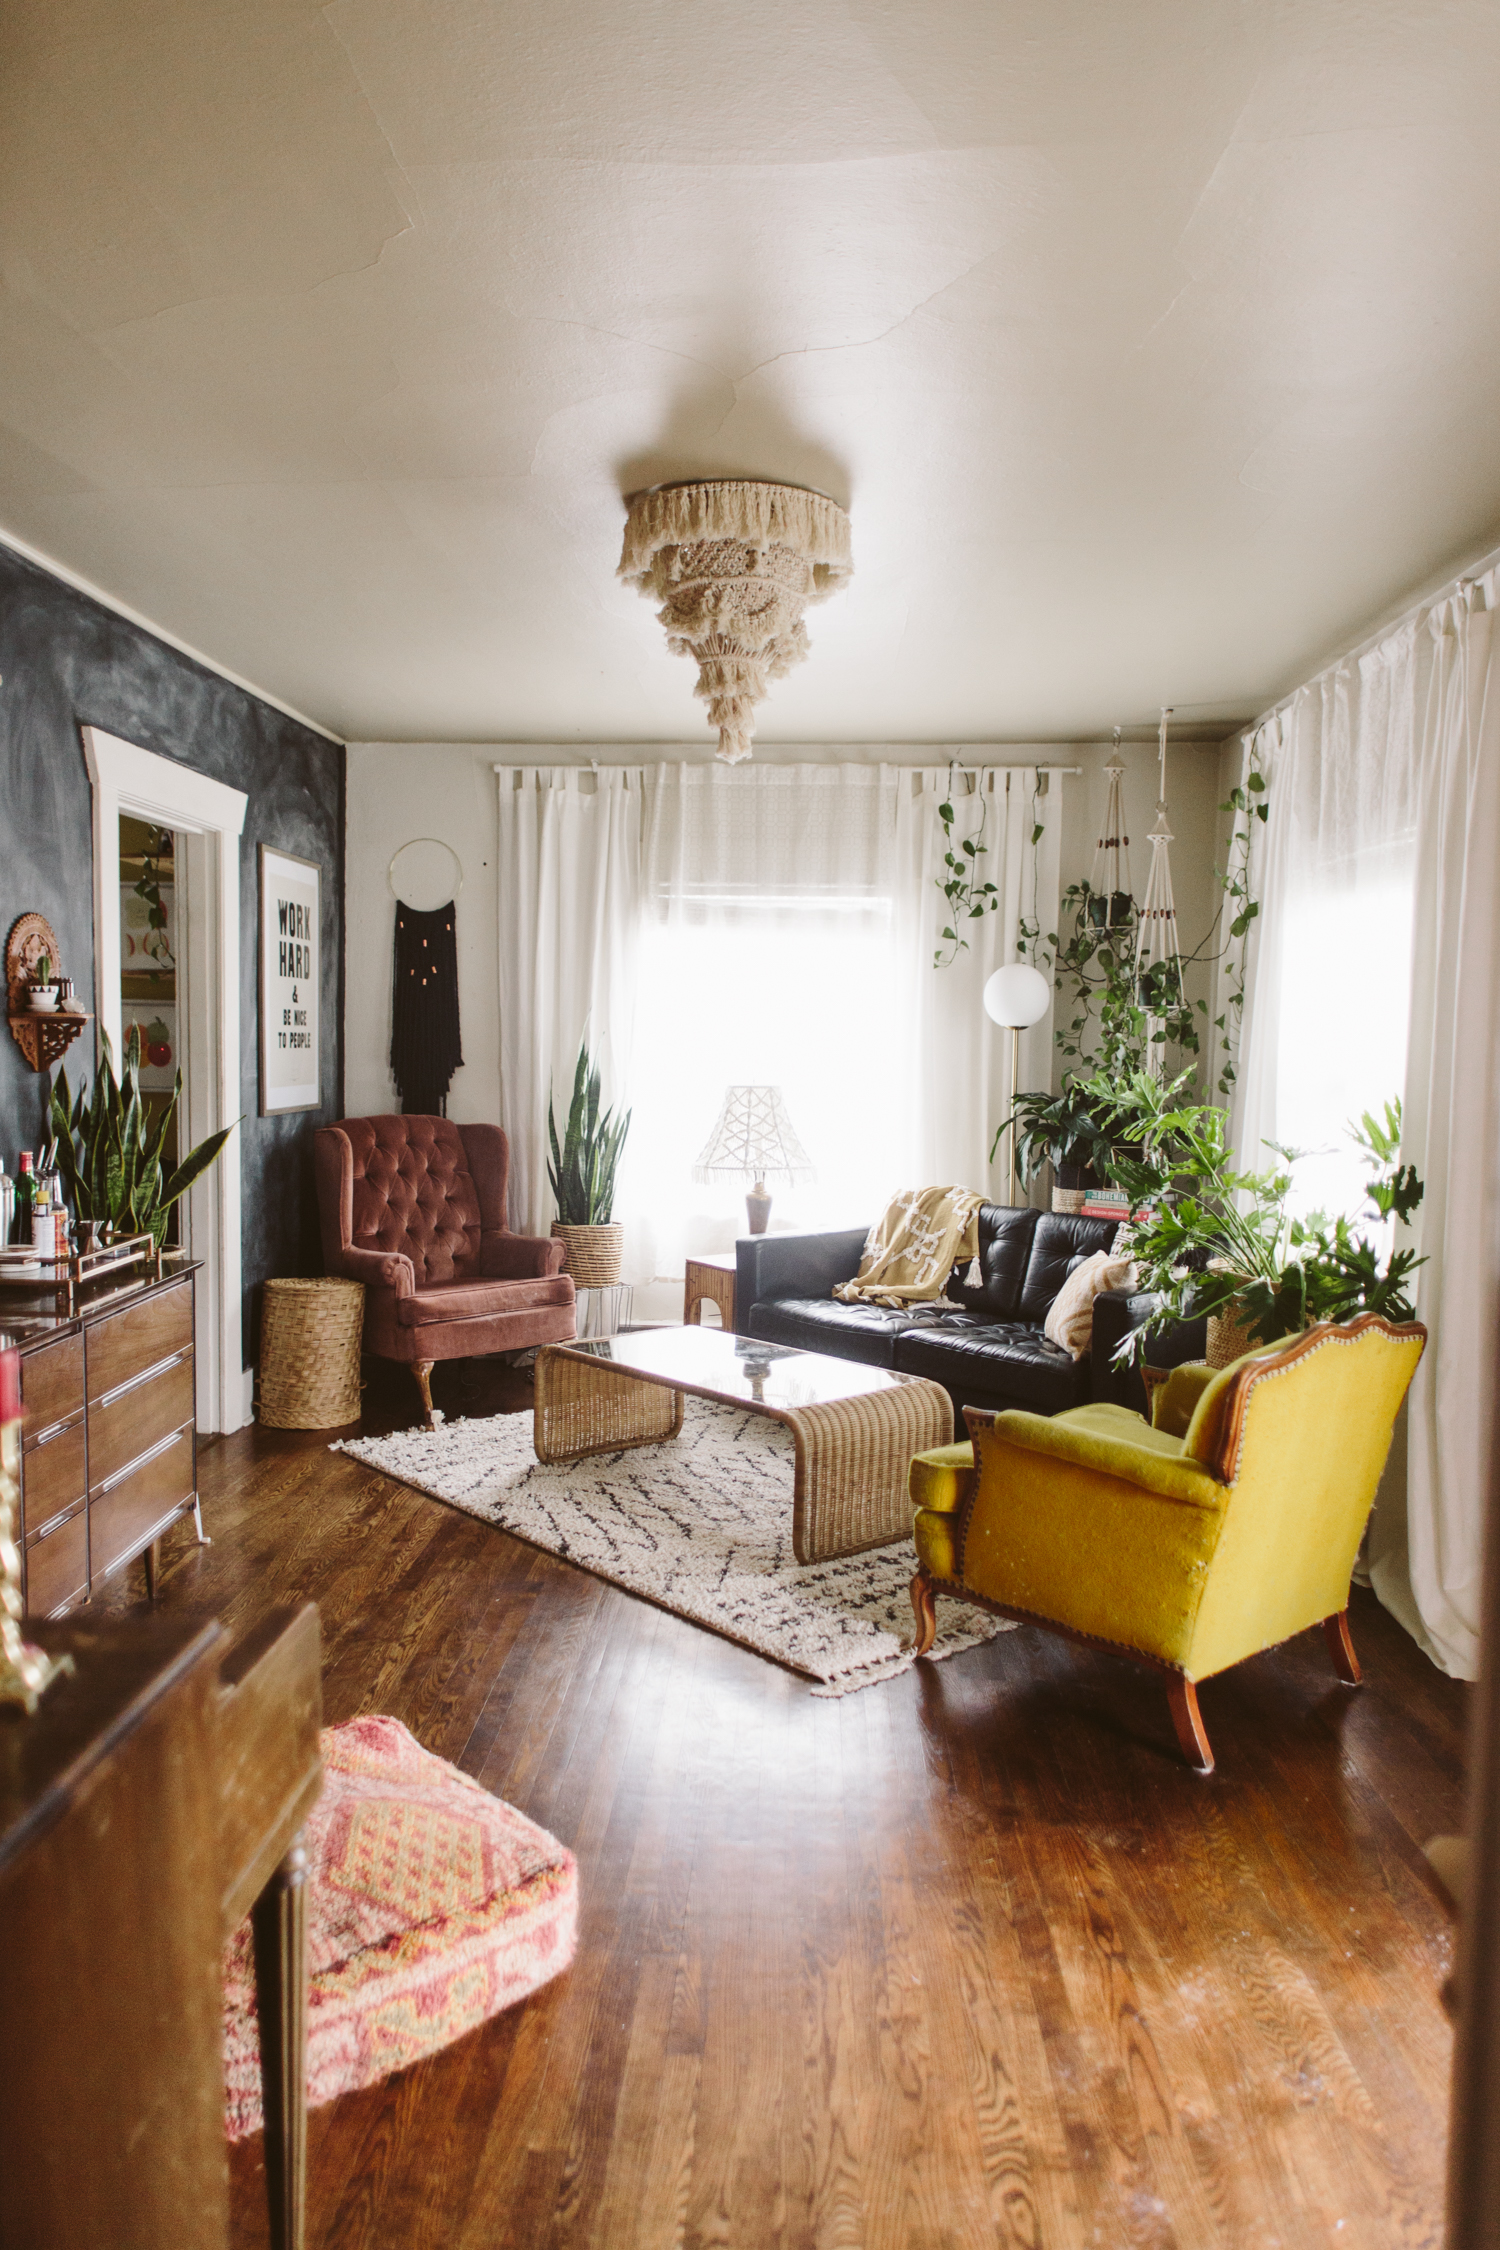
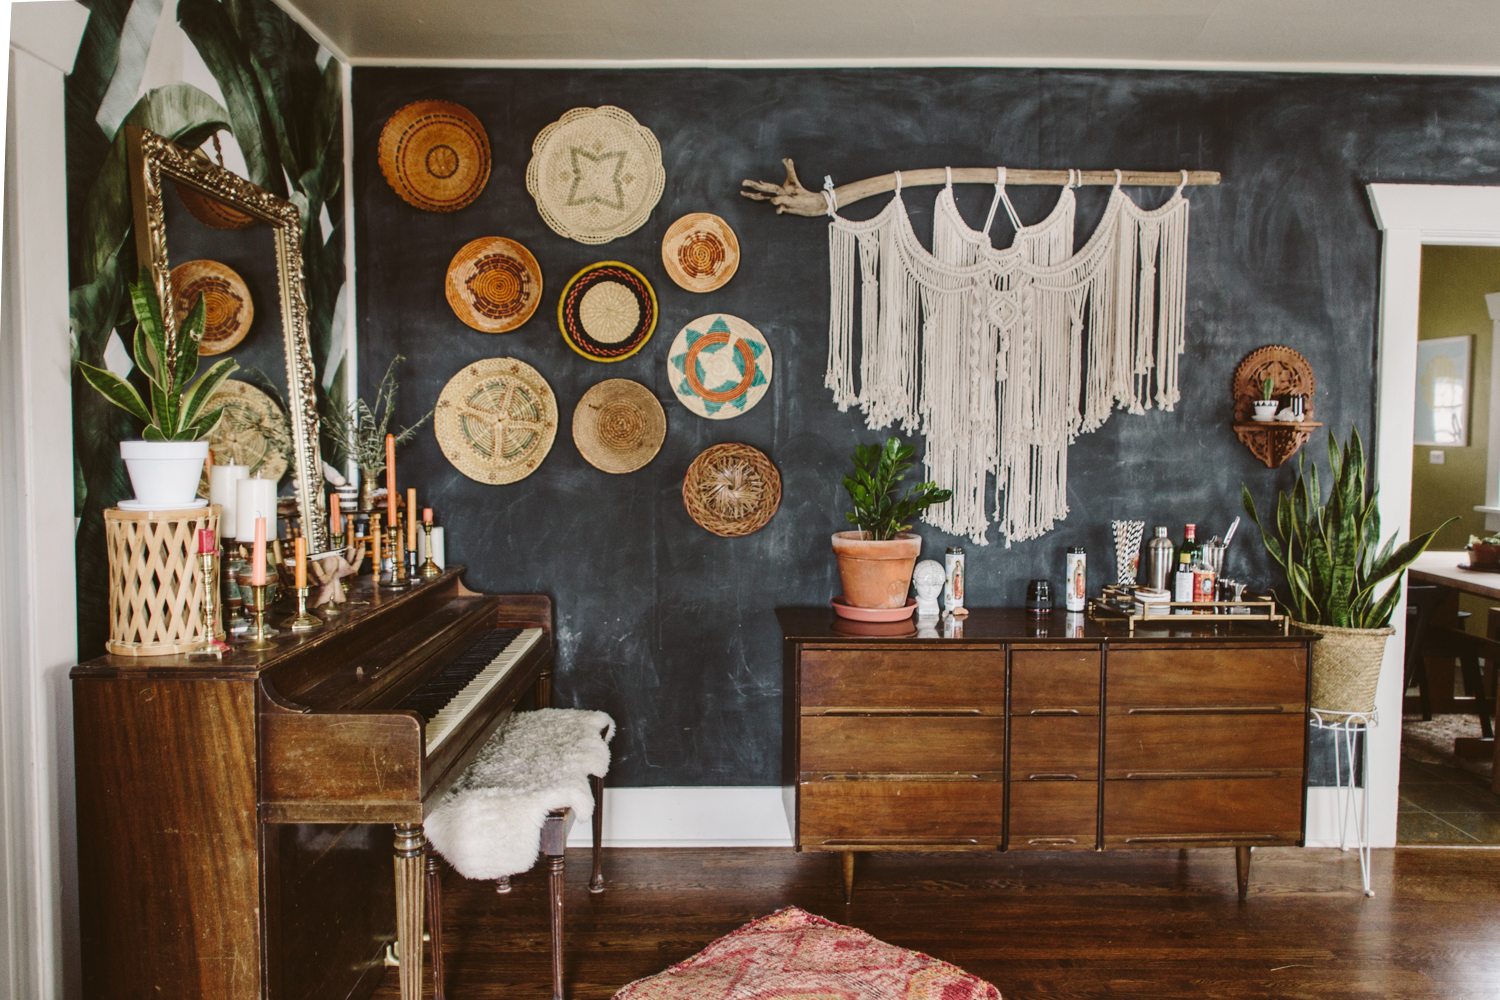
So basically: when you’re shooting, shoot directly at a wall, not diagonally towards a corner. This isn’t a rule, I shoot into corners all the time, but I do love the clean, straight lines of a straight-on shot. If you scroll through these photos you’ll notice almost all of them are directly facing a wall. There’s just something aesthetically pleasing about the perspective lines of a straight-on photo. Again, this can be a personal preference thing, but I notice that many of the photos I like and that are popular on Instagram or in magazines follow this guideline.

02/ ADD A HUMAN ELEMENT

These photos in this post in particular don’t do the best at showcasing this tip, but it is one thing I like to do, and find that I enjoy in other people’s photos. Put people (or pets) in your photos! My Corgi makes it into a lot of the photos I take of my space and I love how she adds a little bit of realness to the photo. I also enjoy putting myself in the photo (standing at the counter cutting fruit, making the bed, playing with my son) just to give a lived-in feel to my images. We do, after all, actually live here! It can be harder to set up, and getting a toddler to cooperate for photos might be more of pain than it’s worth sometimes, but I try to do it when I can.

Even if you can’t get an actual person in your image, you can at least give some kind of staging that alludes to people’s existence, haha. Maybe have an orange sliced up on a cutting board with a knife laid beside it when you take photos of your kitchen. Or a book cracked open with a cup of coffee and a scone on your coffee table when shooting your living room. Just little evidences of human life peeking through your photo.

03/ USE NATURAL LIGHT

Most of our indoor lights have a very warm, orangey tone, so when lights are on they can tend to tint everything orange. I prefer my images to look as natural as possible in order to get an accurate depiction of paint colors/upholstery etc, so I’ll turn off all the lights and use only window light. If you are a whiz at off-camera lighting and feel comfortable lighting your space that way, by all means!


Because turning the lights off in your home will often mean your space is a lot more dim than usual, you’ll probably have to put your camera on a tripod so you can use a long exposure in order to get the correct exposure in your image.

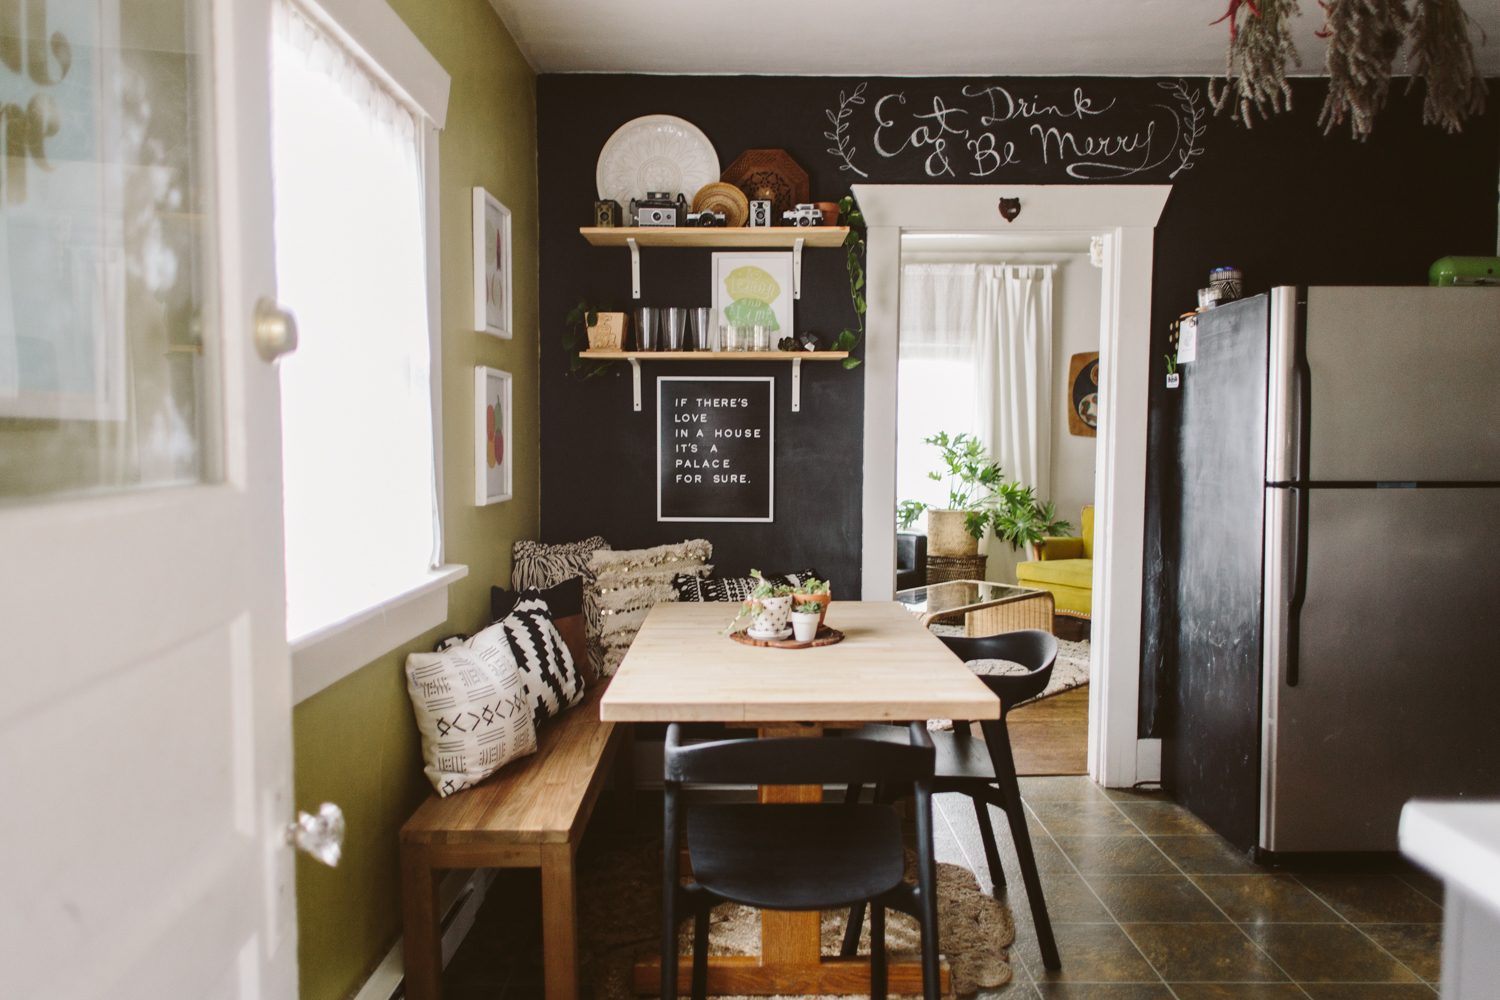
You can also open doors that aren’t in the photo in order to let light in from other rooms or outdoors. I’ll often open my front door when taking photos of my living room because it lets in way more light BUT! I have to put a white sheet over my door because it’s painted orange, so that orange color gets cast onto my space unless I throw a sheet over it. Light can do funny things like that, so just keep an eye out for funky shadows or weird colors getting cast onto your space.

04/ CLEAN UP CLUTTER

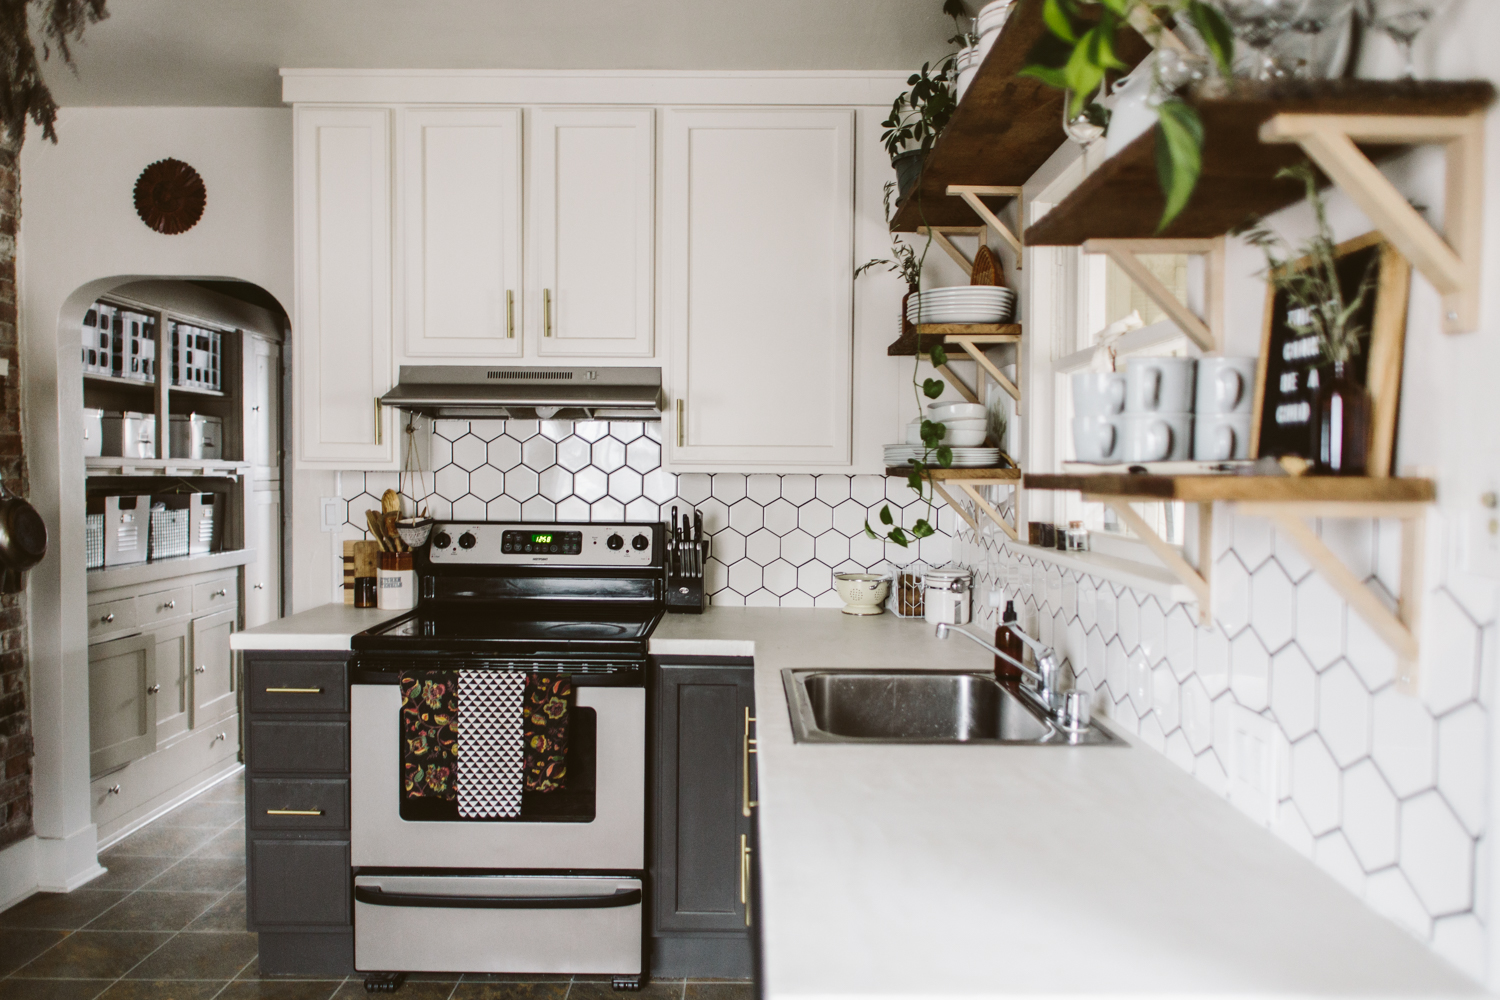
This one is kind of a personal preference depending on how “real” you want your images to be, but I do like to take photos of a space that has odds and ends and clutter tucked away. It helps put the focus on the design elements on the room and draws the eye to the areas you want. For example, my kitchen counters house waaay more stuff in my daily life than is shown in these photos, but I wanted to show the concrete counters and backsplash tile. With coffee makers and dish drying racks all over the counter, it’d be harder for the viewer to focus on those design elements. This can also apply to stuff like cords and remotes. Just tuck ‘em away for the shoot!

05/ MOVE STUFF AROUND

This might be considered “cheating” but I do it a lot. Move design elements from room to room! I definitely do this most with plants. I don’t have as many plants as I’d like in every room of my house, so I’ll usually do a little bit of plant musical chairs, adding plants to the room I’m shooting. You can also do this with stuff like throw pillows, blankets, etc. Since you’re not showing your entire house in one image, you can fudge a little by borrowing stuff from rooms not shown in the photo you’re taking. Tricksy!

06/ USE A WIDER ANGLED LENS

I don’t like to get too crazy, if you have too wide of a lens it can distort things and start to look fish-eyed. The widest I’ll use is a 24mm lens, which seems to be a good lens, especially for shooting smaller spaces. I like to use a 50mm for shooting details, and a 35mm is a happy medium between 50 and 24mm.

07/ SHOOT THE BIG PICTURE

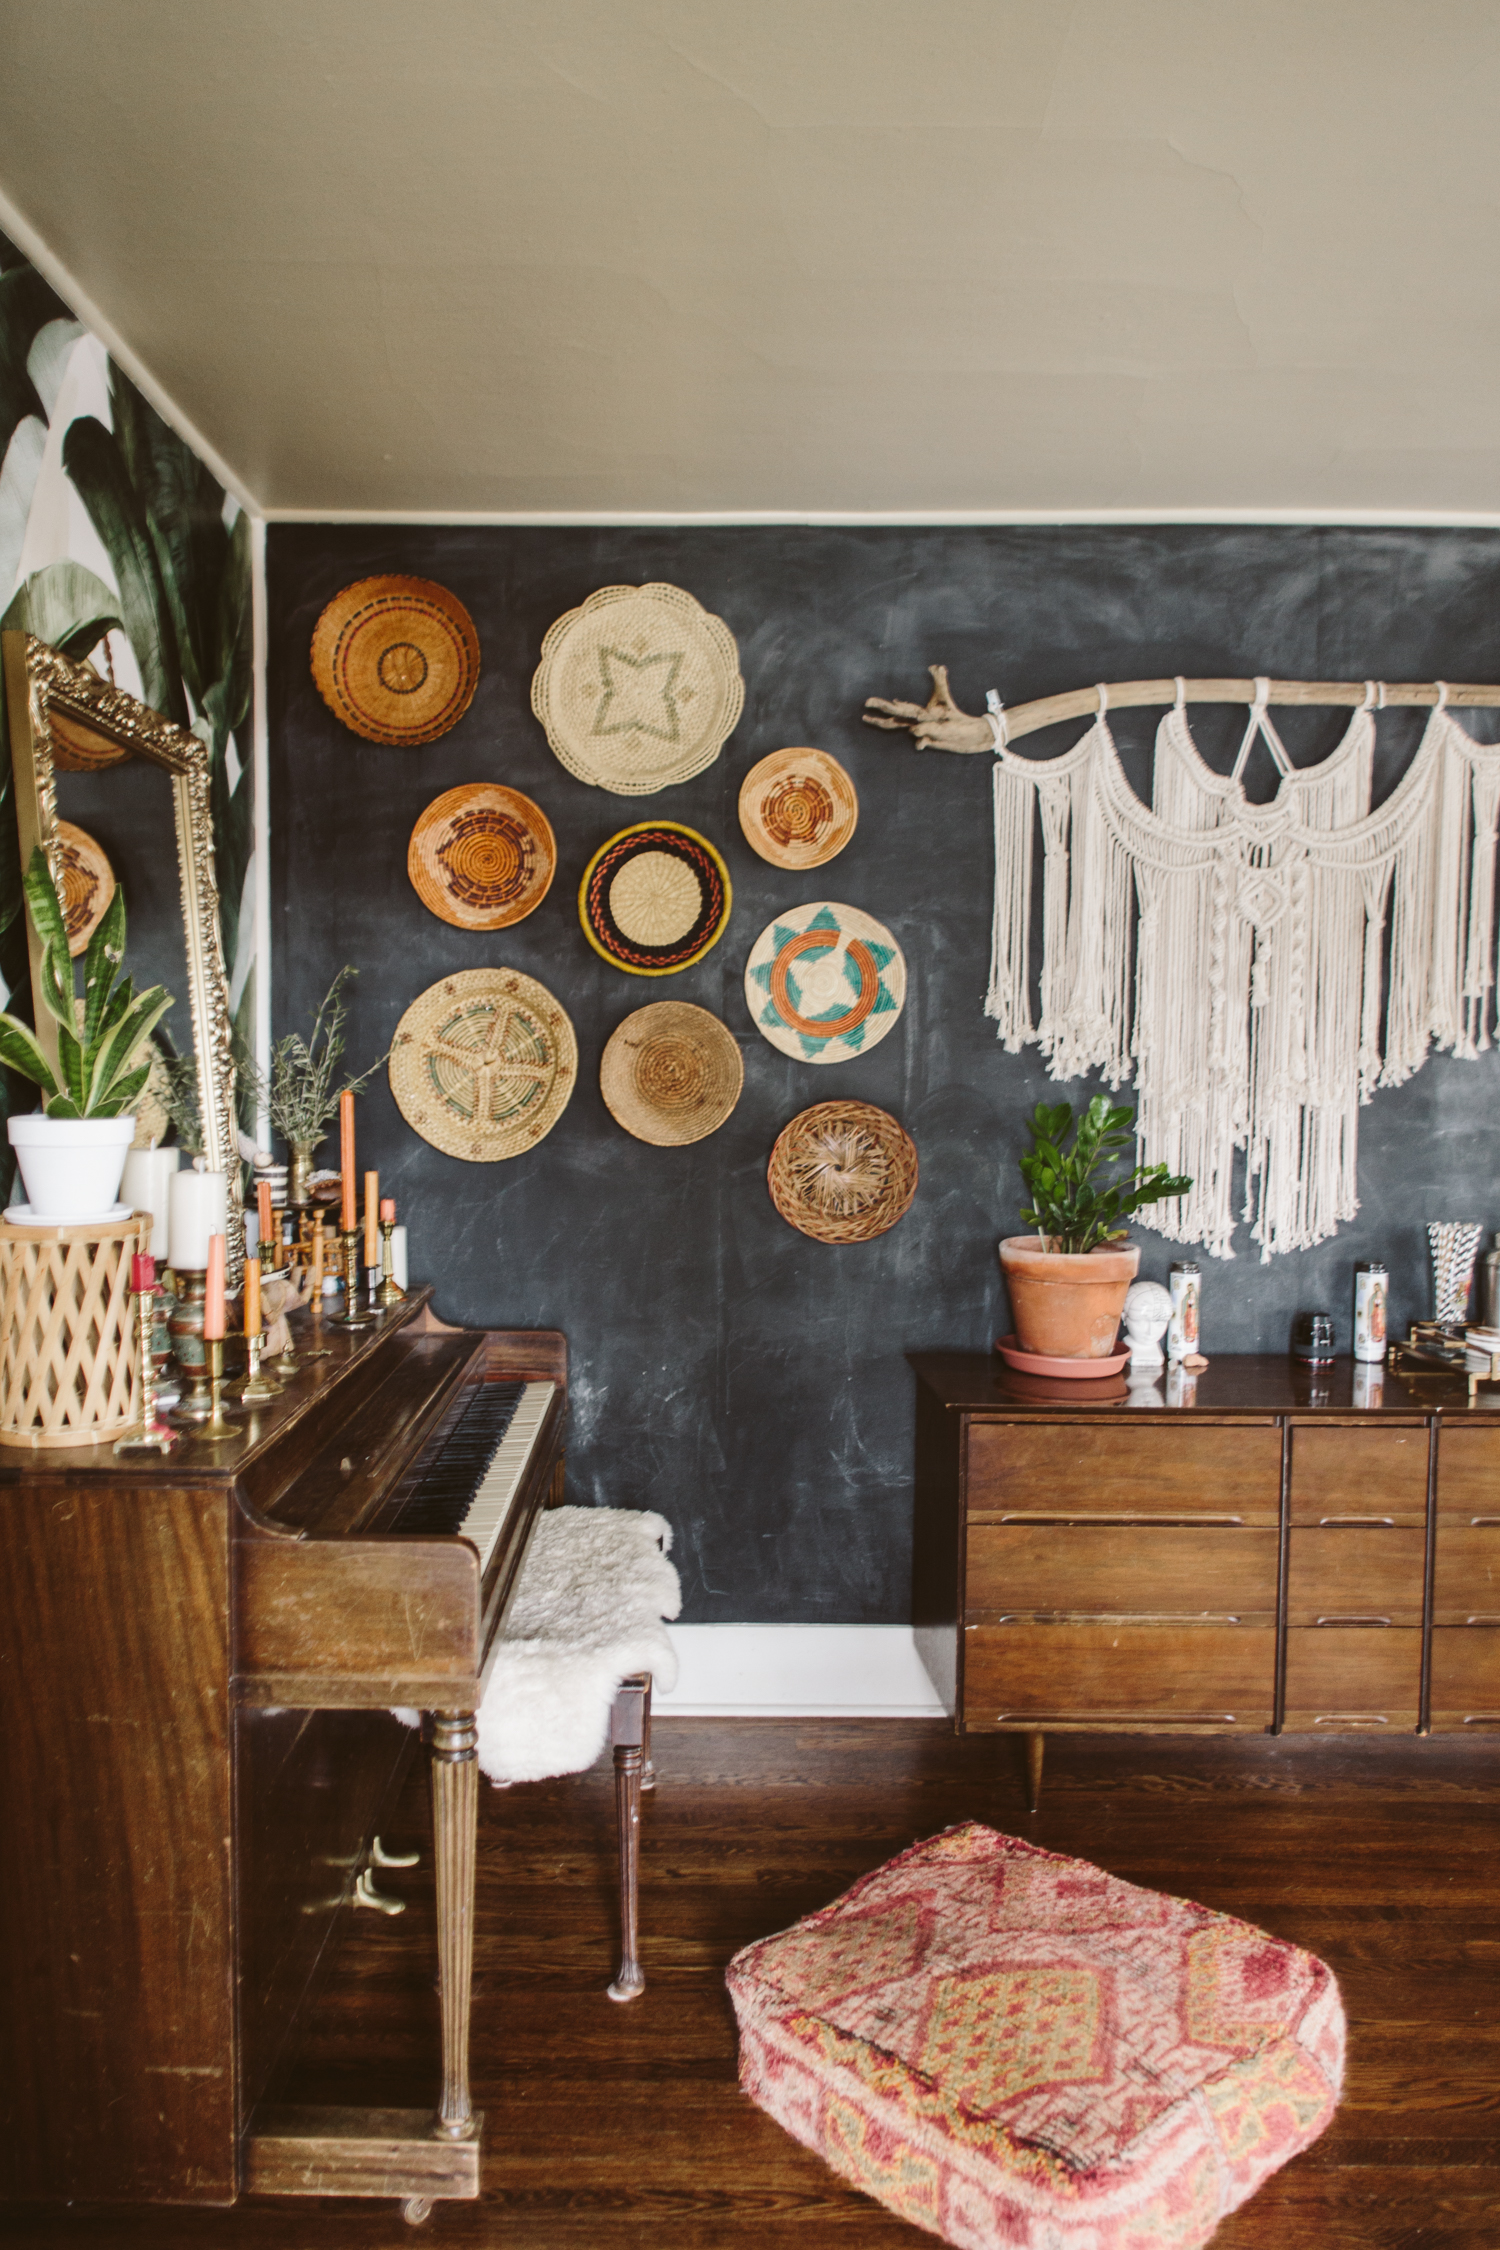
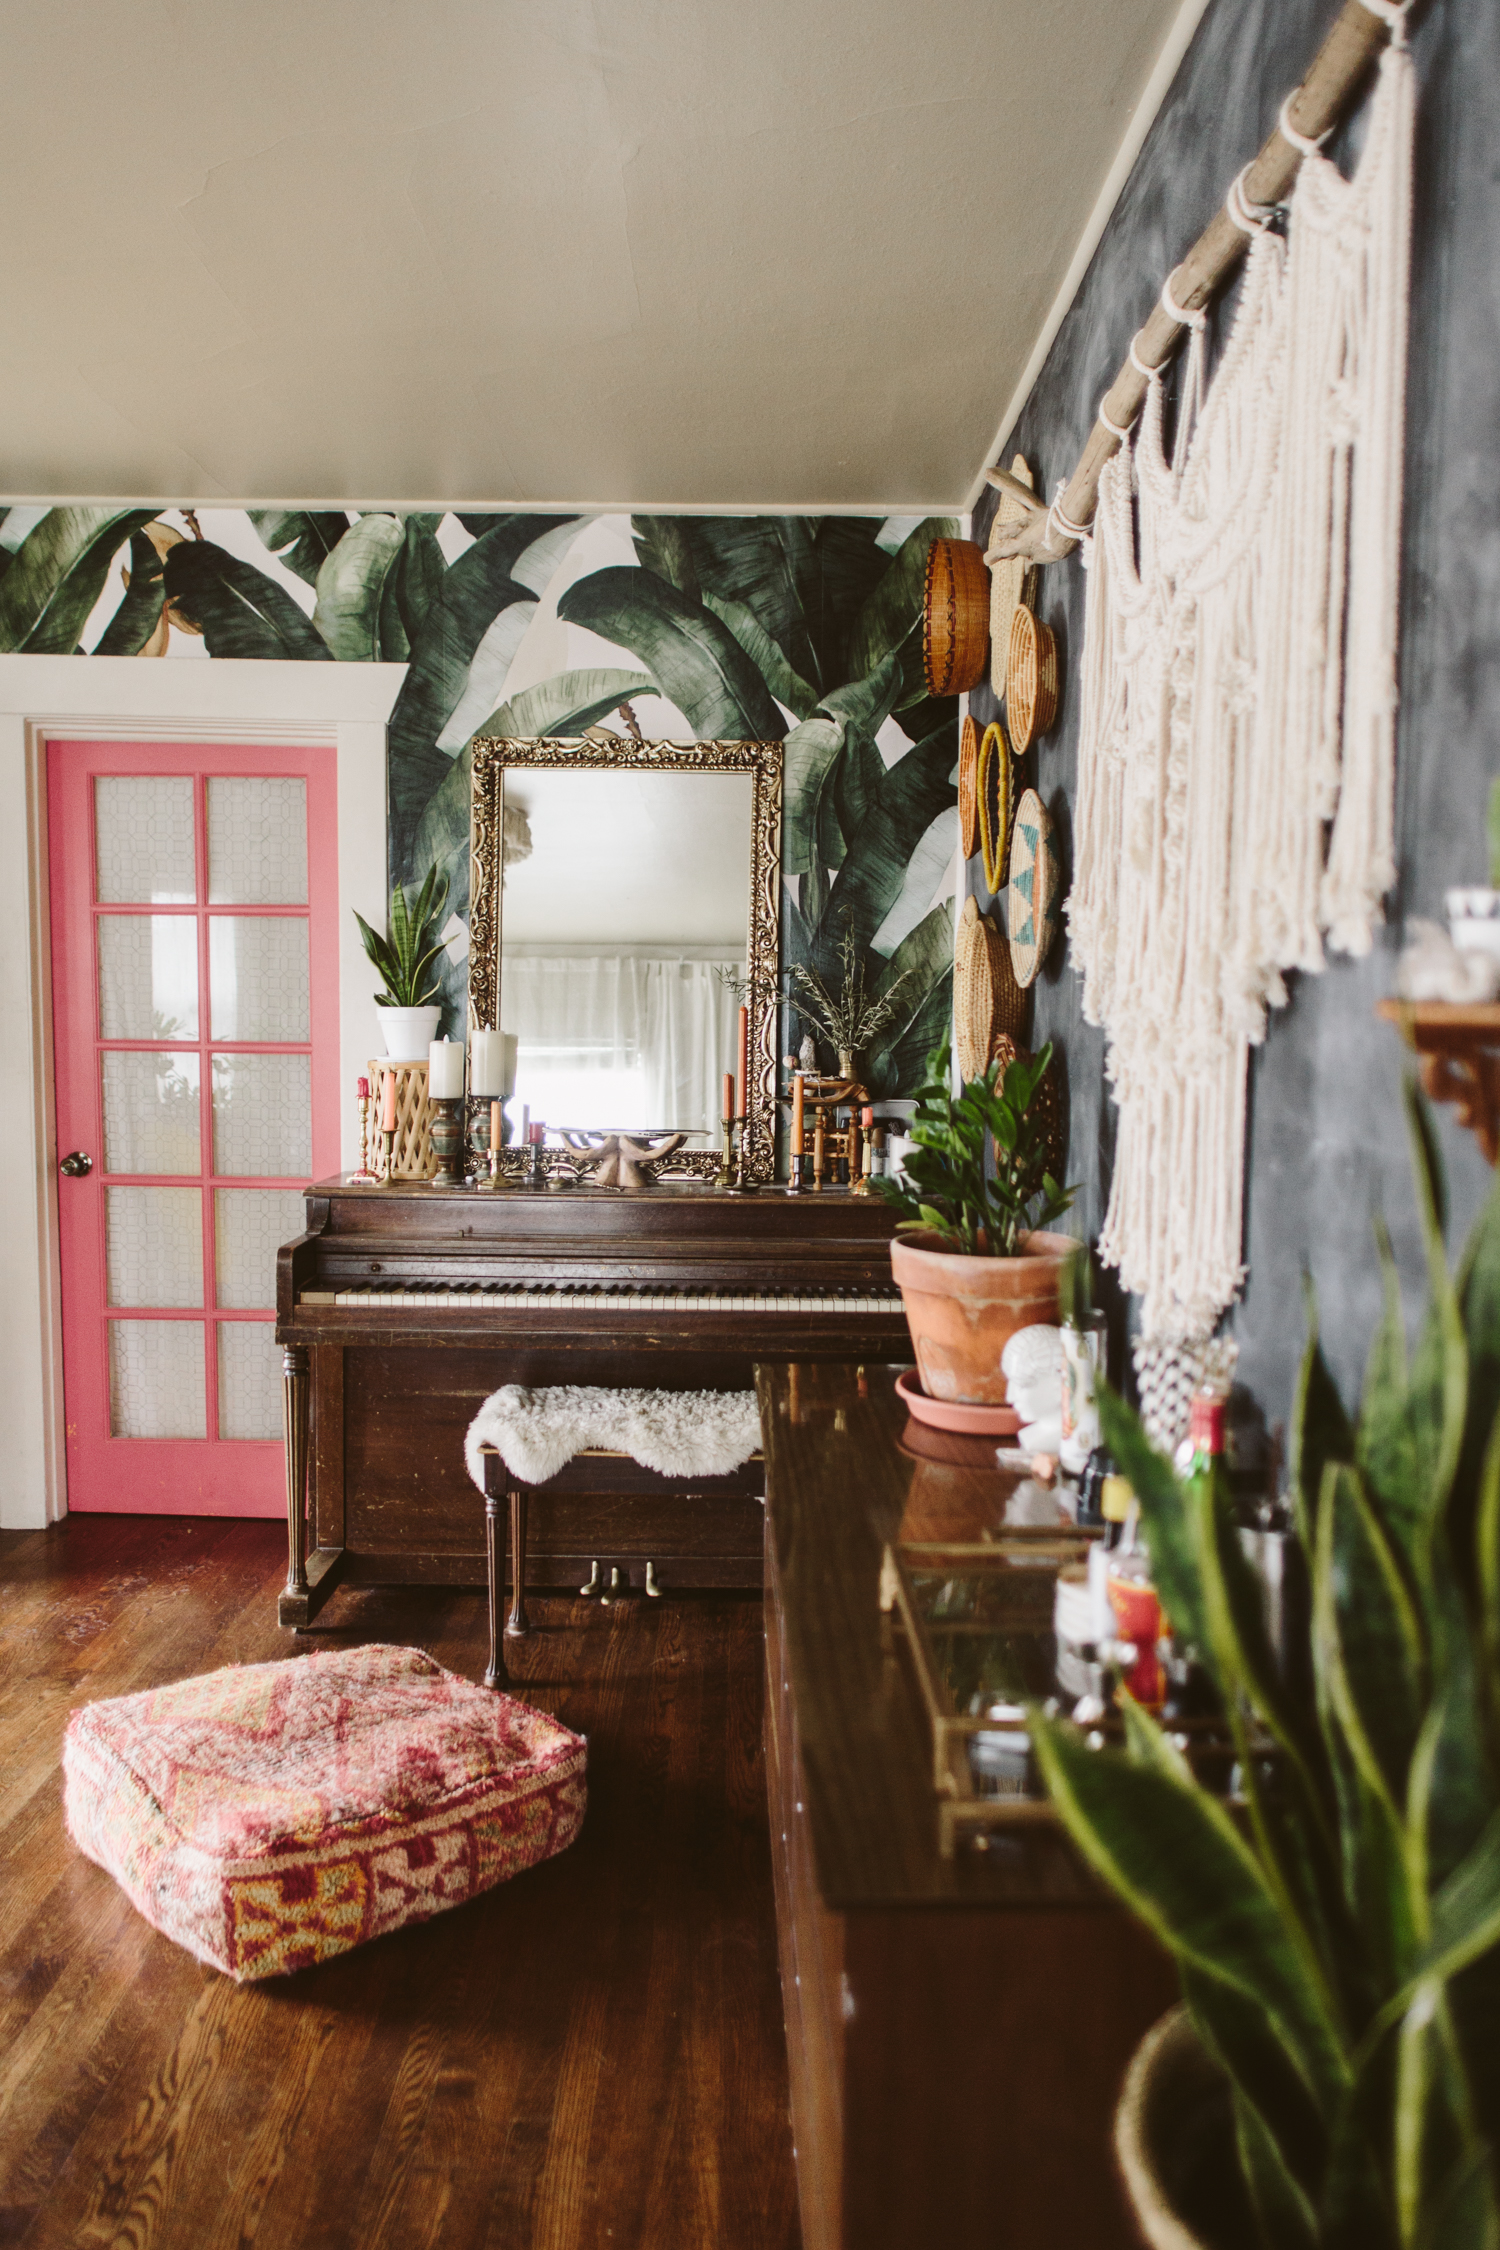
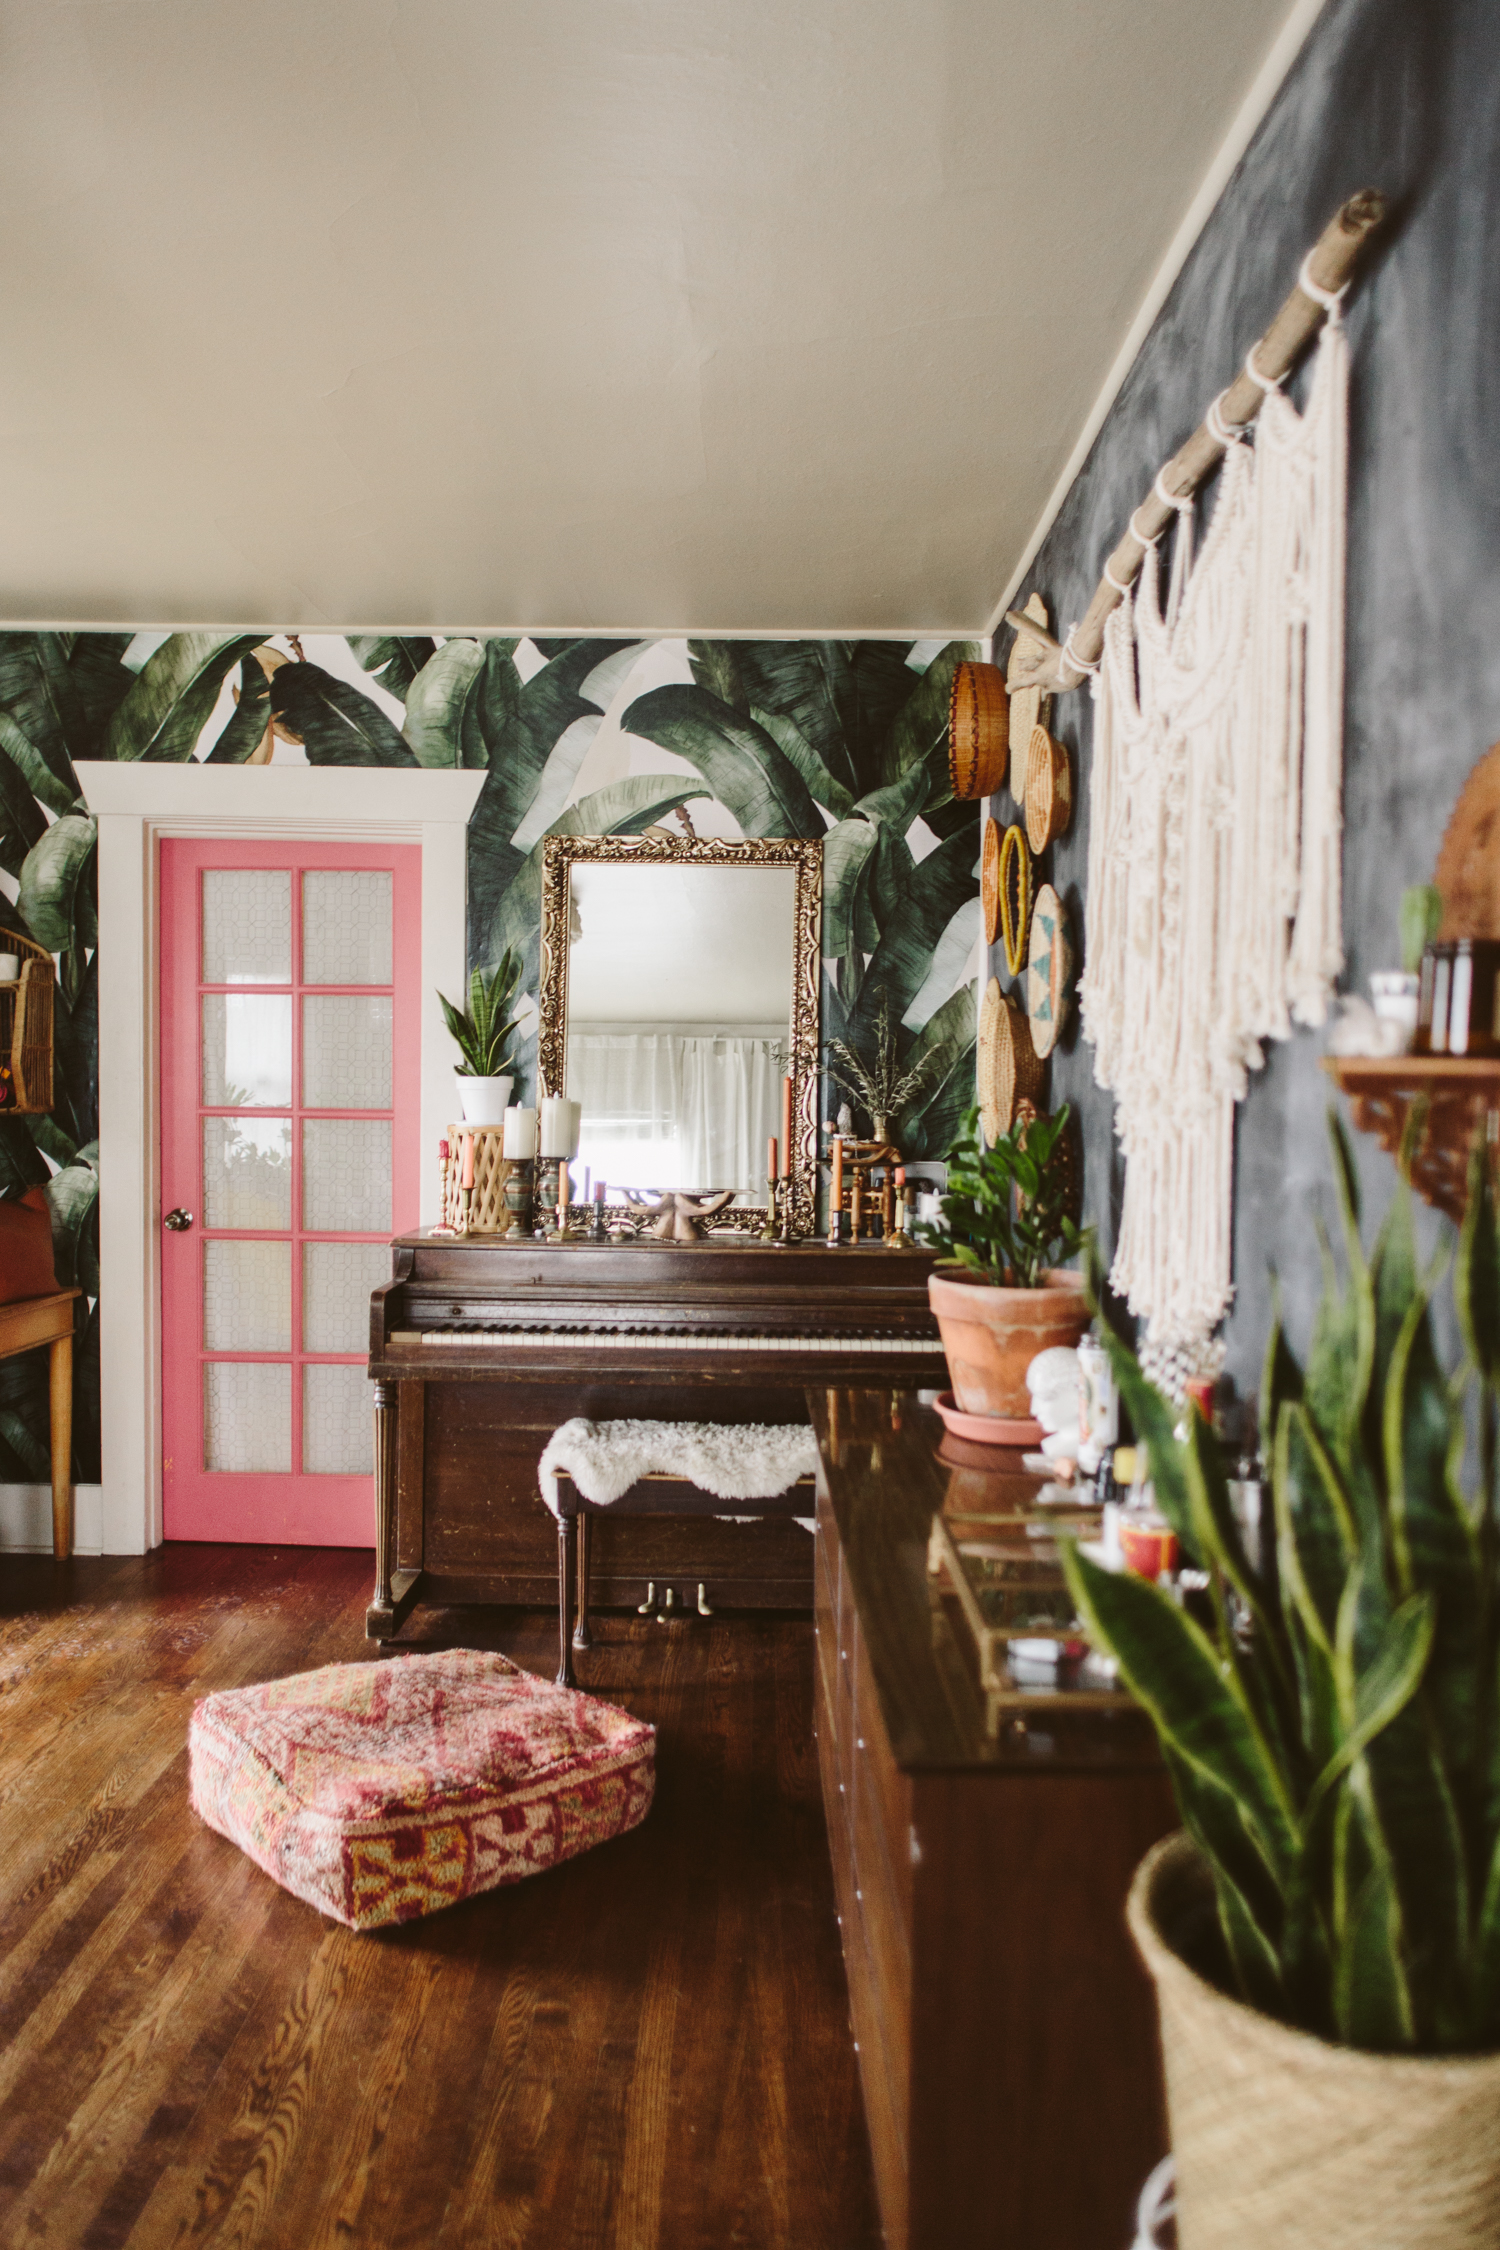
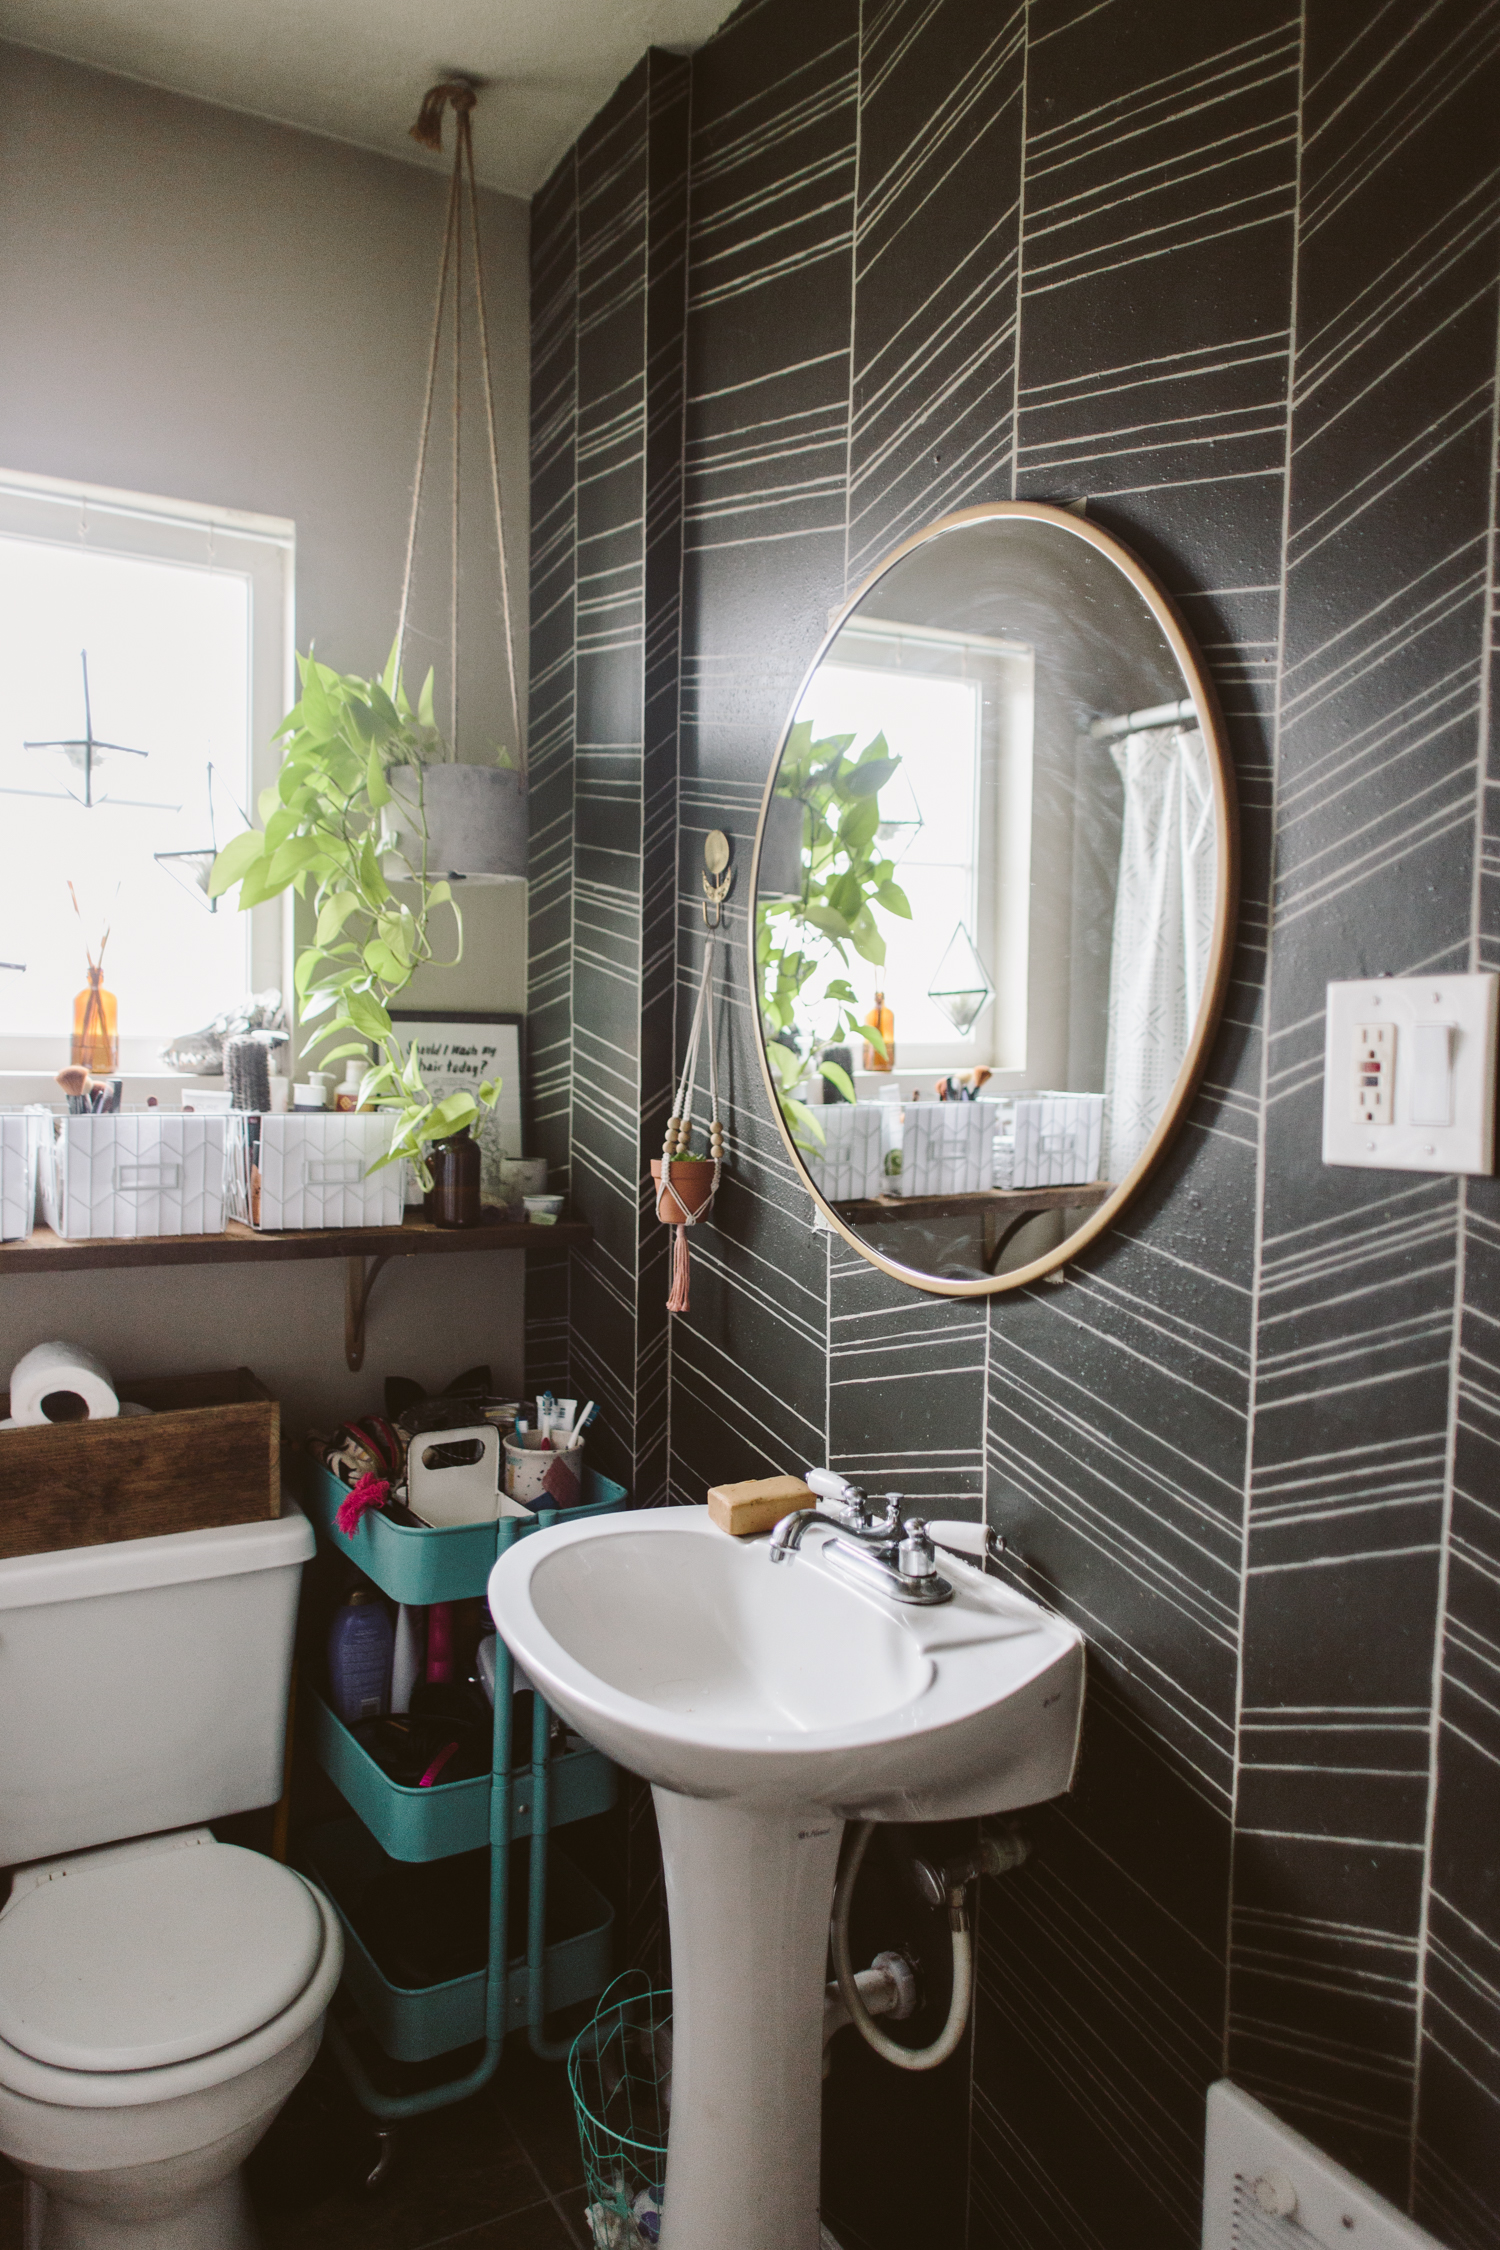
I’m all about a nice vignette (I mean, c’mon, I spent a while styling that shelf!) but people like to see the big picture. If you have a small space, it might mean you have to step into the doorway of the neighboring room in order to get far enough back to fit your room in frame. See that pink door in my living room? In order to get a full shot of my entire living room I have to use my 24mm lens and then be standing about a foot into that doorway to get the shot. In order to shoot my tiny bathroom, I’ve climbed into the very back corner of my shower in order to get the shot. Whatever works!

08/ DIFFUSED LIGHT IS YOUR FRIEND

I do enjoy the occasional harsh sun, shadowed photo, but in general, it’s best to shoot at a time of day when the sun isn’t beaming directly into your windows and casting a bunch of really harsh light. A partially cloudy day makes for really wonderful light (though here in the PNW we can get too many clouds and it’s almost too dim to shoot some days)

09/ MOVE STUFF OUT OF YOUR WAY

Sometimes you want to get just the right shot, but the arm of a chair is getting in the shot. Don’t be afraid to scoot things out of your shot. When you’re shooting, look at the image you just took on the camera’s screen and make sure there’s nothing peeking into the shot that’s distracting the eye.

10/ SHOOT RAW

This one is a little more technical, and you might not have the right photo editing software to edit raw images, but shooting in raw (instead of jpeg) makes it way easier to correct things like over or underexposure. Most DSLR cameras have the option to shoot raw, you just have to scroll through your settings to select the raw option. Again, this one is a little more techy, so if you’re not super comfortable with your camera or if you don’t have software that can work with raw image files, don’t worry about it!

For editing, I like to use Lightroom for my “big camera” images. When it comes to phone images, I always edit using A Color Story app. They’ve got lots of filters, and you can combine, tweak and save your filters too so you don’t have to repeat all the steps you take every time to achieve a cohesive look on your photos. Another app I’ve used in the past for photo editing is Afterlight.

My Camera Bag Review Roundup

Over the years, as both a blogger and wedding/portrait photographer, I've acquired a good collection of camera gear.  Lenses, camera bodies, accessories, they're all super valuable necessities for my business, and so finding a perfect bag for carrying them when I need to be on the go is essential.  There are tons of awesome companies out there who are making camera bags that not only have amazing functionality, but are gorgeous.

PHOTOBOMB! become your own pro photographer!

photography ecourse, photography ebook

ver my 6 years of blogging, I've learned the ins and outs of great blog photography.  Some of my most frequently asked questions have to to with photography, outfit photos, photo gear, and more, so I figured it was high time to finally put together an all encompassing guide covering everything from DSLR basics, to the ins and outs of food photography, shooting your own outfits, and more.  I had originally started this guide out as an e-course, but I wanted to make something easy to download and keep with you without having to get online and log on, so with this guide, once you purchase, you automatically get the link to download the guide right in your inbox! 

I wanted to focus this guide on photography for bloggers, since that's who I most often receive photography questions from, but it's really a lifestyle photography guide for anyone looking to learn more about your DSLR, how to manipulate your settings, tips for finding great light, and shooting various subject matter with ease.  

This guide isn't going to make you a pro overnight.  Like anything, photography is a skill that is honed over time with practice.  Sure some people have a natural talent, but everyone has to learn how to use the camera, figure out how to change settings to achieve the right exposure, and develop their personal photography style and skill as they practice, natural talent or none.  It might take a year of practice to feel confident, or maybe just a month or two, but, as they say, that time is going to pass anyway, so you might as well be honing your craft, right?  In my guide I include photography assignments and prompts after every section to help you keep shooting and practicing on the daily, because you can read as many photography guides as you can, but if you aren't actually practicing on a regular basis, you're not going to see much improvement!  Having a blog and shooting every single day for it was what helped me grow as a photographer more than anything else!


PHOTOBOMB! includes 90+ pages covering:


  • How to get started using your DSLR on Manual Mode
  • Create phone and instagram photos that POP!
  • Learn how to take self portraits so awesome people will ask you "Who is your photographer?!"
  • Find poses which flatter your body, and take your own headshots for social media accounts and more!
  • Take your recipe posts to the next level with scrumptious food photography and styling.
  • Learn the ins and outs of photographing your home and interior decor
  • Capture your life in an engaging way with inspiring lifestyle photography
  • Take your readers with you to your fun events by photographing events like a pro.

...and tons of photography prompts to help you keep shooting, learning, and honing your craft!

photography ecourse, photography ebook
For people looking for more targeted help, I've also split the guide up and have a couple sections from the guide offered separately: Self Portrait Photography, Food Photography, and Intro to your DSLR are all offered on their own for those who are interested in just those specific topics.
I know there are lots of bloggers out there who wish for a pro photographer bff/boyfriend/mom (sometimes even I fall into this category, haha!), but instead of wishing for your magical photographer fairy godmother to drop into your life, you could spend that time working to become your own pro photographer.  Being my own photographer for my blog has been super empowering.  I don't feel like I'm depending on someone else to be able to do shoots for my posts, I don't have to explain my vision to someone else, I don't have to feel bad for wasting someone's time when I want to take forever to get just the right shot, and as an unexpected bonus, I'm actually working as a professional photographer shooting for other people now!   Being your own pro photographer can be frustrating sometimes, but the benefits have far outweighed any frustration I've experienced!
Kick the self doubt to the curb.  You can take amazing photos for your life, family, and blog.  It'll take a little time and a lot of practice, but you can do it!
Head over to the shop and get the guide now!  I've extended my discount code, so you now have till April 10th to get 10% off using the code "NewDT" at checkout!  I've got a special hashtag in there so you can share your progress and the photos from your assignments, so I can't wait to see you guys start getting to work, learning and growing!
If you have any questions you can email me, or leave a comment on this post and I'll reply!  

photography ecourse, photography ebook

how to start a fashion blog

How to start a fashion blog

tarting a blog is very important!  I have some very specific tips to help you learn how to begin a successful fashion blog.  Do these things and you could end up with invites to fashion week events, work with fashion companies, and speak at fashion blogging events!  My first tip is very obvious, as illustrated by the photos below (my first outfit photos ever!  It's hard to tell, I know).  Make sure you find a basement room that is nearly empty save a small stack of unrelated items in the corner and terrible wallpaper.  Make sure to bend over and look inquisitive and jaunty.  Please never use natural light.  Make it very difficult to see your actual outfit, keep 'em guessing, as they say!

If you don't have a nearly-empty-basement room, a dirty laundry room will suffice.  Foot grabbing is advised, but not required.  Place faux flowers in the foreground for styling, and make sure you don't have images big enough to actually see anything.

Posing is important.  Here are some great starter poses straight out of Vogue!

Color coordinating is also suggested.  Again, I must stress: the size of your images must be miniscule.

If all else fails and you can't find a dim basement empty room, or a dim dirty basement laundry room, just set your camera on top the toilet in a large, handicap size bathroom stall in your college art building.  Always look unenthused.

Selfies are the perfect way to get outfit details.

If you find that you want to venture outdoors to take photos, find clashing shades of yellow to wear.  Also: forget to put on makeup.  Choose a location that looks like you may have just escaped from a serial killer's basement dungeon in the middle of the woods.

Keys to success. CLOSE UP DETAILS. REFRIGERATORS.

And above all else: TINY PHOTOS.

other tips:

- accidentally name your blog after half the tagline of a steakhouse where waitresses wear booty shorts.

- use myspace.

- sell stuff on etsy.

- stop selling stuff on etsy.

- wear as many prints at once as possible. 

- wear moccasins.

- endeavor to take most photos with your webcam.

how to start a fashion blog

When I started blogging, not many people seemed to even know what a blog was, or why someone would do it.  It was so casual and dorky, and a lot more like a diary.  Nowadays it seems like people are

intimidated

to start a blog.  People feel like they have to prepare, have professional branding, and a DSLR.  The whole point of blogging is more commercial, more editorial, and more professional.  They're almost like mini-magazines, and I can see how it would be intimidating to start a blog!  If you'd showed me my current blog when I first began and said, "Do it like this!  This is what a blog is!"  I would have been intimidated and felt totally inadequate to be able to make something like that.  I was just a quirky art student in college, blogging about my art projects, my boyfriend, music, and random crap I found inspiring.  If you'd told me I had to post at least 3 times a week consistently, provide new, fresh, and relevant content in each post, had stunning, styled professional photographs, a knockout website design and catchy blog name, I don't think I ever would've started a blog.  But it seems like that's what the message is these days.  That's what a blog is, and if you want to blog successfully you'd better do it like that.

I don't think that blogging is, or should be, done one way.  The best thing about blogging is that it's totally individualistic.  Everyone's paths are different and blogging can create so many different things.  You can be a 12 year old obsessed with fashion who ends up starting a wildly successful online magazine for girls before she's out of high school.  You can be a graphic designer who shares her projects and whats inspiring her and end up designing a line for Target.  You can be a girl who blogs about life and style and ends up getting married, having kids, and continues to share about life.   You can find a passion for graphic design and start designing for friends and other bloggers, starting your own company to do so.  You can quit your successful blog and go back to being a non-blogging mom.

There's no such thing as blogging wrong.  Sure, if you want to become the next Sea Of Shoes, you might want to follow some guidelines, but you don't have to be Sea Of Shoes.  You don't have to be A Beautiful Mess, or Glitter Guide, or Bleubird, or Design*Sponge. You don't have to be anything, especially when you start.  You can have tiny photos and dorky diary-esque writing.  You can wear tacky outfits, and pose like a crazy person.  It's okay to be small.  It's okay to not know about SEO or Google Analytics, and it's okay to not care that you don't know.  You can start a blog without having to pay a designer a thousand bucks to make a fabulous website design.  Really, you can.

There's a little saying out there that says, "Don't compare your beginning to someone else's middle."  Most bloggers didn't start out with photos taken with $2000 cameras and lenses, closets full of courtesy items from designers, sleek site designs, and thousands of followers.  Even

I

still find myself comparing my own story's beginnings to other people's middles and it's discouraging and keeps me from focusing on my own goals and how I want to achieve them.  Sometimes when I look back at my blog's beginnings, compared with the blogging standards of today, I'm amazed that people followed along with my tacky little life and wacky personal style.  Seriously, where did you all come from?  I'm happy you're here, it's been a fun time here on the web with ya'll.

I know that it seems like everyone and their mom has a blog now, but I still believe blogging can be personal and fun and not all about becoming the next internet-famous-fashion-phenomenon.  I still believe you can make your blog work for you, rather than your blog making you work for it.   I found so much inspiration and passion through blogging, and I wouldn't trade that for anything.  My dorky archives are back there for anyone to see.  Without them I really don't think my life would be what it is today.  Blogging was there for me through heartbreak, making dreams into reality, falling in love, finding new dreams, and it's all archived in this little space online.

I'm super excited to share that I'm going to be rebranding my photography website in mid-march with 

Promise Tangeman

 and the 

GoLive team

.  I was 

so

 inspired when I helped out at their workshop in Seattle in January, I was like, "YUP, sign me up for this immediately. KTHXBYE."  Being around other women who are kicking ass and taking names in the creative world is something that gives me so much life.  It's like creative crack and I want all of the hits (do you take hits of crack? You get the point).  I want my blog and my photography studio to be more integrated, and photography has become a big part of they joy I have in blogging.  Making beautiful images is something I 

love

, and blogging is what made that passion blossom.  I debated for a while about whether or not to drop "Delightfully Tacky" as the blog's name.  Was it holding me down?  Did it box me in?  Does it even describe me anymore?  Also, Hooters?  I was convinced for a long time that it was time to drop it and move on to something else.  But lately every time someone asks what my blog name is and I say "Delightfully Tacky" they chuckle a little and get a kick out of it and I'm reminded of how much those two oxymoronic words have influenced my life.  I remember sitting in my parent's kitchen, laptop atop my lap, signing up for a blogspot account and the name came to me instantly.  Unlike pretty much everything else I've ever named, it was as if it named itself.  It's become a name that I'm introduced as.  In some ways 

I

 am Delightfully Tacky, and the blog is just named after me.  Heck, for a long time I didn't even share my real name on the blog!

#mc_embed_signup{background:#fff; clear:left; font:14px Helvetica,Arial,sans-serif; } /* Add your own MailChimp form style overrides in your site stylesheet or in this style block. We recommend moving this block and the preceding CSS link to the HEAD of your HTML file. */

Anyway, I think DT

might

be stuck, but I'm excited about freshening things up.  I'll be giving this little space a new look at the same time as

Liz Morrow Studios

' launch so it'll be freshness all up in this interwebs, y'all!  I've always done smash-and-grab design changes, never fully planned, usually just spur of the moment.  Truth be told, this design never really got fully finished out, and I suppose that matches how blogging felt this past year.  2014 was a strange transition year that had me feeling all over the place.  This year I feel so much more focused and I'm excited about leaning into that.  I'm still a few weeks out from the new site launch, but I'm finishing up a brand new photography for blogging guide which will launch with the site, but I'm giving you guys a little sneak peek (fo' free!).  Sign up below to get the peek in your inbox, and you'll also be getting some special previews of the new design, awesome giveaways that are happening along with the launch, and discount codes to buy the guide when it goes live!


You Might Also Like

how to create scrumptious food photos

ood photography is something that I've become more passionate about in the last couple years.  I'd even venture to say that it's quickly become one of my favorite branches of photography, and not just because I get to chow down on whatever I just shot.  I'd say that for me, food photography is more about food styling than the act of clicking the shutter.  Most of my food shoots are done in the same location with the same lighting set up, but it's the styling that makes them interesting.  Unlike portraits, you can really control food photography very precisely and you can usually take as much time as you need to get the right shot, as long as you aren't shooting something that will quickly melt.  There are a few basics to keep in mind when shooting food that will boost your food photos to the next level.

Unless you're experienced in shooting with off camera lighting set ups, I recommend shooting your food photos in daylight.  Food looks awful under ambient light at night, no matter how good it tastes, so do your best to shoot during daylight hours.  I even turn of all the lights in the kitchen when I'm shooting food so I don't get any weird light seeping in.  This can be inconvenient if you want to shoot a dinner meal that you'd usually make at night, but you're just not going to get good photos if you shoot them with the lighting that already exists in your house.

The top photos were shot indoors, at night, using the lights I had in my kitchen.  The bottom photos were shot during daytime using only natural light.  They have relatively similar styling, but the photos themselves are drastically different.

My set up is super basic.  I have a table right next to the window in our kitchen and I put a bounce card opposite from the window so I can bounce the sunlight back to the shadowed side of the food and fill in a bit where it might lose detail.  My bounce card is just a sheet of foam core board with the plain white on one side and the other side covered with foil.  This way I can choose how bright of a reflection I want.  Sometimes all I need is the white side, sometimes I want more light filled in and I'll use the foil side.

Do whatever you can to shoot with natural light.  I used to live in a house that was tiny and dark, so I'd shoot all my food on the front porch.  I probably looked like a crazy person to my neighbors, but it gave me way better photos than I would've achieved doing them indoors.

Depth of Field refers to how much of your photo is in focus and how much is blurred out.  If you're shooting with an iPhone or point and shoot, you probably won't have much choice as to what your DOF will be, but with a DSLR you'll have options.  I like to keep my DOF relatively shallow so that what I'm focusing on (the food, in this case) is in focus but the background is out of focus.  I typically play between f/1.4 and f/2.2 for my food photos depending on how many things I want in focus.  I use a 50mm f/1.4 lens for most of my food photos but occasionally I'll pull out my 90mm f/2.8 macro lens to get some fun detail shots.

A garnish can really take your food photography to another level.  A bowl of chili on it's own is okay, but if you put a dollop of sour cream on top, sprinkle some cheese and green onions, and add a dash of chili powder?  You just made that photo so much more interesting and, bonus, mouthwatering.  Basically what you're doing is creating visual interest.  A bowl of chili alone is very monochromatic.  It lacks interest, no matter how delicious your grandma's recipe is.  A cocktail alone is nice, but a cocktail with a garnish is better.  Think about color when you garnish, you want the garnish to give the food a pop, not blend in.  Some food isn't naturally photogenic and needs more help, so garnishing is a perfect way to give it a little umph.

The left photo would've been much better if I'd included a garnish on the soup.  The second photo shows a very similar looking soup, but the photo is so much more interesting because I garnished with some cheese, cilantro, and bacon!

A picture of spaghetti on a table alone is boring.  You want to create images with their own story, and food photography is no different.  Add a placemat that brings texture, but doesn't pull focus.  Artfully swirl the spaghetti on a fork.  Place a loaf of french bread in the background and cut a couple slices.  Pour a glass of wine and put it next to the plate.  You've just created a story and the photo is so much more interesting than the plain old plate of spaghetti you started with.  Let's take a hint from this awful photo from one of my first food posts... boring and unappetizing!

This isn't necessary, but it can produce some really interesting photos.  If you're the photographer this can be more difficult as you'll have to document the process with a tripod and self timer, but if you have a helper or can document as someone else creates the food it will make it easier.  Don't think that it's too hard to do on your own, I've done plenty of process shots on my own that have really enhanced a recipe post with just a tripod and self timer.

Process shots don't have to document the

actual

process either.  Determine what parts of the process are most photogenic and focus on getting shots of those.  I like to shoot pouring a cocktail from a shaker into the glass, but it can take a few shots to get all the elements right.  Don't forget to style your process shots too.  Create a scene that tells a story.  Because you're using still photos, you only get that one moment to tell a story.  In baking shots I'll usually have containers of my ingredients where they're measured out, even though I wouldn't do it that way if I was just baking normally.

This is easy to do by going to thrift stores and grabbing a few items that look good in photos.  Maybe have a couple forks with a cool etched design on the handles, get some plain white plates that will highlight the food, grab bowls that look interesting to shoot soups.  Even things like interesting cutting boards or napkins are great to have on hand to style your shoots.  Something I learned is using smaller plates when shooting food than you would normally use for eating.  A smaller plate is easier to fill and the proportions will look better on camera.  You don't need full sets of things, since most of your photos will be plated on only one or two plates, unless you're going for full tablescapes.

Like I said, I use the same location for all my shots, so in order to get some variety, I have some different backdrops that were super simple and easy to make.  I have a light wood table that I occasionally use, but I also put wood planks on top the table to create alternative looks.  One is a set of planks from our old fence, which gives a really nice rustic look.  The other is a set of planks that is whitewashed for a bright, clean, white background.  You could also use plywood, natural, painted, or aged/stained.

It takes just a little bit more thought and effort to take a food photo from boring to mouthwatering.  You don't need super fancy equipment to create delicious images.  It takes some practice to start figuring things out, but you'll start to learn what looks good and what works.  Practice makes perfect!  Keep on shooting!